A few weeks ago we were really having trouble with my three year old listening. I know he's three...but he was off track at home and school and I needed to get him back. I decided to make him a sticker chart using stickers of himself.
Today I'm going to show you exactly how to make custom stickers too!
If you have
Silhouette Studio Designer Edition this is super simple! If you don't, I'm going to show you a little work around so you don't miss out on making personalized stickers.
First the Designer Edition Method:
Save all of the photos that you want to turn into stickers to your desktop.
Open up Silhouette Studio and go to your library.
Then click on the My Patterns folder.
Drag and drop the photos from the desktop into the My Patterns folder.
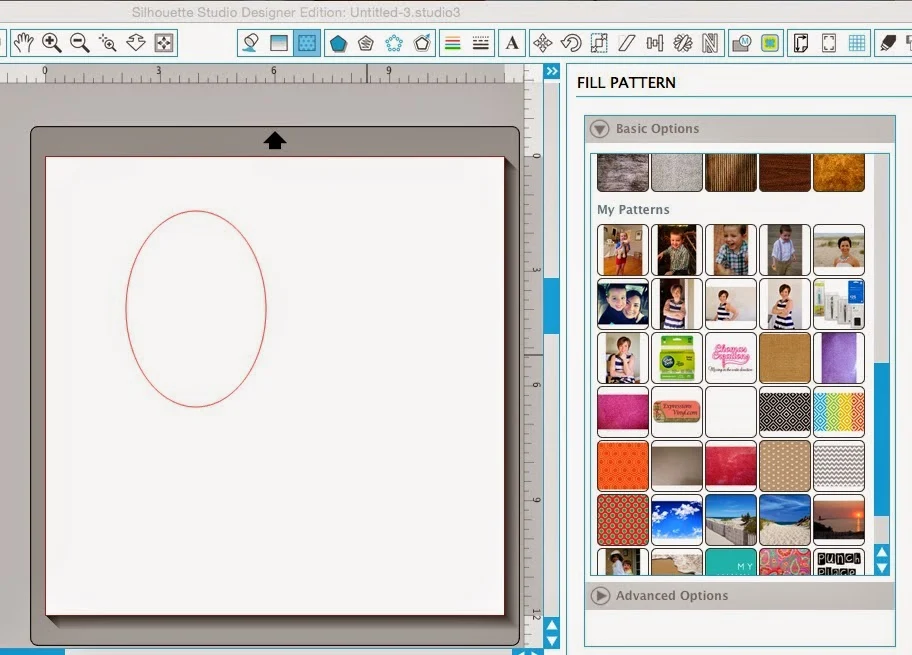
Now go back to the work area and draw out a shape. I used the Draw an Ellipse to draw out an oval.
Select the shape by clicking on it and click Fill Patterns (highlighted in blue along the top tool bar above).
In the window on the right, scroll down to My Patterns and click on the image...now the photo has filled the shape.
Scroll down to little further and click on Advanced Options. Now if you want to zoom the photo in or out use the scale bar. If you want to move it slightly, click "Pan" and you can move the image within the shape.
Continue below at the * to turn these into customized stickers
Standard Silhouette Studio Method:
Save all of the photos that you want to turn into stickers to your desktop.
Open up Silhouette Studio.
Drag and drop one image or photo at a time into the work space in Studio.
Use the Draw an Ellipse tool to draw out an oval or circle.
Place the shape you've drawn on top of the photo exactly how you want it to be positioned as a sticker.
Now select both the image and the shape at the same time. Click on the Modify tool and pick "Crop".
You can't pan or scale the photo with this method, but it still works nicely.
* Now that you have your photos into the shape you want the stickers to be, you can continue as a regular
print and cut. I'm going to go through this part pretty quickly. If you need more details on any step, you can click the links throughout or refer to The Ultimate Silhouette Guide pages listed below.
- Size the stickers, if necessary
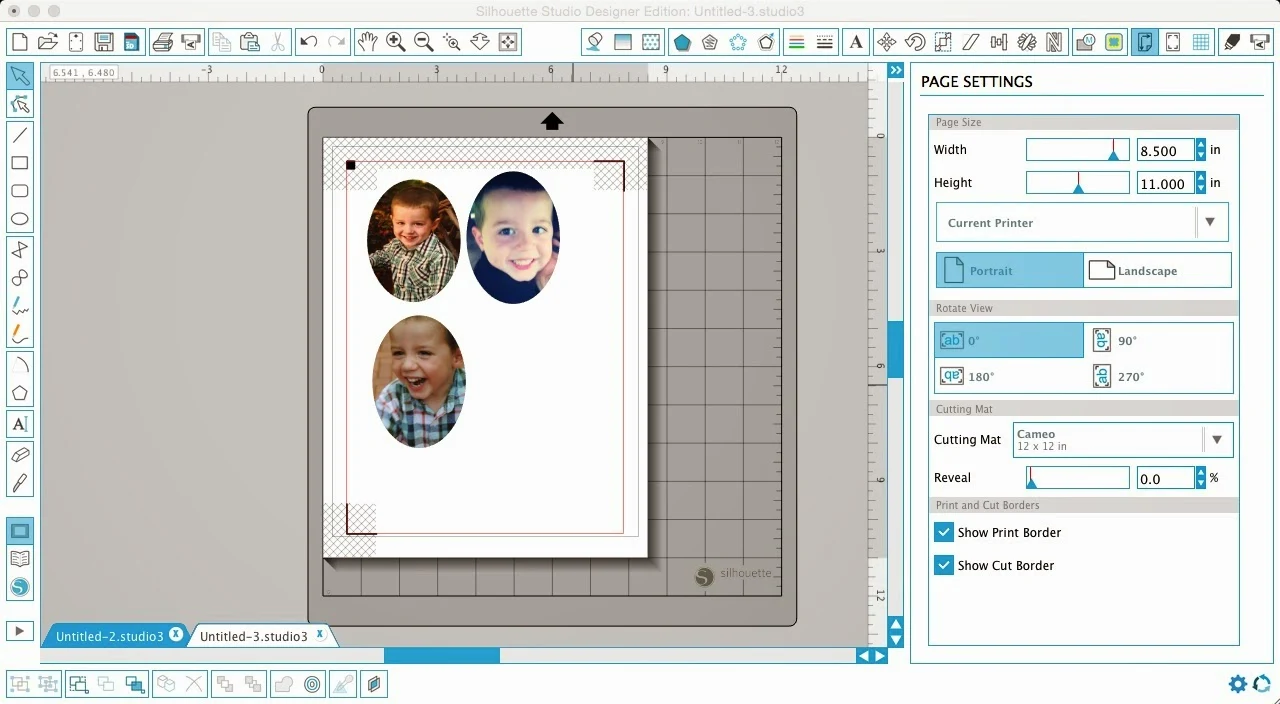
- From the Page Settings window, set up the print area to match the current printer
- Add registration marks and move all stickers within the safe print area (do as I say, not as I do...clearly some of my stickers were outside the print area)
- Place the printed sheet onto the Silhouette cutting mat
- From Silhouette Studio click on the Cut Style window and pick "Printable White Sticker Paper" as the material
- Adjust the blade, if necessary
- Send to Silhouette to cut
And that's all there is to making your own custom photo stickers.
NOTE: I went one step further to make the chart so that my son could place the stickers right onto the chart with an outline the exact same size as the stickers. To do this, I simply copied and pasted the stickers and then from the Fill Color tool selected either white or transparent.
In order to get the outline of the oval to print, it's
necessary to give the line a weight. Go to the Line Style window and
adjust the weight. I usually type in .07. If you don't change the line
color from the Line Color window it will print in red, I changed it to
black.
Oh and good news...Happy Blake is well on his way to his Spiderman Pez (he picked the prize...).
For more on techniques found in this tutorial, refer to the following pages in
The Ultimate Silhouette Guide:
Page 100 - Importing Custom Patterns
Page 44 - Designer Edition
Page 97 - Print and Cut
Page 44 - Fill Color & Line Color
Note: This post may contain affiliate links. By clicking on them and purchasing products through my links, I receive a small commission. That's what helps fund Silhouette School so I can keep buying new Silhouette-related products to show you how to get the most out of your machine!
Thanks for coming to class today at Silhouette School. If you like what you see, I'd love for you to pin it!















.png)


