If you're a Silhouette beginner, using Silhouette Studio for the first time can be a little overwhelming. There are a lot of tools and features in the software it can be intimidating.
In this Silhouette Studio beginner tutorial I'm going to show you the very basics on how to use Silhouette software so you know enough to cut your first Silhouette CAMEO project.
You'll need to start by downloading Silhouette Studio from the SilhouetteAmerica.com/software page if you haven't already. The Silhouette basic software is free for everyone to use and is still packed with tons of features. Most users decide eventually to purchase a one time paid upgrade for Silhouette Studio to unlock more features, but you can decide that later.
Launch Silhouette Studio. you'll notice at the top right there are four large blue buttons. These are the four main areas of the the software: Design, Library, Store, and Send. You'll mostly be working in Design, Library, and Send.
While it seems kind of backwards, I ALWAYS suggest you start in the Send panel because making some selections here first will automate some settings in the other areas for you.
How to Use Silhouette Studio for Beginners: Where to Start
Open the Send panel. The Send panel is where you are going to control all of the setting when you go to actually cut your material. But it's also where you are going to tell the software which machine you are using.
Doing this now will allow for some later selections to be automatically made for you.
Power on your machine and plug it in (or connecting by Bluetooth) to your computer. Make sure you have a blade installed and locked into the left carriage.
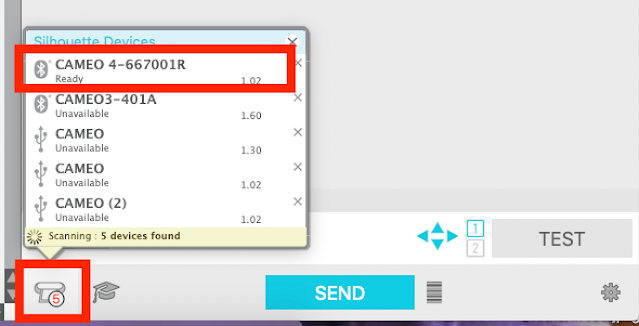
In the Send panel, click the small Machine List button at the bottom. From the list of available machines, select a "Ready" or "Available" machine (one that's powered on and connected!)
Your software now knows you are going to be cutting with a Silhouette CAMEO 4.
Design Page Setup: Silhouette Studio for Beginners
Now you can move to the Design area of the software (we'll return to the Send panel later).
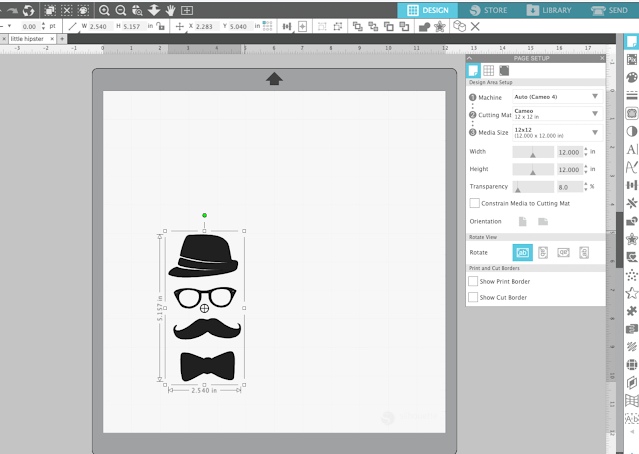
Open the Page Setup Panel by selecting the top tool on the right sidebar.
Start at the top of the Page Setup Panel and review the selections. The machine selected in the Send panel in the previous step is the "Auto" machine selected in the Page Setup panel, so you should not need to make any changes to that option.
Start at the top of the Page Setup Panel and review the selections. The machine selected in the Send panel in the previous step is the "Auto" machine selected in the Page Setup panel, so you should not need to make any changes to that option.
Move down the Page Setup panel selecting the cutting mat size. The Auto size will be selected based on the machine you pick in the previous step. I would suggest, for a beginner, you use a 12x12 cutting mat which would be indicated as "Auto (CAMEO)" again based on the Send panel selections you previous made.
Finally move down to the Material Size area and make sure Media Size is also on Auto (12x12).
Finally, make sure the Show Cut Border box is checked. The red line you see within your design area is the Cut border. Anything you want to cut needs to be inside this area.
How to Open an Image in Silhouette Studio
There are several ways to open and access designs in Silhouette Studio. In the free basic version of Silhouette Studio you can open Silhouette Studio design files, PNG files, and JPEG files.
- You can go to File > Open and navigate to a design to open it
- You can drag and drop a file directly into the Design area from your desktop
- You can create your own designs using the drawing tools in Silhouette Studio
- You can open a design from the Silhouette Studio Design Library
Silhouette School provides a free Silhouette .Studio design file each week so download one onto your computer and we'll focus on #1 above.
NOTE: .Studio files come into Silhouette Studio ready to cut so there's no other manipulation needed. JPEG files do not have cut lines and need to be traced and PNG files are easy to cut, but aren't what I'd recommend for a very beginner.
From the Design Area of Silhouette Studio go to the File menu and click Open.
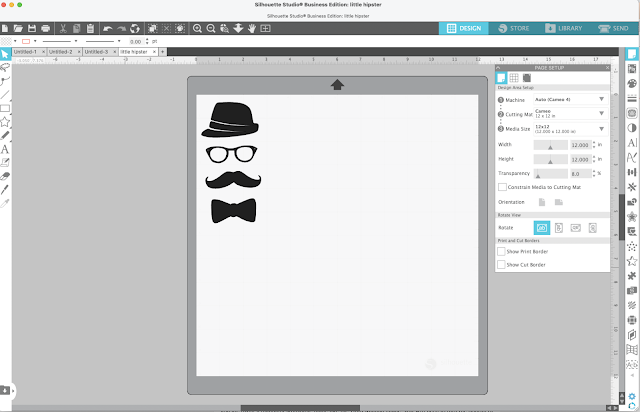
Then navigate to the file you just downloaded to your computer. Once you find the .Studio file, click "Ok" to open it in the design area.
Basic Silhouette Studio Tools and Features Beginners Need to Know
Select - Perhaps the most important thing you need to know now is how to select (or click on) the design so you can work with it. To select a design you need to click on any colored part of it with your mouse.
If the design is transparent, you will need to click directly on the outline to select it.
Group / Ungroup - If you select the design and there's one big box around all elements of the design (like in the photo above) that means the pieces are "grouped" together and will move together around the Design area.
If you click the design and a box only appears around one section of the design the design is not grouped aka "ungrouped".
If you go to move that one piece of the design the rest of the image won't come with you unless you hold your mouse down and make a big dragging swoop across all pieces. Then right click > Group.
Likewise to ungroup a design that is currently grouped select the design > right click "Ungroup"
Scale - Scaling, or sizing, your design is how you can adjust the size of it. When your design is selected the bounding box around it will indicate the dimensions of the image.
Drag one of the corner boxes in or out to enlarge or reduce the size of the design so your liking. For your first cut I would suggest your design be at least 6" and no areas less than half an inch thick.
To prepare to cut, select the design and move it to the top left area of the cutting area. You don't have to place your design in this area of the cutting area to cut, but it's where most people do and helps avoid wasting an entire sheet of vinyl by cutting smack in the middle of it.
Silhouette Studio for Beginners: Cut Settings & Sending to Cut
Return to the Send panel by clicking the Send button towards the top.
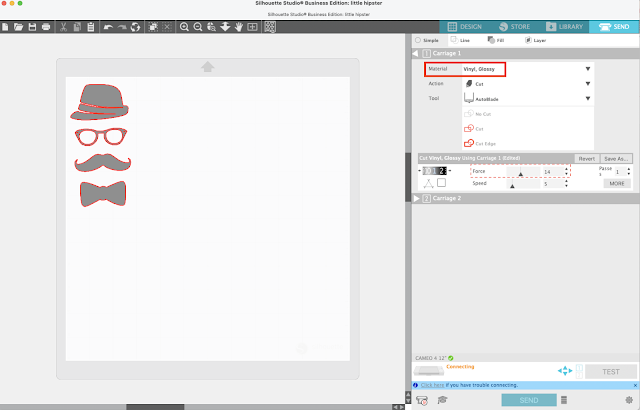
When you open the Send panel you'll see your design on the left preview area with red lines around it. The red lines are the cut lines and they give you a preview of exactly where the blade will cut.
This time we're going to make our material selections from the Carriage 1 area. From the Material List select the type of material you are cutting. I would suggest you start with vinyl so pick Vinyl, Glossy.* Once you pick the material the recommended cut settings for that material will appear immediately below.
*The only change I would make to the default vinyl settings are to increase the force to 14.
If you are using the Autoblade you really don't need to pay much attention to this area right now. But if you are using a manually adjustable blade like the 1mm Manual Blade, you will need to turn the bottom of your blade so the red line matches the blade depth number shown on the dial in the Send Panel.
The Tool should be automatically selected since you have a tool in the machine which is powered on and connected.
Once the machine is loaded with the mat and material you can press Send at the bottom of the screen to begin the cutting process.
Need some tips on your first vinyl project? Check out this blog post for 10 tips for your first Silhouette CAMEO 4 vinyl project.
Get Silhouette School lessons delivered to your email inbox! Select Once Daily or Weekly.


.png)


Thank you so much I was so lost on how to click and unclick things, I would make a mess with boxes everywhere.
ReplyDelete