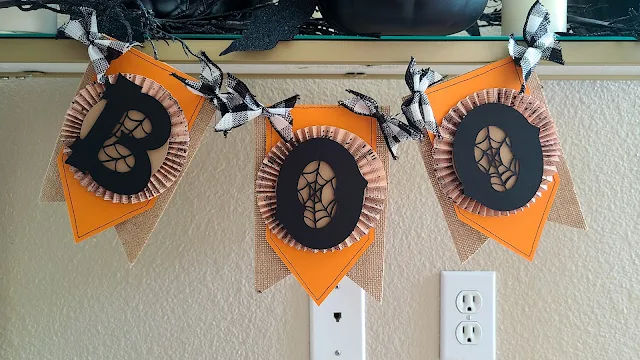
This hack may become your newest best friend when it comes to making score lines with your Silhouette machine. You may already know how to create a score line using a cutting blade, but now here's a way to use your Silhouette and the Foil Quill to create "soft" score lines that put a gentle bend in the paper instead of a small cut like the cutting blade does.
This is especially helpful when you are working with thin, lightweight paper and need to make lots of score lines - like when creating the paper rosettes for this Halloween Banner. (This trick saves you SO much time versus using a bone folder and score board to make all the score marks!)
I'm using this method to create paper rosettes which require a series of parallel score lines. I'll be sharing how to set up that cut file in another blog post, or you can download a free paper medallion cut file here.
If you're not making paper medallions or rosettes like I am for this Halloween Banner no worries - this method of scoring is especially helpful when you are working with thin, lightweight paper and need to make lots of score lines. This trick saves you SO much time versus using a bone folder and score board to make all the score marks!
With your design set up in Silhouette Studio...lets focus on getting the cutting mat and paper set up.
Silhouette Mat and Machine Set-up
To score with Foil Quill on the Silhouette CAMEO or Portrait, you'll need a thin piece of craft foam that's larger than your cardstock. Any color will work, but I am using a piece of white craft foam that measures 9 x 12 inches and is 1/16 inch thick. You're just using the foam to make your mat a bit spongey.
Stick the piece of foam to your cutting mat.
Use a piece of repositionable tape (such as Scotch Delicate Surface Washi Painter's Tape) to stick your cardstock over the top of the craft foam.
Use the standard or wide tip Foil Quill tip fitted into the D adapter in your CAMEO 4 or Portrait 3. If you're using any other CAMEO or Portrait, use the A Foil Quill adapter.
Place the tool into the tool carriage but do not plug in the Foil Quill as not to heat it! Load the mat into your Silhouette like normal.
Silhouette Cut Settings for Scoring with Foil Quill
Back in Silhouette Studio, move your design, in my case a series of vertical lines, so that it is not positioned right at the very top of your cardstock (you want it at least an inch or two from the top). I found working lower on the cardstock worked the best.
Then, in the Send panel, change the Tool 1 Action to Sketch and the Tool to Pen.
As for the Force settings, you may need to do some testing. For the gray 100 lb. cardstock I used in the pictures, a force of 33 worked the best.
But for lighter weight papers, like the patterned paper I used in the "Boo" banner, a lower force of 17 worked the best. If the force is too high for a thin paper, the Foil Quill will just rip right through it.
Click Send when you are ready to start scoring!
After it's done scoring, unload the mat and carefully remove the cardstock from the craft foam.
If you're making paper medallions, use a paper trimmer to off the excess cardstock above and below the score lines.
Cut the score lines in half to create two 2 x 11-inch wide strips.
Now you can assemble your rosettes by simply folding the paper in alternating directions and gluing together at the center with a hot glue gun.
To make this adorable Halloween banner I layered the rosettes with other coordinating paper and cut the BOO using the Halloweb font from the October SVG and Font Bundle at So Fontsy.
The limited time October SVG and font bundle includes 180 commercial use SVGs and 15 fonts at a whopping 91% off!
Note: This post may contain affiliate links. By clicking on them and purchasing products through my links, I receive a small commission. That's what helps fund Silhouette School so I can keep buying new Silhouette-related products to show you how to get the most out of your machine!
Get Silhouette School lessons delivered to your email inbox! Select Once Daily or Weekly.


.png)


Will the quill tip work in a Cameo 3? I haven't had any luck so far even with foam in place. I used the A adapter. Not enough force it looks like. Thank you for taking the time to answer my question!
ReplyDelete