 |
| This is a sponsored post, but all opinions are my own |
First things first: get yourself some sticker paper. I always get my sticker paper from Online Labels. For planner stickers especially, my favorite sticker sheets are the glossy white inkjet printable sheets.
They print well and don't smear and you can write with a pen on them once they're in your planner!
Removing registration marks in Silhouette Studio is easiest done by using the line color and Action by Line Color settings. So we need to set up our sticker sheets that way. Just keep that in mind while we work through this...but let's start from the beginning.
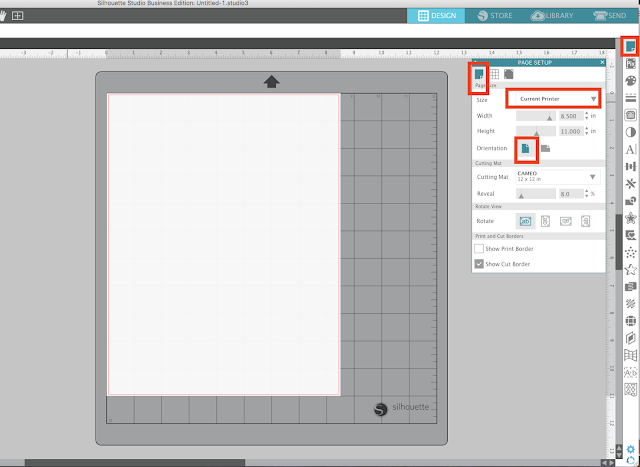
Start by opening a new work area in the Page Setup panel - from along the right sidebar.
Change the page size to "Current Printer". Also change the Orientation to Portrait.
At the bottom of the page check the boxes for "Print Border" and "Cut Border". These are the boundaries your stickers - and their cut lines - need to stay within.
Still in the Page Setup Panel, but now in the Registration Marks tab, click "Type 1: CAMEO, Portrait" from the Dropdown Menu. This will add registration marks to the page in the default location.
Further down in the same panel move the slider bars for Top, Left and Right Inset all the way to the left. This will push them out as far as possible. Do not move the Bottom Inset or the bottom registration marks will fall below the print border and it will not print correctly resulting in a registration error.
Finally, you have the option to change the size of the registration mark by moving the "Length" bar as far to the left as possible. This will minimize the hashed area giving you more printable space.
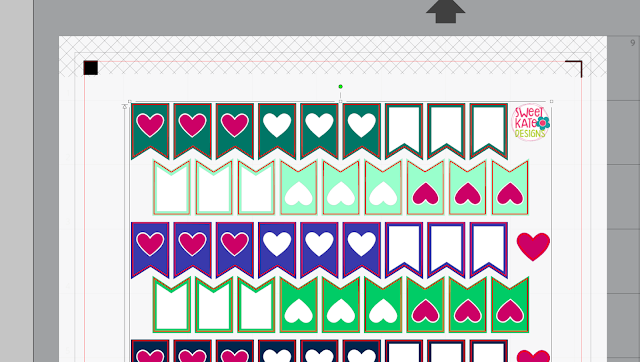
Now go back to the work area and add your sticker designs or a pre-designed sticker set. Once the sticker designs are on your sheet arrange them (if necessary) how you want and get them all set up to print and cut. You can learn how to add a bleed area to stickers in Silhouette Studio here.
Change any lines around your stickers - that you want to cut - to red. Turn any interior cut lines that you do not want to cut to transparent.
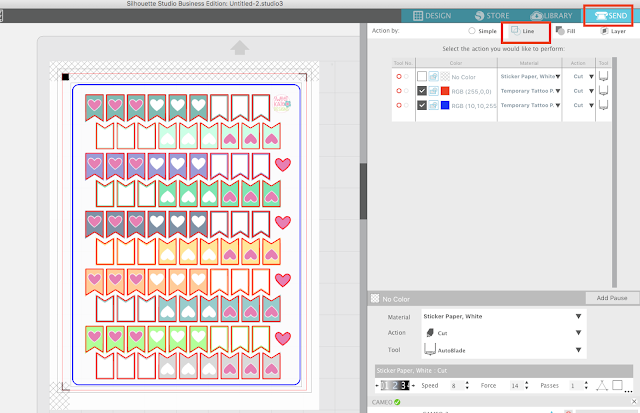
After your stickers are set up you are going to draw a box around them. This box is going to be the edge of your sticker sheet. Use the Draw a Rectangle tool to draw out the box - as close to the Cut Border line as possible. Change the line color to blue (do not give the line weight).
The transparent line should be set to "No Cut." These are all interior lines that you do not want to cut.
The red is the sticker cut line - these lines will be cut by the autoblade in the left carriage. This line should result in a kiss cut. A kiss cut is a cut that goes through the sticker sheet, but not the backing of the sticker paper. I would suggest using the Sticker Paper, White as the material type.
For the blue line, be sure to change the tool to the Blue tool. Also change the tool to ratchet blade.
For this line we need to change the material type to something other than the material type on the red tool so that we can manipulate them independently. We also need to make sure that the material we pick is a thicker material so the cut settings are such that the blade will cut clear through the sticker sheet and the backing hence cutting off the registration marks. Sticker Paper, Clear is a good option for this.
Place the autoblade in the red carriage of the Silhouette CAMEO 3 and the ratchet blade in the left/blue carriage. Be sure you've manually adjusted the ratchet blade to the correct blade depth (3).
Everything is now set to both print and cut. Place your Online Labels Glossy Printable Sticker sheet into your printer so that it's oriented correctly that your printer will print on the glossy side.
Go back into Design in Silhouette Studio and click the "Print" icon from along the top tool bar.
The red and blue lines should not have printed (since they do not have a line weight); the registration marks and stickers should have.
Place the sticker sheet on your Silhouette cutting mat and load it into Silhouette Studio.
From the Send panel in Silhouette Studio click "Send."
The stickers will first be cut. The machine will then re-set and use the ratchet blade to cut the edge of the sheet leaving you with a nice clean set of stickers to sell in your shop - without any registration marks.
Before you remove the Silhouette cutting mat and the sticker sheet from the Silhouette cutting machine, verify that you have successfully cut through the full sheet by peeling up the corner of the sticker sheet.
Once you've confirmed the registration marks have been cut off, you can remove everything from the Silhouette CAMEO. You're left with a beautiful glossy sticker sheet that you can now confidently sell without any ugly registration marks!
I love the look of the glossy sticker sheets, but if you prefer matte white or clear - you can pick those up at Online Labels as well.
Note: This post may contain affiliate links. By clicking on them and purchasing products through my links, I receive a small commission. That's what helps fund Silhouette School so I can keep buying new Silhouette-related products to show you how to get the most out of your machine!
Get Silhouette School lessons delivered to your email inbox! Select Once Daily or Weekly.


.png)


I don't know why my studio pauses my machine after the sticker cut. I have to manually press resume in studio then click on resume anyway because my machine thinks it should unload the paper
ReplyDelete