

After last week's floating photo Christmas ornaments tutorial, you guys have basically been banging down my door for a glitter ornament tutorial and so...today's your lucky day!
And some big news today...Becky and Glenna from My Paper Craze, are back with yet another awesome tutorial here on Silhouette School. And I'm bringing them on board as Silhouette School's first contributors...which basically means they'll be sharing their brilliant ideas and tutorials on Sil School about once a month! You have read their other guest posts on getting the perfect print and cut, cutting craft foam, resticking a Silhouette cutting mat and making die cuts for your stamps, right? So awesome!
Anyway, they're back with yet another high demand tutorial. Ladies??
Hi there! We're Becky and Glenna from My Paper Craze and we're honored to share a fun and crafty tutorial with you today!
We love learning new crafts and tips from Silhouette School, so we're back to share another tutorial on one of our favorite holiday projects: DIY {NO MESS} GLITTER ORNAMENTS! You may be asking yourself, what's so hard about glitter ornaments? A little glitter, a little glue and POW! A glitter ornament, right?
Well, that certainly is a fun craft for a toddler, but for us serious crafters (HA!) we might want something a little more sophisticated. This tutorial will show you how to add glitter to the INSIDE of your ornament without filling it up and weighing it down! There are also two added benefits to glittering inside the ornament: the glitter won't rub off and you can add embellishments (like vinyl) to the outside for extra pizzazz.
Supplies:

- Clear Ornaments - glass or acrylic
- Minwax Polycrylic Clear Gloss
- 2 Funnels (for the glitter you could make a cone shape out of a piece of paper)
- Cup, glass or small jar
- Extra fine glitter
How To:
1. Remove the cap from the ornament and set aside.
2. Gently stir the polycrylic. Using too much force can cause air bubbles.
3. Insert the tip of a funnel into the ornament and pour in the polycrylic. I didn't measure how much since I was pouring the excess back out. It was approximately 1/4 cup.

4. Tip the ornament to the side and begin turning it to coat the entire inside of the ornament. Do not shake it or the polycrylic may get air bubbles.

5. When the ornament is completely coated on the inside, turn the ornament upside down and pour the excess liquid back into its container making sure the opening of the ornament is completely coated also.
6. Place the ornament on top of the cup (still upside down) and allow any excess polycrylic to drain out into the cup. I let mine sit for 2 minutes.

7. Insert the second funnel (or paper cone) into the ornament. Pour the glitter into the ornament. Again I didn't measure, but I used approximately 1/2 cup glitter.
8. Turn the ornament on its side and turn it until the entire ornament is completely coated. Pour the excess glitter back into its container making sure that the opening to the ornament is completely coated.

9. Place the ornament back onto the cup and allow to dry. I checked mine after 4 hours and it felt dry to the touch but I let it sit overnight before putting the cap back on to make sure I didn't scrape the glitter off around the opening.
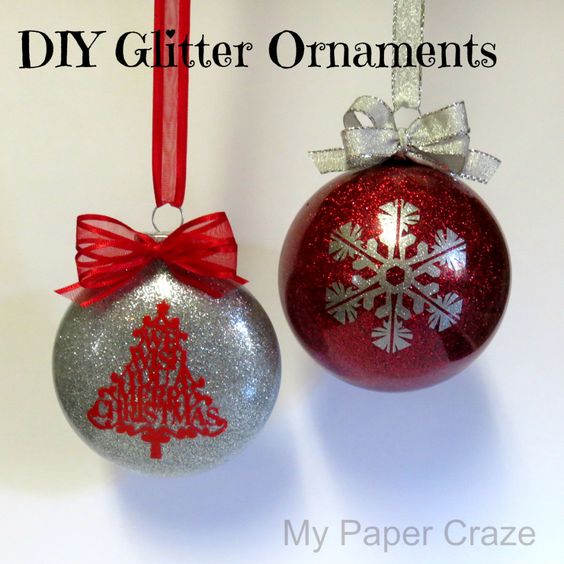
10. Replace the cap and apply any special touches! I used 2 designs from the Silhouette Online Store: #5395 Snowflake and #14865 Merry Christmas Tree.
I hot glued a bow on to the cap of the ornament and used the same ribbon for the hanger.

If you need help cutting vinyl for your ornament, be sure to check out this tutorial: How to Cut Vinyl with Silhouette CAMEO 4: Tutorial for Beginners (2022)

Imagine all the fun designs you can create with this neat-o tutorial. In fact, we've made a whole Pinterest board of glitter ornament ideas, hop on over and check it out!
Glitter Ornament Inspiration Board
A huge {THANK YOU} to Melissa for hosting our guest post today! We truly love the Silhouette School and all the wonderful tutorials she provides! Thanks to you, our reader, for giving us an opportunity today. Hope to see you again soon!
Thanks for coming to class today at Silhouette School. If you like what you see, I'd love for you to pin it!


.png)


The Viral Site simply awesome idea , loved it so much.
ReplyDeleteCan you help me get the letters straight on a 3.25" ornament? they tend to bow and I don't know how to make a template to get them right! Thank you!
ReplyDeleteDoes it matter what kind of gloss you get in the minwax brand? They have semi gloss and gloss and etc.
ReplyDeleteI also would like to know whether I need a special design of the vinyl for the sphere shape? any curve needed?
ReplyDelete