The Print Bleed feature in Silhouette Studio is a very handy tool for printing and cutting borderless stickers and decals.
There isn't much customization options with print bleed so it may cause you some grief with certain designs and fonts. But there's a work around for that... here, let me show you.
This floating frame rainbow art was created by printing the design with print bleed feature on inkjet printable vinyl. Then, the Silhouette Cameo 4 cut out just around the outside of each piece.
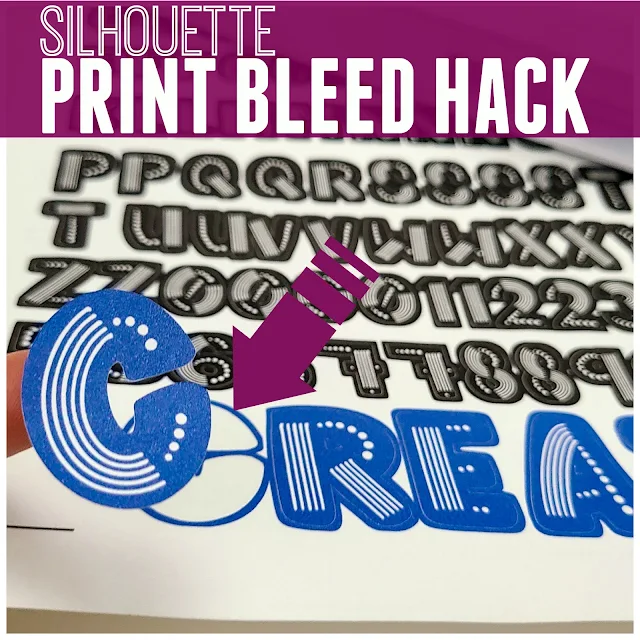
These alpha stickers were created the same way using the Rainboho font from the So Fontsy Massive Craft Fonts Bundle.
The Rainboho Font also includes a bunch of extras including the adorable rainbow in the floating frame above.
Using the font to create a sticker sheet, the characters were typed out then printed on white sticker paper with the print bleed feature. Using Print and Cut the Silhouette CAMEO cuts the outside edge.
How to Avoid a White Border on Silhouette Print and Cut
But here's what happens in Silhouette Studio, when you just type the word "create," with this font then turn on the print bleed feature...
then, preview it in the Print Preview window.
The print preview shows you that the print bleed is universally applied to every edge in the design - not just the outside edge. There isn't an option to selectively apply the print bleed to only the outside edge.
Obviously we don't want the letters to print this way - we want it to print with all the details in the middle of each letter.
So, if you want to print stickers or vinyl decals with the print bleed feature like the examples above, then have your Cameo cut out just around the very outside edge of the letters or design, you need to use the following trick to work around that.
If you need more information about print bleed, you can check out this blog post about print bleed.
Print Bleed Hack in Silhouette Studio
I will warn you this is a lot of steps...but unfortunately all workarounds for this are...
First, import your design into Silhouette or download and install the font (don't forget to re-start Silhouette Studio to get the font to show up in the Text Style box).
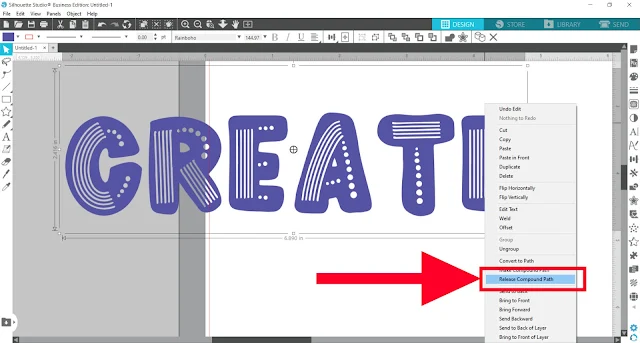
Select the design or type out your font and right click on it to Release Compound Path. You may also need to Ungroup the design/font to gain full access.
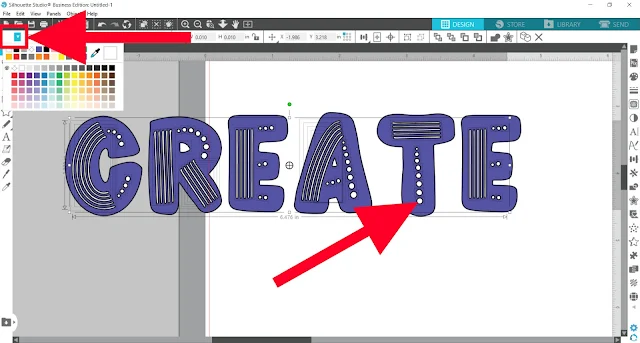
Immediately, hold Shift on your keyboard as you click on the outside edge of each letter to deselect them. Do not deselect the interior cut lines. Only the inner shapes of all the letters will be selected.
Note: To make it easier to see, I added a black 1.0-point outline around all the shapes.
Then, give the inner shapes a white fill color.
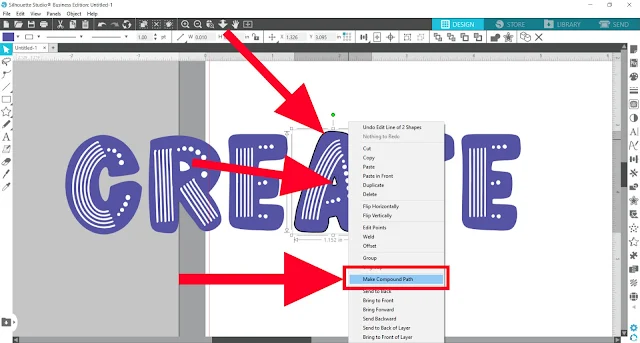
This next step is only for letters and shapes that have an opening in them, like the letter R and the letter A. Select the outside shape of the letter, hold Shift and click on the inner "hole(s)" in the design or letter. Then, right-click >> Make Compound Path.
If it then looks like any parts of the letter or design "disappear" (don't worry, they haven't!), just select the design and click Send to Back in the top menu.
Now, select everything, right-click >> Group to group it all together.
Add registration marks to the document and make sure the Print Bleed box is checked. Then, open the File menu and click Print.
Now, you can see in the Print Preview window that the print bleed is now only applied to the outside of the letters and not the inner design parts like before. That's because the inner design parts of each letter have been changed from being the edge of the letter to being just white shapes sitting on top of the letter (and the print bleed feature isn't applied to shapes like that).
Note: Print Preview is a feature introduced to Silhouette Studio versions 4.4 and higher.
Then, go ahead and print out the design on white sticker paper or printable vinyl. Load the printed sheet onto your cutting mat and into the Cameo and open the Send panel in Silhouette Studio.
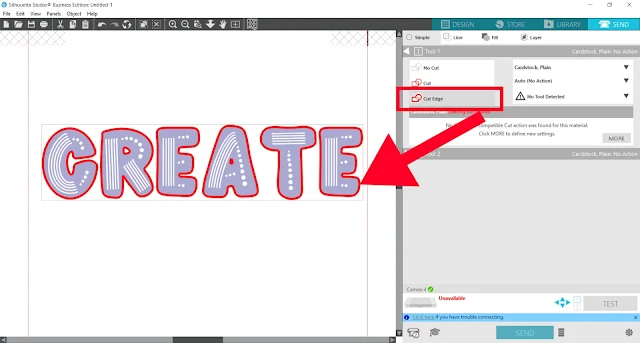
Select the word or shape you want to cut out and select the Cut Edge option. (You won't see a print bleed preview in the Send panel). If you want more information about print and cut, check out this beginner print and cut tutorial.
Then, the Silhouette CAMEO will cut on the original cut line of the design while the printer printed outside that edge, so what you end up with is a perfectly borderless sticker or vinyl decal.
Find the font to create these projects in the Massive Craft Fonts Bundle. With 40 fonts and 100+ extra characters, you can certainly create a whole lot of crafts!
Note: This post may contain affiliate links. By clicking on them and purchasing products through my links, I receive a small commission. That's what helps fund Silhouette School so I can keep buying new Silhouette-related products to show you how to get the most out of your machine!
Get Silhouette School lessons delivered to your email inbox! Select Once Daily or Weekly.










.png)


Before the print bleed feature I just created an offset duplicate behind that didn’t cut. It’s much quicker than this method, any reason not to do that?
ReplyDeleteSame here...
DeleteThanks for the info. I had this problem and didn't know how to fix it. Great information.
ReplyDelete