If you're wondering how to make a border in Silhouette to frame your design, this tutorial will take you through the process step by step.
You don’t need to be a digital design wizard to learn how to outline an image in Silhouette Studio.
The Silhouette Studio software makes it easy for you to create a border around any design or text!
The Silhouette Studio software makes it easy for you to create a border around any design or text!
How to Outline an Image in Silhouette Studio
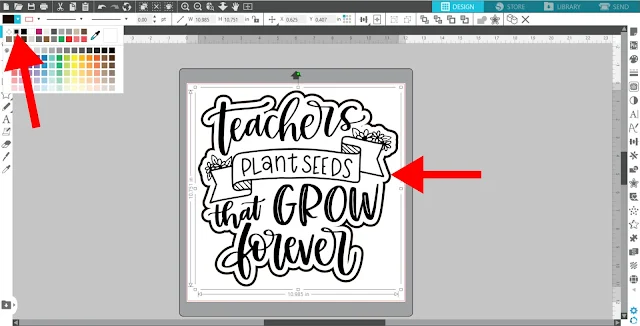
The SVG design we used on this potted plant comes from the Awesome Teacher and School SVG Bundle from So Fontsy. This bundle definitely earns an A+ in our book because it includes 39 commercial free school and teacher designs for under ten bucks!Import and Offset Design in Silhouette Studio
Start by importing your design into Silhouette Studio. For more info on opening files in Silhouette Studio, check out this blog post: 8 Ways to Import or Open Designs in Silhouette Studio.
With the design selected, open the Offset tool in Silhouette - it's on the right sidebar.
Click Offset, then select the desired offset distance. This will be the inner edge of the finished outline. I chose 0.25 inches.
Click Offset, then select the desired offset distance. This will be the inner edge of the finished outline. I chose 0.25 inches.
Here are some tips for working with the Silhouette Offset Tool Panel:
- Once you open the Offset Panel and click Offset/Internal Offset, an offset line will automatically appear on your selected design/designs.
- You can preview the offset at different distances by adjusting the distance slider left or right, clicking the up or down arrows, or entering a numerical distance.
- After entering a number in the distance box, tap Enter on your keyboard to preview that distance.
- You can continue to change and preview distance adjustments around your design(s) as long as you do not click outside the Offset Panel menu.
- Once you are happy with the distance of the offset, click Apply.
Remove the Inner Parts of the Offset (Optional)
If you want the outline to be around only the outside of the design (and not around any of the inner bits), select just the offset around the design > right click > release compound path.
This will release the offset into all its different component shapes and each of them will become selected. Press and hold Shift on your keyboard, then click on the outermost edge of the offset. This will deselect it but keep all the other shapes selected.
Click delete on your keyboard and you'll delete all the inner bits of the offset at once while keeping just the outermost outline!
Add a Second Offset to Make a Border in Silhouette Studio
Now, the next step is really simple, just repeat what you’ve
just done! But this time, make an offset of the offset you just created.
You'll do it just like before except this time you'll select just the offset (not the design itself) and open the Offset Panel. This time I used a distance of 0.125 inches. Click Apply.
Now you'll have two lines around the outside of your design, and
you need to make those two lines into one complete shape to make a border in Silhouette. Select both the offsets > right click > make compound path. This creates a frame.
You can add a fill and line color if you want to see it a little better or preview what vinyl colors might look nice together.
To learn how to add the EXACT Oracal 651 vinyl colors to Silhouette Studio, check out this blog post: How to Save Hex Ids and Pantone Colors in Silhouette Studio.
Using Silhouette Point Editing to Clean Up Designs
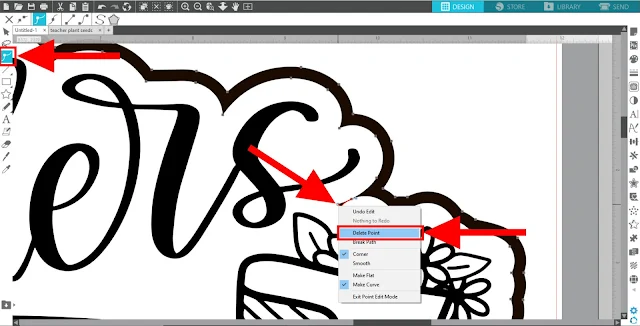
You can also make minor adjustments to the outline when you select it, and then click the Edit Point tool in the left side menu. Take a look here, the outline is extremely thin and probably wouldn’t cut very cleanly into adhesive vinyl.
In Edit Point mode, you can move around or delete
points to slightly adjust the shape so that this part is not so thin. All that
needed to be done was to delete one point - to do that just right click on the point > delete point.
This will cut much, much better. For more info about edit points, check out this blog post: Silhouette Studio Edit Points: Everything Beginners Need to Know (And More!).
How to Cut a Border in Silhouette
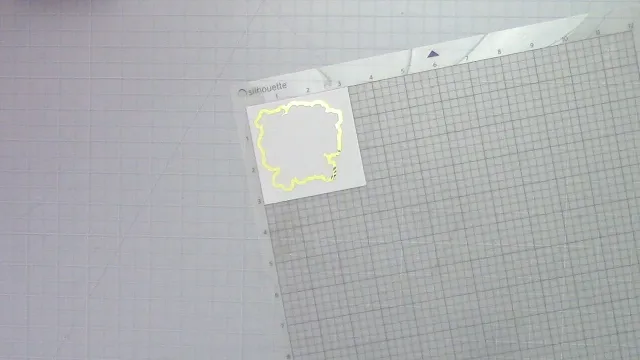
With your outline created, you’re set to cut your design and outline in vinyl. If you’re cutting the outline and design from the same color of vinyl, then you can keep them together. If you’re using different colors of vinyl, separate the outline and the design.
Cut and weed your vinyl for the design...
...and do the same for the outline. For more info on how to cut vinyl, check out this blog post: Cutting Vinyl with Silhouette Cameo For Beginners.
Use transfer tape to pick up the weeded vinyl design. To align the outline and the design together, I used a vinyl layering technique that doesn't require registration marks. For more info about that, check out this blog post: How to Layer Vinyl Decals Without Registration Marks.
Lastly, apply your outlined vinyl decal to the surface of your choice. The hinge method works great - check out how to do it in this blog post: How to Apply Vinyl Straight on Silhouette Projects...on the First Try.
And look at how awesome that gold outline looks around this design!
Don't forget, you can grab the design used in this project from the Awesome Teacher and School SVG Bundle over at So Fontsy!
Get Silhouette School lessons delivered to your email inbox! Select Once Daily or Weekly.


.png)


No comments
Thanks for leaving a comment! We get several hundred comments a day. While we appreciate every single one of them it's nearly impossible to respond back to all of them, all the time. So... if you could help me by treating these comments like a forum where readers help readers.
In addition, don't forget to look for specific answers by using the Search Box on the blog. If you're still not having any luck, feel free to email me with your question.