In this Silhouette tutorial I'll show you exactly how to get your Foil Quill tips working in the CAMEO 4 - even with the re designed CAMEO 4 tool carriages. Are you ready to make some stunning foiled stickers?!
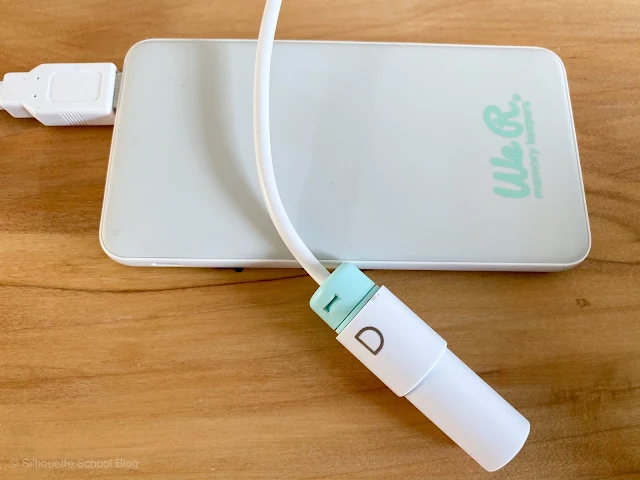
The key to making the Foil Quill play nice with the CAMEO 4 is to use the D adapter that comes with the Foil Quill tools.
Best Foil Quill Adapter in Silhouette CAMEO 4
This is labeled for Sizzix and is shaped differently than the A adapter which is the adapter needed to use the Foil Quill in the other Silhouette machines.If you got rid of the extra adapters thinking you'd only need the A adapter to use the quill in your Silhouette machines, you can buy a replacement set of Foil Quill adapters OR you can get a full set with the purchase of any of the quill tips including the new Quill Bevel and Etching tips.
Once you have the D adapter, thread it onto the Foil Quill and place it into the left tool carriage - Carriage 1. The adapter does not have teeth, but you can still press in the lock to keep the Foil Quill securely in place.
Plug it into a USB adapter or use the WRMK Foil Quill power brick to warm up your Foil Quill tip while you prepare your design. Remember to use the metal plate to prevent the heated tip from damaging the cutting machine while heating OR have it heat up before you place it in the carriage.
Foil Quill Cut Settings in Silhouette CAMEO 4
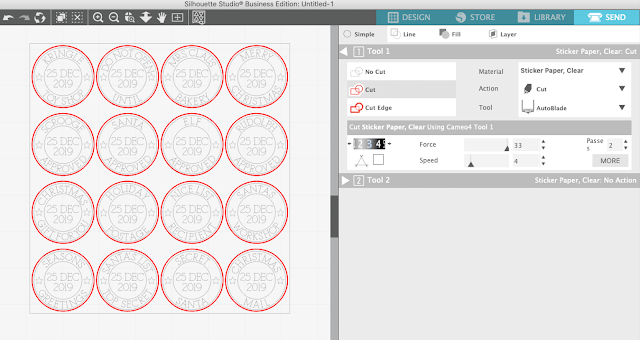
If you are used to using your Foil Quill in your CAMEO 3 or other Silhouette machines, the same settings won't work. They produce too much pressure so you'll need to adjust them.Head over to Silhouette Studio and start in the Send panel. Pick the CAMEO 4 from the machine list and then select the Action as "Sketch". Change the Tool to Sketch Pen. The best cut settings for using the Foil Quill in Silhouette CAMEO 4 are a Force of 4 and a speed of 7 with a single pass.
By the way, I found no matter what settings I used with the fine tip Foil Quill it was still too much force and the foil ripped so I would only recommend the standard and bold FQ tips for use in the CAMEO 4.
Preparing Your Silhouette Design to Foil
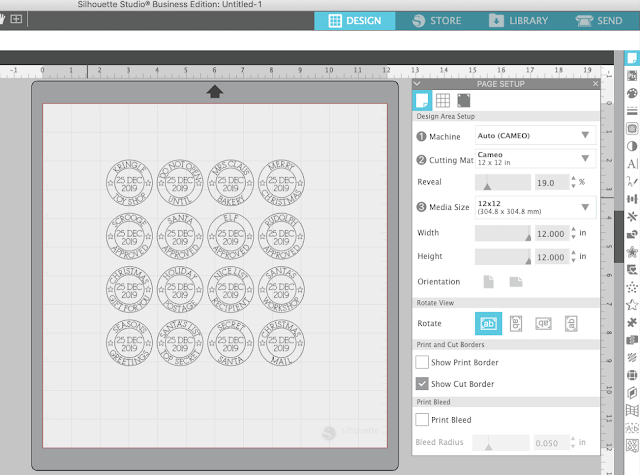
Prepare your design in the Design area of the work space. Single line designs and fonts are ideal for sketching and foiling. I'm using the entire set of 16 Foil Quill Christmas Stamps and foiling onto clear (printable) sticker paper from Online Labels.I prefer to place my design slightly down on the cutting mat. I do this as a habit when foiling so IF I decide to foil and cut, like I did here, I can remove the foil before cutting and it's not stuck under the rollers.
OPTIONAL STEP: To cut out the stickers, I selected the outer circle and created a small offset. This line will NOT be foiled, only cut.
Now you're ready to foil. Place your sticker paper or paper on your cutting mat and your foil on top of that held down with tape or with the edges stuck to the cutting mat and pulled taunt across the paper. If you do this be aware you will get foil bits on your cutting mat.
Due to the big metal bar on the CAMEO 4, it's challenging to use the Foil Quill Magnetic Mat in the CAMEO 4 because the magnets want to stick to the bar.
Load your cutting mat into the CAMEO 4.
If you haven't yet loaded the Foil Quill into Carriage 1 do so now - just make sure it's been warming up for at least about five minutes.
Move back to the Send panel.
If you created an offset to be used for a cut line, turn that cut line off by selecting it (only) and clicking "No Sketch".
When you're ready, click "Send" to begin the foiling.
When the foiling is done you can remove the cutting mat if you are completely done.
If you created the offset line to cut around your stickers, DO NOT REMOVE YOUR MAT!
If you need to cut something out, like I did with the stickers, remove the foil from the mat (leaving the paper or sticker sheet on the mat) and take the Foil Quill out of the carriage. Pop the Autoblade in Carriage 1.
Return to the Send panel in Silhouette Studio, this time turn OFF the cut lines for the areas that have already sketched. Turn the cut lines on for the outer offset circle. The AutoBlade and Auto Cut action should automatically be detected.
For the Online Labels Clear Sticker Paper, I use the default cut settings in Silhouette Studio for Sticker Paper, Clear.
Click Send again to begin the cutting.
Once the cutting is done you can unload everything. You should easily be able to remove the negative space of the clear sticker sheet.
I mean really, how cute are these?! And how happy am I that I can still use my Foil Quill in CAMEO 4.
Note: This post may contain affiliate links. By clicking on them and purchasing products through my links, I receive a small commission. That's what helps fund Silhouette School so I can keep buying new Silhouette-related products to show you how to get the most out of your machine!
Get Silhouette School lessons delivered to your email inbox! Select Once Daily or Weekly.


.png)


Hi Melissa I just tried to use the foil quill on clear stickers. It printed the foil beautifully but as I touch the sticker the foil wipes off. I am using the Silhouette branded clear sticker paper. Is thsi the problem and will the online paper work better??? These are pretty thick clea stickers from silhouette. Was trying to print labels for a favor for a bridal shower. Now I am stuck. How to people on Etsy sell clear foil stickers and the foil doesn't wipe off??? Help need to order different sticker paper or change my plan.
ReplyDeleteGayle
P.S. Shower is Mar 19th !!!!!!!
Hi Gayle!
DeleteA lot of the people that are selling stickers with gold is actually a toner or ecosolvent printer. Are you using the foiling process as above with the foil overlayed? I do recommend the Online Labels clear sticker paper (https://www.onlinelabels.com/products/ol177ck?src=mp-452). If you keep having trouble, shoot us an email or reach out on social media.
Hi Melissa
ReplyDeleteI am trying to use my WRMK foil quill but my cameo 4 states no tool detected. I am using adapter d. What am i doing wrong????
Hey there! Do you have it in slot 1?
DeleteAnd it did not melt your sticker paper at all?
ReplyDeleteHey there! It does not melt the sticker paper.
Delete