Not only do I have the written tutorial, but also a video for you to demo.
First off you want to find a digital cut file for a paper flower. There are several in the Silhouette Online Store or you can a find a variety of free designs from Birds Cards (which is where I got one of paper flower cut files I used). She has tons of awesome designs so go check it out!
Open up the file in Silhouette Studio and cut it on patterned paper using the recommended cut settings in the software.
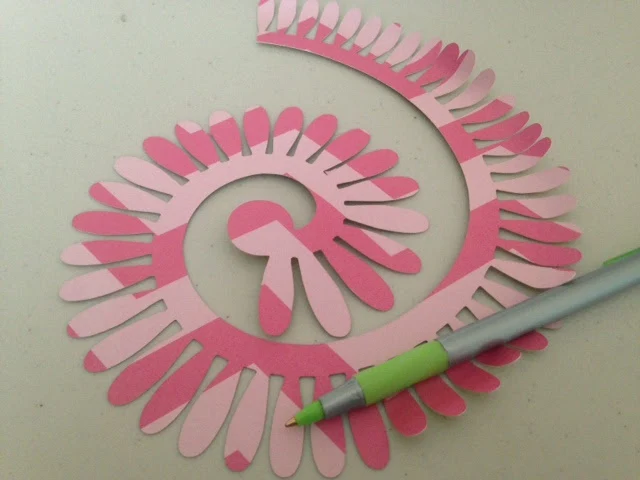
After you've cut your flower design it won't look like a flower at all. It will look something like a scalloped spiral with a circle on the end. The circle is going to be the base.
When it's time, you want to start rolling from the other end - so keep that in mind. If you want, you can grab a pen or other rounded object and use it to slightly curl the petals before you actually roll the flower.

Before you start rolling your flower you want to do a few things including warming up your glue gun. Also, grab a drill or electric screw driver (I used my Black + Decker Drill/Driver) and make sure it has a screw driver bit (not a drill bit) in it. The smaller the bit the better so you don't hurt yourself!
Also you'll need a bobby pin.
Slide the bobby pin onto the end of the paper flower that does NOT have the circle on it.
Then slide the rounded edge of the bobby pin right into the opening by the drill bit. Just kind of wedge it in there next to the bit. Make sure the petals are facing out and away from the drill and make sure when the flower starts being rolled, the backside of the paper is what you see.

Now...S L O W L Y pull the clutch with one hand while you guide the paper flower as it rolls with the other. Do not go too fast or you'll end up ripping the petals!
Once the entire flower is rolled up with just the circle end left, pull the flower (still on the bobby pin) off of the drill. Carefully remove the bobby pin.

Put a generous amount of hot glue right on that circle area and then hold the rest of the flower on there while it sets and the glue dries.

Once it dries, carefully spread out the paper flower petals.
Gotta love rolling paper flowers with a drill! It's such a time saver - especially when you're making a craft with a lot of paper flowers.
And here's a quick video if you'd prefer to watch than read.
Note: This post may contain affiliate links. By clicking on them and purchasing products through my links, I receive a small commission. That's what helps fund Silhouette School so I can keep buying new Silhouette-related products to show you how to get the most out of your machine!
Thanks for coming to class today at Silhouette School. If you like what you see, I'd love for you to pin it!

Get Silhouette School lessons delivered to your email inbox! Select Once Daily or Weekly.


.png)


The link to Birdie's Cards doesn't work to take you to any designs. :-(
ReplyDeleteExcited to try this method, though!
Wow.. brilliant work. Just loved the creativity. I would love to try this. Thanks for sharing :)
ReplyDeleteThesis writing service
The link to Birdie's Cards doesn't work to take you to any designs. Thanks
ReplyDeletecoradar
Hi Other Melissa!
ReplyDeleteThanks for posting this! Some more ideas:
1.You can take out the screw driver bit and put in one of the skinnier drill bits instead - you will get a tighter roll/smaller center.
2. My drill has a speed adjustment which is very helpful!
Melissa