 |
| This is a sponsored post, but as always, all opinions are my own |
Here's the situation - you find an amazing graphic from say, The Hungry JPEG's March bundle, like this gorgeous flower or the adorable pineapple or a pretty dream catcher. You grab the deal, download the PNG files, and bring them into Studio to make print and cuts of some sort - maybe stickers, maybe printable vinyl, maybe a shaped card or, in my case, an invitation.
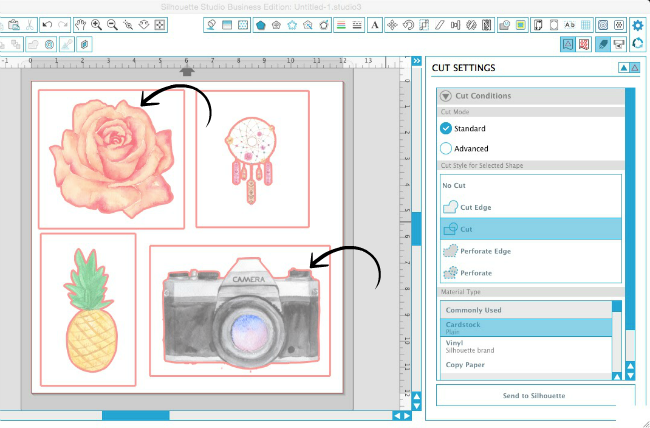
All PNG files are on a transparent background so one would think turning on the cut lines in the Cut Settings window would produce a cut line around the edge of the design. In fact, that's actually exactly what Silhouette Studio is doing. It's putting a cut line around the edge of the design - which transparent or not - is the edge of the image.

What to do? The answer is simple: trace and detach! It may just be the most under-used tool in Studio.
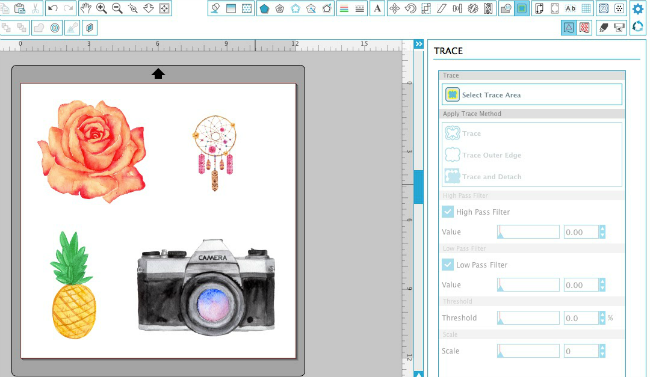
After you import the PNGs into Silhouette Studio and before you turn on the cut lines you need to do a quick trace and detach. Go to the Trace tool and click "Select Trace Area." Draw a selection box around the design to be traced. Uncheck High Pass Filter and move the threshold bar to the right so the entire design is filled in yellow. Click 'Trace and Detach.'
Once the software processes this request it will go back to looking like your original design. You may even think, "What the what? Melissa said some magic would happen but....nothing happened!"

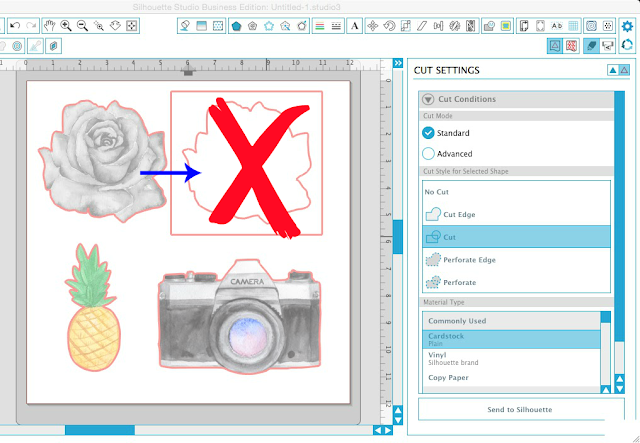
Actually a whole lot happened...the image detached from it's transparent background. Go to the Cut Settings tool now and turn on the cut lines again..and you'll see exactly what happened..and believe me, it's a thing of beauty!

Now you can grab the design and pull it to the side, apart from its background. I've shaded the flower gray below so you can more easily see the red cut line around it. You can see the transparent background also has the exact flower shape cut out of it. You can now delete the transparent background.

Now you are free to use the design however you want as a print and cut! I traced and detached several of the flowers and stems from the Dreaming Rose Garden collection in the March bundle to design a shaped print and cut invitation for a garden party.
And because I know you'll ask, the script font is Wallows - also from The Hungry JPEG March bundle (as are all graphic designs shown in this tutorial).
Curious what else you get with the $29 March bundle? Let your eyes feast on these beauties..and as always, they all include the commercial licenses so you can use the fonts and graphics commercially.
If you're interested, hurry because The Hungry JPEG March Bundle only last through the end of the month!
Note: This post may contain affiliate links. By clicking on them and purchasing products through my links, I receive a small commission. That's what helps fund Silhouette School so I can keep buying new Silhouette-related products to show you how to get the most out of your machine!
Thanks for coming to class today at Silhouette School. If you like what you see, I'd love for you to pin it!

Get Silhouette School lessons delivered to your email inbox! Select Once Daily or Weekly.


.png)


thank you Melissa! I do use the trace tool a lot but it's always a matter of trial and error with the settings. Did you already write a post about when and why to use the high pass and the low pass filters, and what the threshold and the scale sliders actually do? Thanks so much!
ReplyDeleteI would love to see one on what Marcella said...
DeleteTerrific! Thank you so much.
ReplyDeleteThat is one great piece of information--I never thought to try that!!!
ReplyDeleteOh my goodness....THANK YOU!!!!
ReplyDeleteI have spent the better part of a night trying to figure out WHY I HAD A RED BOX around everything. THANK YOU it is now gone!
ReplyDeleteYou just saved me so much with this. Thank you SOOOO much!!
ReplyDeleteThank you so much for your help. Do we have to do the above steps even if you have the Business Edition?
ReplyDelete