

Not only are DIY Temporary Tattoos guaranteed to be a huge hit with the little ones, they can also add an extra layer of safety when venturing out in crowded places. Today Silhouette School contributors Becky and Glenna from My Paper Craze are sharing a Silhouette Tattoo 101 tutorial from start to finish.

If you're a pro with Print and Cut, this one will be second nature to you
(but don't fret if you're not, your trusty Silhouette will get you
through!).
To kick off this tutorial, let's check out the goods. We purchased Silhouette Temporary Tattoo from Amazon and sure enough, it was delivered to the house two days later (thank you Amazon Prime!). The pack comes with two tattoo paper sheets (white) and two transfer sheets (green).
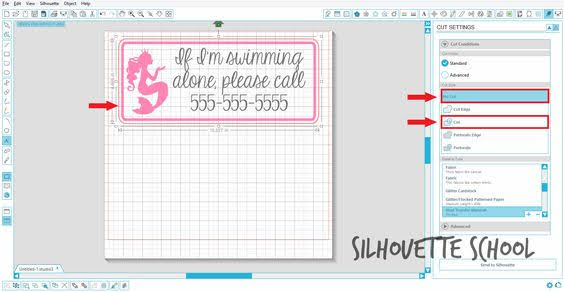
Design your tattoo image in Silhouette Studio. Just to clarify, the swimming reference is a pun on the mermaid image, we certainly don't encourage children to swim alone, lol. My husband had to point this out for me.

For the print and cut, you'll need to adjust your cut settings.
Create an OFFSET of your design.
Select the entire design and modify your CUT SETTINGS to NO CUT. Then select just the offset and setback to CUT. Be sure to change the LINE COLOR to white or clear so that it doesn't show when you print. Select the entire image again and GROUP together.
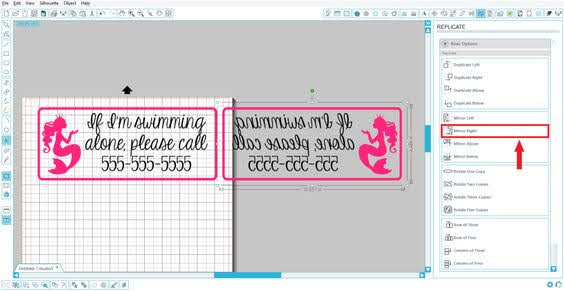
Once you are completely satisfied, MIRROR YOUR IMAGE from the Replicate window. Don't forget this part or you will be seriously disappointed.
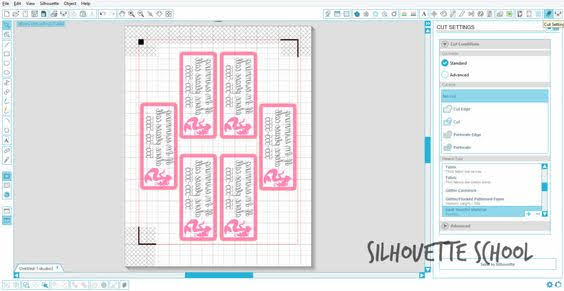
Now we'll set the file up for printing. Check your DESIGN PAGE SETTINGS to ensure your page size is set to LETTER or current printer.

Next, check your REGISTRATION MARKS and set the STYLE to TYPE 1 (CAMEO, Portrait). Obviously if you have a different model, select the appropriate setting.
Fill your page with your desired design or designs, they don't have to all be the same.
At this point, I always double check my CUT SETTINGS and review where my cut lines are in comparison to the printing and cutting margins.
Remember to stay within the RED lines and the registration area. Since this is going through your printer, we recommend fully utilizing your available space because you cannot use the leftover scrap (unless your printer is set up to accept smaller sized paper).
Once your document is prepared, move forward with printing.
You'll want to modify your paper type to the GLOSSY PHOTO PAPER if available (or as Melissa has recommended with the clear sticker paper, select the paper type as 'transparency') and make sure the ink quality is set to HIGH.

STOP AND READ THE NEXT STEP BEFORE ACTUALLY PRINTING
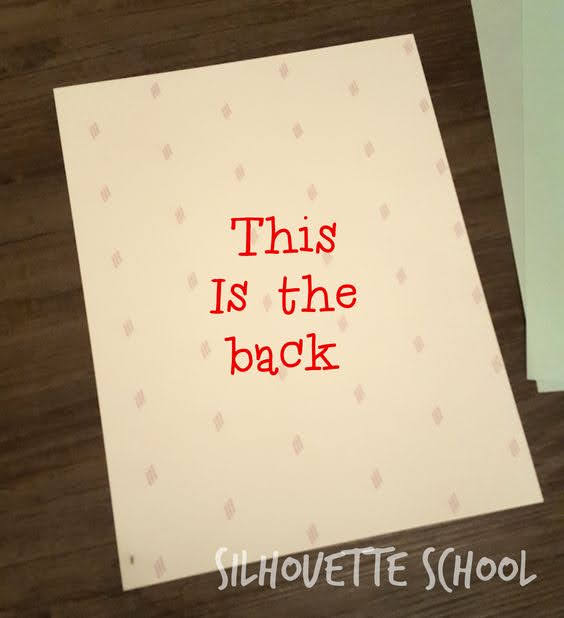
Load the Silhouette Temporary Tattoo into your printer to print on the GLOSSY side (the pattern side is the back).
After printing, set aside for the ink to completely dry.

After the ink is COMPLETELY dry, grab the clear transfer sheet (green backing). Notice that one edge has a pre-cut line. DO NOT ACTUALLY PEEL IT BACK JUST YET.
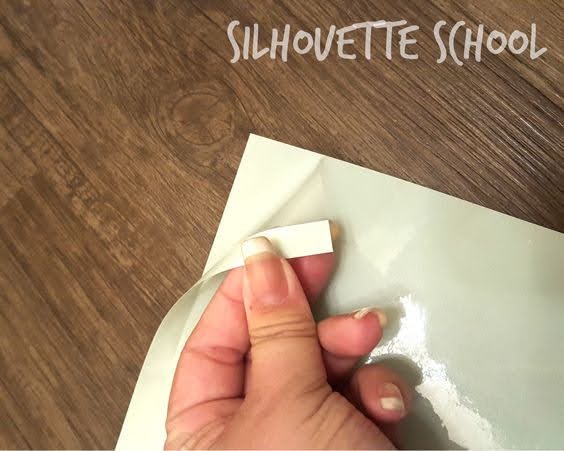
Line up the green transfer backing to the FRONT of the printed temporary tattoo paper.
Secure the top of the transfer sheet (ABOVE the pre-cut line) with your finger. If you need both hands, you can do this with paper friendly tape. Reaching between the two sheets, find the pre-cut line and slowly peel pack the green backing. As you peel, use your other hand to smooth the clear transfer sheet onto the printed tattoo images.
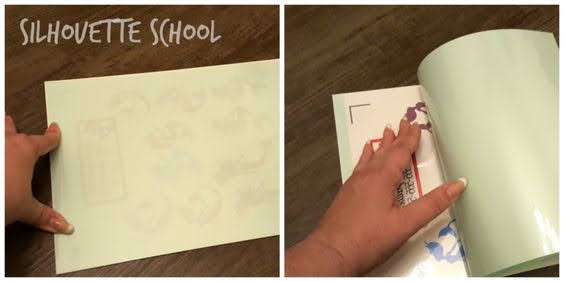
Now you can proceed with the Print and Cut by securing the temporary tattoo paper (with transfer sheet adhered) to your cutting mat. Feed into your Silhouette and cut.
Once cut, remove from the mat as usual. Now congratulations, you have a temporary tattoo just begging to be applied! Don't worry, we'll walk you through how to do that too, but it's the same as most temporary tattoos; nothing too complicated.

When you get ready to apply your tattoo, grab a wet cloth or paper towel.
Peel off the clear transfer sheet from the front of your tattoo. You'll notice a sticky adhesive will be left behind - this is what makes the tattoo adhere to the skin.
Line up the temporary tattoo paper at its desired location and press against the skin. Apply the damp cloth or paper towel and press evenly over the entire back of the tattoo for 10 to 15 seconds. Carefully remove the backing.
And there we go, an amazing little personalized temporary tattoo for your little one (or yourself!).
As you can see, I didn't measure the size of her arm, but at least no one will miss it when it takes up her whole upper arm.

Note: This post may contain affiliate links. By clicking on them and purchasing products through my links, I receive a small commission. That's what helps fund Silhouette School so I can keep buying new Silhouette-related products to show you how to get the most out of your machine!
Thanks for coming to class today at Silhouette School. If you like what you see, I'd love for you to pin it!


Get Silhouette School lessons delivered to your email inbox! Select Once Daily or Weekly.


.png)


Ohhh this is awesome! Thank you! :)
ReplyDeletehave you ever tried to use silhouette sketch pens instead of printing on the tattoo paper? any idea if this can be done? i want to use the metallic pens to create metallic tattoos, if possible?
ReplyDeleteI have not tried the sketch pens on the tattoo paper. In theory, I think it should work. Let us know if you decide to give it a try!
Deletedid the metallic sketch pens work on the tattoo paper? very interested. I am trying to transfer metallic letters onto a candle and thinking the tattoo is the one option where you can still burn the candle
DeleteSo, does anyone know if you can work w/ metallic pens for this? (Should I have any concerns over the toxicity of the inks?)
DeleteI must have done something wrong. When I peeled the backing off the ink is on the adhesive side and not on the paper. Yikes. Can you help me?
ReplyDeleteHappy Diwali
ReplyDeleteHappy Diwali images
Happy Diwali wishes
Advance Happy Diwali
Happy Diwali 2015
Google Nexus 6p
halloween pictures
Happy Halloween
Happy Halloween images
Happy Halloween pictures
Happy Halloween quotes
Hot Halloween Costumes For Friends
Couples Halloween Costumes Pictures
Cool Halloween Costumes Free
Mens Halloween Costumes Images
Unique Women Halloween Costumes
Cat Halloween Costumes
Costumes For Halloween Women
Ladies Devil Halloween Costumes
Cute Kid Halloween Costumes
Adult Halloween Costume Ideas
Ideas For Halloween Costume
Funny Baby Halloween Girls
new year poems
ReplyDeletenewyearpoems.com
www.newyearpoems.com
happy new year resolution
happynewyearresolution.com
www.happynewyearresolution.com
goodbye2015welcome2016.com
good bye 2015
welcome 2016
happybirthdaywishespictures.com
happy birthday wishes pictures
happy birthday Jesus wishes pictures
valentinesdayquotesimages.com
valentines day quotes images
happyteachersdayquotesspeech.com
happy teachers day quotes speech
www.happyveteransdayusa.com
happyveteransdayusa.com
happy new year quotes with images
happy new year quotes xanga
happy new year jokes quotes
happy new year quotes spanish
happy new year quotes in german
happy new year quotes best friend
happy new year quotes with pictures
think thoda hatke
thinkthodahatke.com
www.thinkthodahatke.com
happyimageswishesquotes.com
www.happyimageswishesquotes.com
happy images wishes quotes
halloweenpicturess.com
www.halloweenpicturess.com
merry christmas pictures
merry christmas pictures free
funny merry christmas pictures
Happy christmas cards
christmas quotes
happy new year msg
ReplyDeletehappy new year msg in hindi
happy new year 2016 msg
happy new year msg in english
happy new year msg images
happy new year text msg
happy new year msg for girlfriend
free text msg
happy new yr msg
happy new year msg for lover
happy new year love msg
happy new year msg for gf
happy new year wish msg
best happy new year msg
happy newyear msg
happy new year wishes msg
happy new year msg for boyfriend
happy new years msg
happy new year msg for husband
sms msg
happy new year wishing msg
send msg
new year 2016 hindi msg
happy new year 2016 hindi msg
2016 happy new year msg
happy new year short msg
new year hindi msg 2016
happy new year msg download
happy new year msg for wife
happy new year msg for friend
happy msg in hindi
happy new year msg in urdu
new hindi msg
happy new year msg for friends
happy new year msg for family
best friends msg
new year msg with images
happy new year hindi msg 2016
greeting msg
wish msg
wishes msg
msg new
happy new year prayer
ReplyDeleteprayer for new year
prayer for the new year
new year prayer quotes
prayer for a new year
new year prayer quotes
prayer for the new year 2016
2016 new year prayer
new years family prayer
christian new year prayer
new year prayer for family
prayer for new years
christian prayer for new year
new year prayer for friends
a prayer for the new year 2016
prayer for new years eve
new year prayer messages
happy new year prayer wishes
happy new year 2016 prayer
happy new year prayer quotes
a love prayer happy new year
happy new year prayer sms
happy new year prayer 2016
happy new year prayer images
a new year prayer poem
Hello, does anyone know about how long it takes to completely dry?
ReplyDeletehappy fathers day
ReplyDeletefathers day messages
fathers day date
fathers day cards
fathers day poems
fathers day uk
fathers day gift ideas
whens fathers day
fathers day ideas
fathers day pictures
fathers day greetings
fathers day presents
fathers day gift
fathers day songs
fathers day card
happy fathers day cards
fathers day crafts
fathers day jokes
fathers day 2016
funny fathers day cards
date of fathers day
good fathers day gifts
fathers day card ideas
fathers day ecards
fathers day sayings
fathers day cakes
happy fathers day date
when is the fathers day
fathers day craft
fathers day cards to make
printable fathers day cards
poems for fathers day
fathers day usa
free fathers day cards
personalized fathers day gifts
fathers day coloring pages
cheap fathers day gifts
funny fathers day
cool fathers day gifts
when is fathers day celebrated
fathers day us
fathers day verses
What type of ink do you use?
ReplyDeleteDo you recommend a specific printer for tattoos and transfers? We are just getting ready to start purchasing our products and you are obviously an expert!! I am sure you don't endorse products but would appreciate recommendations. There are so many different products and reviews. We are only looking for a small home/ side project. This will mostly be for our daughters softball team but can "see" much more potential. Thank you, Brandi brandilynn27@aol.com
ReplyDeleteDo you recommend a specific printer for tattoos and transfers? We are just getting ready to start purchasing our products and you are obviously an expert!! I am sure you don't endorse products but would appreciate recommendations. There are so many different products and reviews. We are only looking for a small home/ side project. This will mostly be for our daughters softball team but can "see" much more potential. Thank you, Brandi brandilynn27@aol.com
ReplyDeletePretty good post. I just stumbled upon your blog and wanted to say that I have really enjoyed reading your blog posts. Any way I'll be subscribing to your feed and I hope you post again soon. Big thanks for the useful info. Tattoo removal
ReplyDeleteAfter washing and rinsing, pat the area dry with a soft towel. Allow the tattoo to air dry for about twenty minutes. The area may feel tight but that is perfectly natural. Primitive Outpost
ReplyDeleteThis comment has been removed by a blog administrator.
ReplyDeleteWhat type of ink do you use?
ReplyDelete