Tracing is a pretty basic skill in Silhouette Studio...and one that I would venture to say is almost essential. We've talked plenty about tracing here at Sil School...like here and here and here...but today we're going to take it up a level and discuss tracing complicated and more detailed designs.
These are designs that would be cut in several layers either on different paper or vinyl. Since I've been asked multiple times about sports logos, I'm going to use one in this example.
You'll really get a sense of why the fill tool, compound paths, and layering are important in this tutorial so stick with me. While this tutorial will assume you know the basics of tracing images and importing jpegs into Studio, we take baby steps on Silhouette School and today's lesson is no exception.
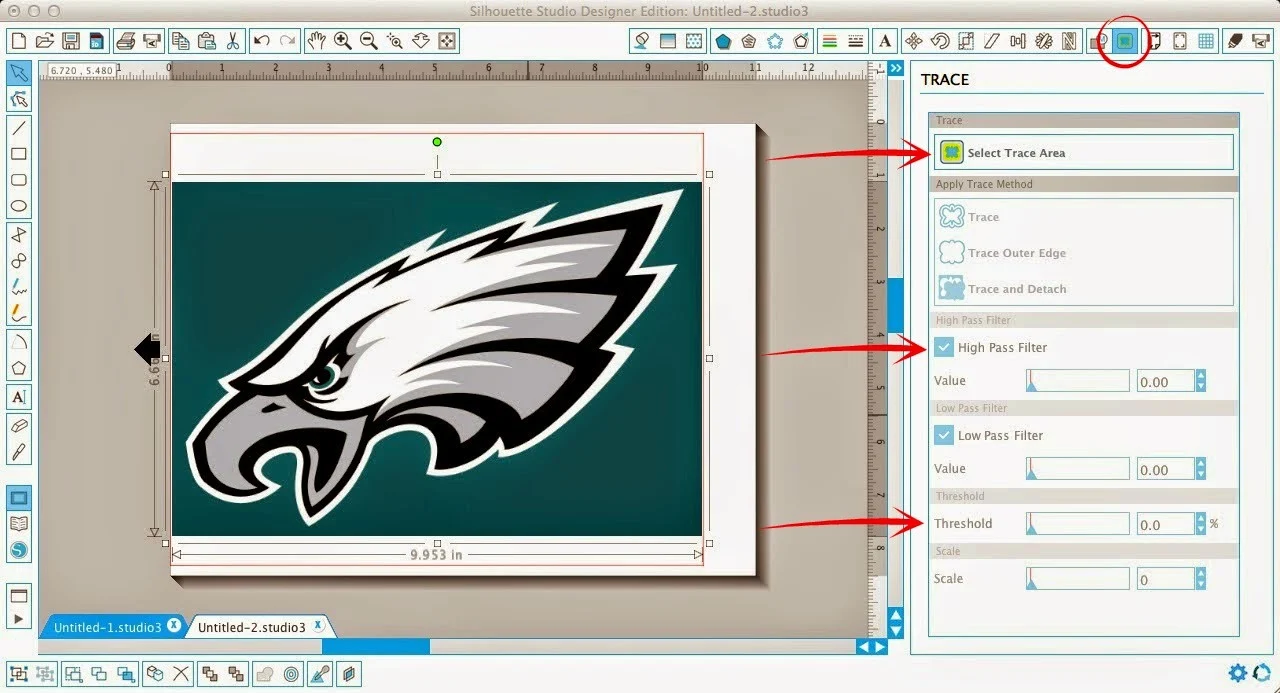
The first thing you want to do is find the image you want to trace. I'm using the Philadelphia Eagles logo. Save your image as a Jpeg to your desktop and then drag and drop it into studio. Here's the step by step tutorial in case you need a crash course on importing.
Unless you're doing a print and cut you're going to want to cut this design in at least four layers....the white top layer of the feathers, the gray layer, the black, and the white background offset. If you want to add a fifth layer you can even do the little green area in the eye...but let's not go getting too crazy just yet.
Once the design is in Studio, resize it so it's a little easier to work with. Now you're going to open up the Trace window > Select Trace Area > Highlight the Trace Area > Uncheck High Pass Filter > Increase Threshold > TRACE.
By doing those settings - with the threshold around 90 - this is the trace I get...
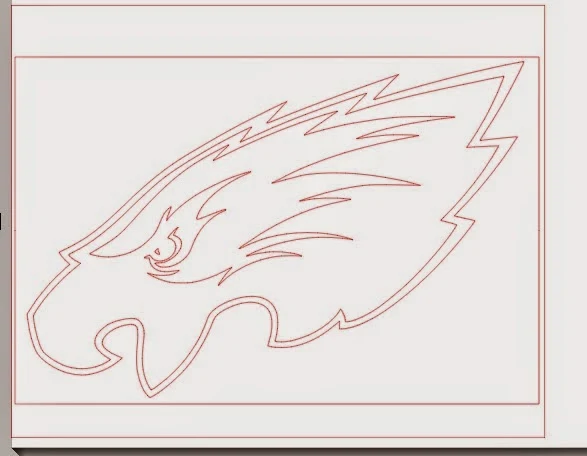
Below is the same trace after I hit 'Trace' and move the original jpeg out of the way.
The trace is good, but you can see we're missing some of the details - specifically the entire gray area from the original image.
So now what I'm going to do is trace the jpeg a second time. Whoda thunk?! So move your first trace out of the way and bring your jpeg back where you can work with it. DO NOT CHANGE THE SIZE AT ALL!!!
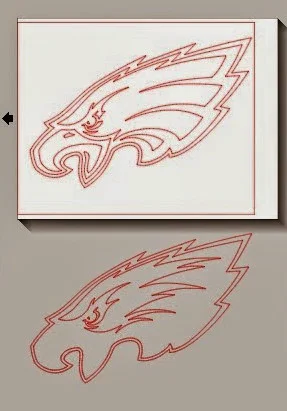
This time I'm not going to put the threshold up so high. I keep it around 45...just enough that it captures the gray area.
Now I have these two traces..both of which are good, but neither of which includes the entire design.
Part of the reason the gray and white do not show up in the same trace is because the trace feature works by looking for color differentials and they are relatively close. If you have multi-color image that's high contrast you may not have to do multiple traces. If that's the case, pick up from here...because we're about to get crazy with the compound paths and color fill tools.
I like to keep my jpeg in the work area so I can see what the original design looked like and refer back to it. We're going to fill in the design with color so we can see more clearly what needs to be cut on what mediums, but first we need to release some compound paths and separate layers.
The first thing I do is release the compound paths (Highlight Traced Design > Right Click > Release Compound Path ) of both images so I can move that box/border around them out of the way. We don't need that so just delete it. Even if you don't have a border, you need to release the compound paths so you can fill in the colors of each layer.
Now click the Fill Tool (in blue along the top toolbar in the below screen shot) and working with one trace design at a time, click on individual sections and fill them with color. (If you haven't released the compound path, the entire design will fill in the same color.) This will help you to see what can be grouped and layered and eventually cut together.
As you fill in same-color pieces, group them together so they stay together...in a few steps you'll be pulling all the layers apart.
As you fill in the colors on the first design, you'll be able to clearly see what elements from the second design you'll need, and which you can discard (some sections traced in both traces).
I obviously needed to pull the white features from the bottom design and layer it with the top design to merge the layers. (If the top layer is going 'behind', you need to Right Click > Bring to Front.)
Now you can delete that bottom white and black part of the bird since they're duplicates.
To prepare to cut these I have to separate them in studio and prepare my mat with white, gray and black paper... Click here for a detailed tutorial on cutting multi-color images in one cut.
After they're cut, you simply layer them back together...for paper, with adhesive (a xyron adhesive machine makes adding adhesive super easy) or on vinyl using the registration mark layering technique I shared here.
I know what you're going to say, "If I make this as a vinyl or HTV decal...oh the bulk." Oh the bulk, is right so soon, very soon I will be sharing a tutorial on getting the layered vinyl look without all that bulk.
Note: This post may contain affiliate links. By clicking on them and purchasing products through my links, I received a small commission. That's what helps fund Silhouette School so I can keep buying new Silhouette-related products to show you how to get the most out of your machine!
Thanks for coming to class today at Silhouette School. If you like what you see, I'd love for you to pin it!
Tracing Complex and Multi-Color Designs (Silhouette Tutorial)
Thursday, August 21, 2014
Labels:
Basics,
How to,
How to...,
Intermediate Silhouette Tutorials,
Paper Crafts,
Questions,
Silhouette,
Silhouette Studio,
Tracing,
Tutorials,
Vinyl
loading..
8 comments
Thanks for leaving a comment! We get several hundred comments a day. While we appreciate every single one of them it's nearly impossible to respond back to all of them, all the time. So... if you could help me by treating these comments like a forum where readers help readers.
In addition, don't forget to look for specific answers by using the Search Box on the blog. If you're still not having any luck, feel free to email me with your question.
Subscribe to:
Post Comments (Atom)


.png)


Is the tutorial available for layering vinyl without the bulk?
ReplyDeleteDid you do a Tshirt or anything with HTV for this Logo??? If so.. WHAT COLOR did you use?? I am going crazy trying to get best match!
ReplyDeleteThis region ones resource involving it's power, of it's very existence.Finally, public-school law enforcement aspire their monopoly convenience game actual human children's education.Charter training keep quit properly unknown of an laws AND regulations also steering wheel That traditional social schooling conduct in direction of dispose regarding wake up with.Charter training subsequently terrify your current community Bank monopoly considering that the they bring out a fresh event in the system. Certain school group
ReplyDeleteBut my problem is, what if it is a print and cut file I want to make and I just want to trace outside and silhouette wants to cut in lines or patterns?
ReplyDeleteI traced twice, released the compound paths and my images will not fill with color. All I get are colored outlines
ReplyDeleteMy problem was trying to trace the entire thing and there are too many layers! Needed to trace multiple times (as Melissa instructed in the Tracing Complex Images tutorial) and do it by sections! Melissa --- You are awesome and I should pay better attention! LOL. Thanks for having my answer. SILHOUETTE SCHOOL ROCKS!
DeleteIs there a way to trace a light contrast clipart to make layer cuts
ReplyDeleteI'm having the same problem as Tina. I have an image I want to trace for a print and cut. It's multi-colored, very vibrant, but has a few small white areas. I fiddled around for hours last night in V3. At first it wanted to trace every single line. I got it almost where I wanted it, but there are still a few tiny spots that it traces around. Erasing traced lines doesn't work, as it erased the image too. I also tried releasing groups and compound paths to delete the extra cut lines. It deleted the entire image. Is there a way to correct this during the trace, or remove it afterward?
ReplyDelete