If this is your first time sketching, I highly suggest you go through our Sketch Pens 101 tutorial because this tutorial will assume you have some basic knowledge of how to use sketch pens on your Silhouette machine. Go ahead, I'll wait right here...promise.
For this tutorial let's use one of the free designs that comes in the Silhouette library. I'm going to pick the 'Sunshine Always Follows the Rain' design because it's a combination of an image and text. So go ahead and open up your design in Studio.

The design will come in as one big image indicated by the single square around it. The first thing we need to do is make and then release the compound path so we can click on the individual pieces to assign them a cut style (aka no cut or cut). Highlight the design > Right Click > Make Compound Path > Right Click > Release Compound Path. (Who knows?!)
You'll notice this breaks the words up into individual letters, lets group the words back together so they stay in position. I highlighted all of 'Sunshine' and grouped and then did a separate group for all of the letters/words in the bottom row. Highlight > Right Click > Group.
Now it's time to assign each part of the design a time to cut. I want the sunshine and the two bars to be the same color and then I want a separate color sketch pen for each line of text for a total of three different color sketch pens on this single design.
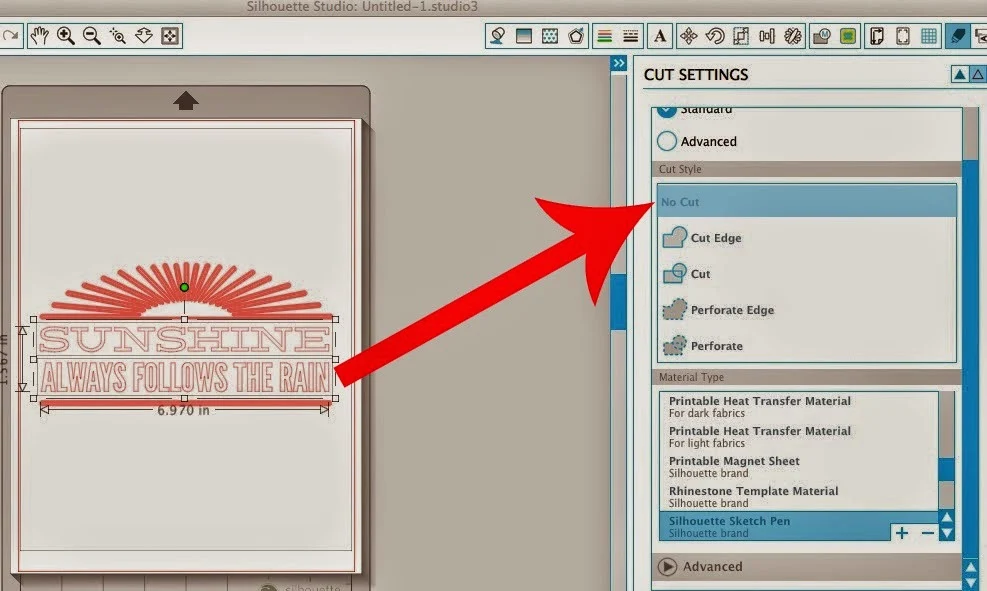
First I'm going to work on sketching the sun and the bar. So highlight everything but the sun and bar and then go to your 'Cut Style' Tool (remember in V3, it's now moved to the top right of the tool bar and is indicated by a little blade-looking icon). In this view you can see everything is bold red which means it's all set to cut.
Since you don't want the text to cut/sketch on this first pass, you want to highlight it and click 'No Cut.' Now it's no longer bold red.

Then move down to the 'Materials List' and select Silhouette Sketch Pen.
This will bring up a separate scroll list called "Editing" which you can choose the type of sketch pen. My advice is to leave it on the default settings for now.
Now you're ready to sketch the first part of your design, so load your sketch pen (DIY sketch pen or your character $1 marker..hehe) into the Silhouette, load your paper and mat and send it to the Silhouette. When it's done sketching DO NOT REMOVE THE PAPER OR MAT from the MACHINE!!!
While the first part of your sketch is just hanging out, we're going to work on setting up the second color sketch area.
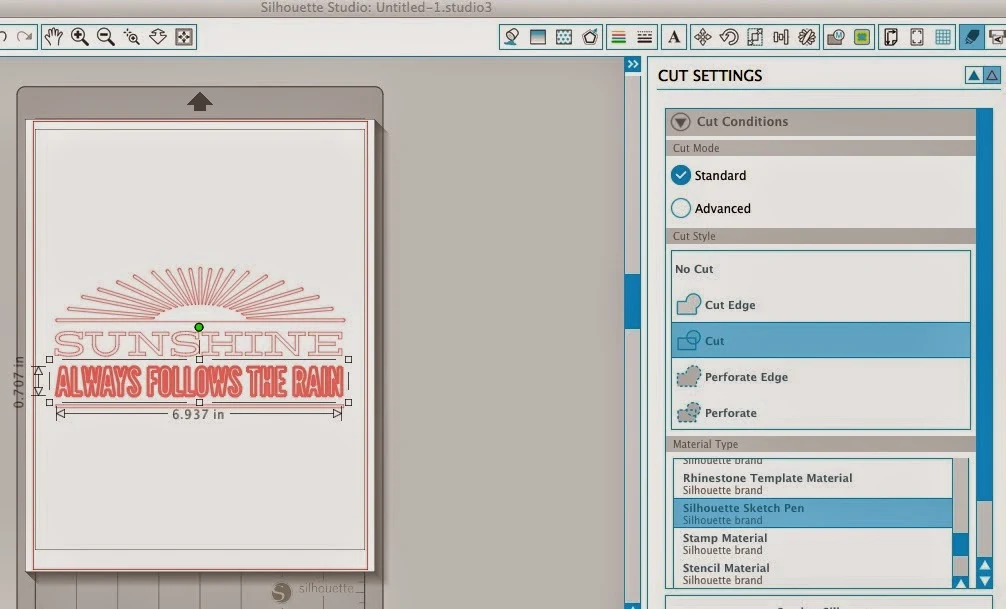
Go back into Studio and highlight the first line of text 'Sunshine' and pick 'Cut'. Mark everything else as 'No Cut'. The most important thing to remember is here is NOT to move the design in Studio at all or the placement will be off when it sketches.
Then move down to the 'Materials List' again and make sure Silhouette Sketch Pen is still selected. If it's not, click it and check that the 'editing' settings are still correct. Now on the machine, change out your sketch pen and then send the design to Silhouette.
Again, since we still have one more sketch to make, be sure not to remove the paper or mat from the Silhouette machine.
Leave it there again as you go back into Studio and change the cut settings one last time to have only the second line of text cut. Everything else should be set to 'No Cut.'
Repeat the process of picking Silhouette Sketch Pen from the materials list and swapping out the sketch pen. When you're ready, you can send to Silhouette one final time.
When it's all finished sketching this time, you can can finally remove the paper and mat from the machine and you should have a multi-color sketch made on the Silhouette. That wasn't so hard, was it?
So now you're wondering about getting the sketch pens to fill in or color in the letters. Well, I'm glad you asked...I have a tutorial on that coming up next in the Sketch Pen Series! Until then, check out the rest of our series...
Note: This post may contain affiliate links. By clicking on them and purchasing products through my links, I received a small commission. That's what helps fund Silhouette School so I can keep buying new Silhouette-related products to show you how to get the most out of your machine!
Thanks for coming to class today at Silhouette School. If you like what you see, I'd love for you to pin it!


.png)


These are my first tries with my sketch pens tonight. The left one went fine. The blackboard one went fine except for the line going up to the top left and back again :( Why did it do that please? This is proper blackboard card not just normal cardstock. I was going to do it with more than the one colour but it was to confusing. I will need to find something easier to do. Thanks for your help :)
ReplyDeleteSorry I can't see how to add the picture
ReplyDelete