Want to divide an image into panels or smaller pieces in Silhouette Studio? It's easy to do!
In this tutorial, we'll show you how to turn a regular mandala into a 9 piece work of art using the Silhouette software.
First open your mandala design in Silhouette Studio.
This design comes from the Big Mandala Design Bundle over at So Fontsy. This mandala is one of 121 designs in the bundle so you'll definitely find your favorite mandala for this project.
Size the mandala to fit your project. This was sized to 12 x12 inches.
Center the rectangle on the page.
Click "G" on your keyboard to turn on the grid lines.
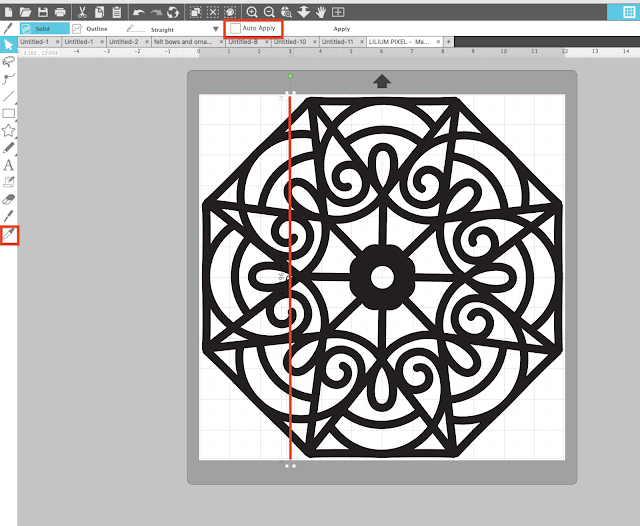
Select the knife tool and from the top uncheck "Auto Apply". Use the mouse and hold down Shift at the same time do draw a straight knife line.
Place the knife line on the 4" grid line. Duplicate the knife line and place another on the 8" line. This will make 3 columns.
Select both knife lines and open the Replicate panel. Click "Rotate Copies"...they should automatically be placed at the 4" and 8" horizontal grid lines.
Now select all 4 knife lines and click "Apply" along the top toolbar...
...and this will split your design into 9 pieces.
This is the perfect kind of mandala to use for a project like this because the entire design is connected together. That means, no separate little pieces - every piece is connected and makes transferring the design into frames much easier.
You can cut the design on cardstock or vinyl...and here's a tip: label the pieces as you go so it's easy to reassemble them later.
We used this split design to make paneled wall art by putting the vinyl directly onto cardstock then framing.
For tips on how to put vinyl on cardstock, check out this tutorial over at the So Fontsy blog.
Find this mandala design (plus lots more) in the Big Mandala Design Bundle at So Fontsy.
Get Silhouette School lessons delivered to your email inbox! Select Once Daily or Weekly.


.png)


Thank you for this tutorial. Love this idea and have the perfect wall for it.
ReplyDeleteGreat idea, thanks for sharing.
ReplyDeleteUsing vinyl, is it best to cut each panel separately? And what size frames did you use?