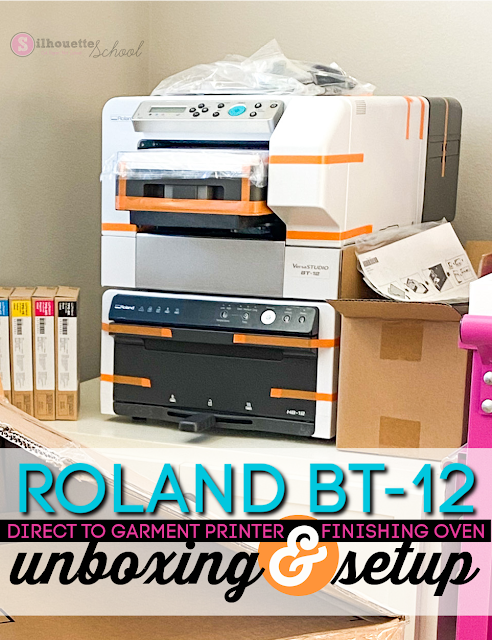
The Roland BT-12 Direct to Garment (DTG) Printer is a really easy and fast DTG printer for the small home-based craft business.
The direct to garment printer allows you to print on cotton, filling a void left open by sublimation which requires a high polyester count or polyester coating for hard goods. This tutorial will walk you through a beginner first print with the Roland BT-12 DTG printer and finishing oven.
If you haven't already set up your Roland BT-12, installed the software, and print drivers before sure to do that first. A Roland BT-12 Direct to Garment printer unboxing and set up tutorial can be found here along with how to use the Roland BT-12 cassette tray (and why I think having a second one is a good idea).
Workflow for Printing Direct to Garment with Roland BT-12
There are really only a few steps for printing direct to garment and once you get the process down it's pretty easy just follow these steps:
- Select your design
- Power on the Printer and Finishing Oven
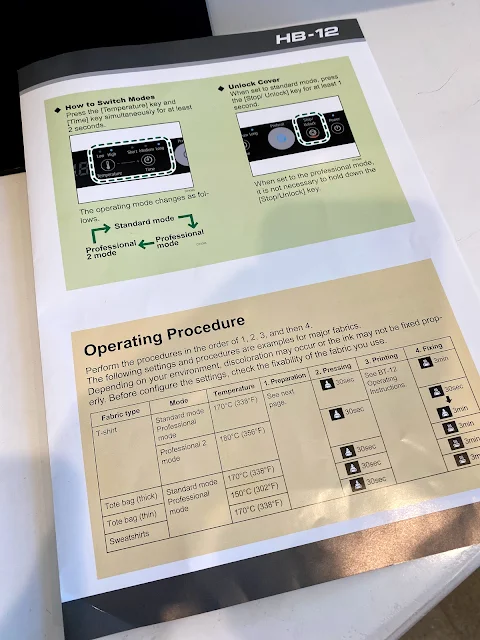
- Adjust the temperature based on the textile and operating mode. (Refer to the chart on page 3 of the Finishing Quick Guide".) Press the Pre Heat button
- Load the garment or item into the cassette tray
- Launch the Roland Design Software and import the design. Press "Print" when the design sizing and positioning is finalized
- Load the cassette tray in the finisher for :30 Pressing and slide the handle to the left for Pressing
- Move the cassette tray to the Printer and press "Start"
- Move the cassette tray back into the Finisher
- If you are using Standard or Professional Mode: Set the timer to "Medium" (3:00) and slide the handle to the right for Fixing
- If you are in Professional 2 mode: Set the timer to "Short" (:30) and slide the handle to the right for Fixing. Then reset the timer to "Medium" (3:00) and slide handle to the left for Pressing
- Unload the garment from the tray
First Roland BT-12 Direct to Garment Print
For this first project we will print on a cotton canvas tote bag.
I like to start with figuring out which design I am going to use. In this case it's this fun and colorful Educational Rockstar design which is dubbed as a sublimation design on So Fontsy.
This design would be really difficult and time consuming to cut and apply with HTV, making direct to garment perfect especially where sublimation is out of the question due to a cotton fabric.
Power on the Roland BT-12 printer and the Roland HB-12 Finishing Oven. Press the Pre-Heat button on the finisher to begin warming up the oven.
The finisher only takes a few minutes to warm up so let it come to temperature while you load the garment into the Cassette Tray. For a tote bag you want the oven to heat up to 170 degrees Celsius. (Hint there's a very helpful time and temperature cheat sheet on the Roland HB-12 Quick Guide.
Loading a Garment in the BT-12 Cassette Tray
The cassette tray is what will hold your garment...whether it's a shirt, tote bag, towel, wine bag or something else.
Slide off the clear top cover. You can use this as a guide to help mark where your design should be positioned, but I found it easier not to use it.
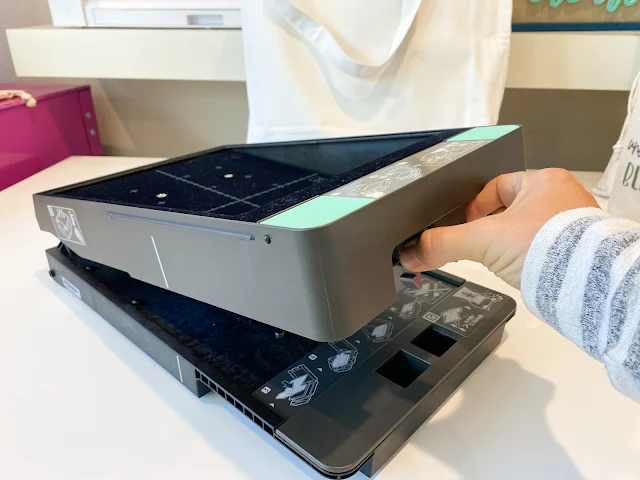
On one end of the tray are gray buttons that when squeezed will pop open the hinged top part of the tray.
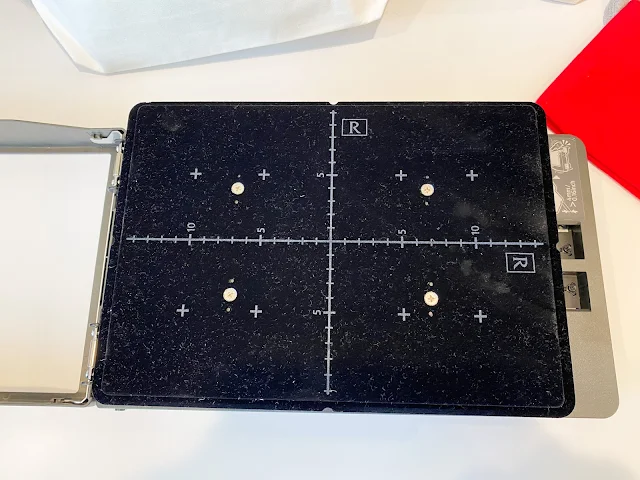
The black tray is marked with two R's and a bunch of other marks. The top of your garment needs to be in the direction of one of those two R's. In most cases, if the design is larger or horizontal you will want the top of the garment to be in the direction of the R on the long side of the tray allowing the design to be printed up to 11" wide - such is the case with this tote bag.
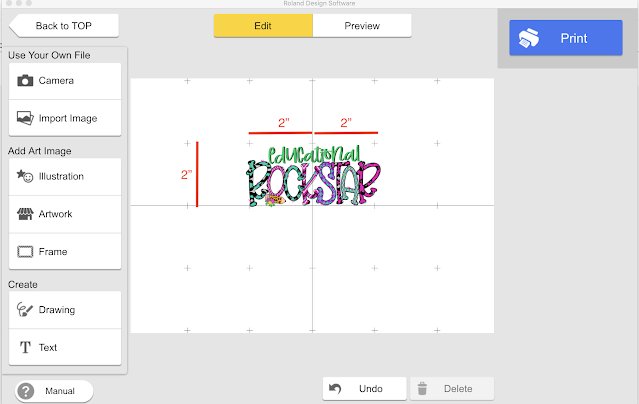
The + marks on the black tray are all 2" apart....and they correlate to the same marks in the software. This is important because the software does not tell you the size or dimension of the image you import. You need to base the size solely off these marks. (More on that in a minute)
I find if you fold the garment in half and line the center fold up with the center line on the tray (making sure it's correctly oriented with the right "R") then unfold the item so it fully covers the tray, you can center the design correctly!
The area of the textile that's on the tray is where the image will be printed.
The rest of the garment needs to be tucked under the tray.
The top should be smoothed out, before that top part of the tray is locked back down.
Setting Up an Image to Print in the Roland Design Software
Launch the Roland Design Software and select "Advanced Designer" which is ... not very advanced.
Select the type of garment you are working on...if the specific item isn't listed just pick the one that's closest in textile type and thickness.
In the bottom section select the orientation of your design. This is about the trickiest part of the process but you will get used to it.
Select the A4 tray (that's the one that came with your printer) and then pick Landscape or Portrait. Remember, this is determined by which "R" the top of the item is lined up with...in this case it's Landscape. Click "Ok"
On the left side of the software you can import an image, take a picture or use some of the built in clipart. In this case, I click "Import Image" then navigate to the JPEG or PNG that's downloaded on my computer.
Once it loads in the software you can size it. This is where those little marks come in since the size of the design is not displayed. If a design spans two sets of marks that would be a 4" wide design since there's 2" between each set of marks.
Keep in mind the full design area represents the maximum printable area. For this tote bag design, I wanted it pretty much the full printable area so I just centered the design and enlarged it to fill the entire space.
I would also recommend increasing the Contrast and Brightness slightly to get a more vivid print.
You can get a rough preview of what your design will look like by clicking Preview. I say "rough" because the software doesn't know where you positioned the printable area of the garment in the tray or the size of the garment, so the positioning in the preview isn't accurate.
Pre-Heating, Printing and Finishing with BT-12
Pre Pressing:
Assuming the finishing oven has come to temperature (it will beep once it has) open the door and place the cassette tray in there.
Click the timer button to pick "Short" (:30 seconds) and move the handle to the left for "Pressing" mode. This will start the timer. This pre press will get out any wrinkles and moisture in your garment.
When the time is up move the handle back to the middle, open the door, pull out the tray, and close the door.
Printing:
Now place the tray in the printer. The line on the side of the tray is indicates how far in you should push the tray.
Make sure the printer and your computer are connected via wifi or USB. In the Roland Design Software click "Print". Confirm you want to print. On the actual printer click the Start button.
If you get an alert to press the tray down, this is because the garment is too bulky and the laser isn't clearing it. In that case press the Tray Down button and then press Start again.
It will take just a minute or so for the design to print.
Fixing:
Once it's finished printing, remove the tray from the printer, and place it back into the finishing oven. According to the manufacturer (see the cheat sheet in the HB-12 pamphlet) you need to reset the timer to 3:00 minutes "Medium" for a tote bag.
Move the handle to the right for 3:00 of "Fixing" for standard and professional mode which is what is recommended for a tote bag.
If you opt for Standard or Professional mode, set the timer to "Medium" (3:00) and move the handle to the right for fixing. There is no pressing in this mode
Remove the cassette tray from the finishing oven when the fixing is complete.
Unload the bag from the tray by pressing the gray buttons on the end of the tray to release the top and remove the garment.
You can see that with direct to garment, the ink is printed directly onto the garment so there's no hand or feel to the design.
This makes direct to garment specifically ideal on items like shirts, hand towels, and pillows where you don't want a heavy or vinyl-like feel.
Note: This post may contain affiliate links. By clicking on them and purchasing products through my links, I receive a small commission. That's what helps fund Silhouette School so I can keep buying new Silhouette-related products to show you how to get the most out of your machine!
Get Silhouette School lessons delivered to your email inbox! Select Once Daily or Weekly.







.png)


Hi Melissa, great tutorial! How much is the machine and what is cost of inks? Wonder how quickly you go through them. Thanks!
ReplyDeleteIf you click on the name of the machine, it is linked to the price of the printer and the inks at the top of the page.
ReplyDeleteThis is a great tutorial! Are there smaller cartridges for items like the bib in your picture? If not, how do you work around the thicker edges/seams on things like bibs and onesies?
ReplyDelete@ Tara J. - I am wondering this, too! The Roland website has a cassette tray that measures 8in x 5.5in, but I think that would still be too small for the bib shown...
Delete