Getting started with Silhouette CAMEO 4 Pro is pretty quick and easy...and lucky for you I'm going to walk to you through from unboxing to set up!
This Silhouette CAMEO 4 Pro beginner tutorial will explain what comes in the box and how to get your machine and Silhouette Studio software.
Silhouette CAMEO 4 Unboxing: What's in the Box?
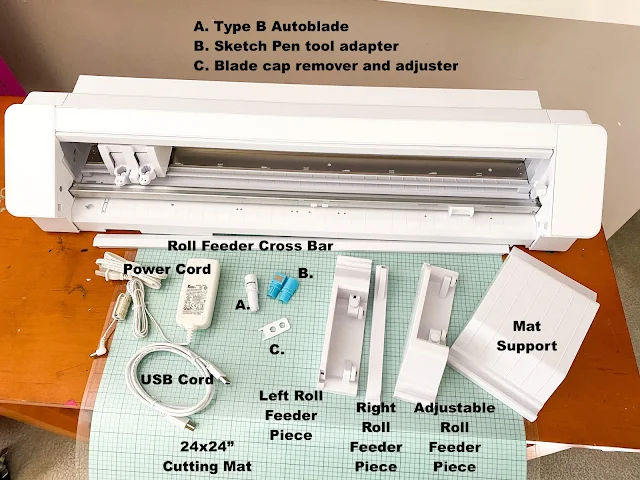
When you receive your Silhouette CAMEO 4 machine, you will not only receive the cutting machine, but several
other necessary accessories in the box including a power cord, USB
cord, CAMEO 4 Auto Blade, ratchet tool, a blue tool adapter for sketch pens, and
24" x 24” cutting mat. (For the record I giggled at the size of the mat!)

- Power Cord: A two part power cord, which connects to the side of the Silhouette CAMEO machine and to a power source to supply power to the cutting machine
- USB Cord: The USB Cord is an option to use to connect the CAMEO 4 Pro with the computer when the Bluetooth connection is not being used
- Type B Auto Blade: A single tap auto-adjusting cutting blade that will automatically adjust the blade depth based on the material type the user selects in Silhouette Studio
- Blue CAMEO 4 Tool Adapter: The blue tool adapters to use sketch pens in the left tool carriage of the CAMEO 4 Pro.
- Blade Adjustment Tool: The tool is used to adjust the depth of the black ratchet cutting blade (not included) and to manually adjust the AutoBlade
- Four Piece Roll Feeder: An adjustable and detachable roll feeder that can be connected in pieces and used to cut various width vinyl rolls
What comes in the box with the Silhouette CAMEO 4 Pro is slightly different than what comes with the Silhouette CAMEO 4 and CAMEO 4 Plus. In fact, it's one of the only differences between the CAMEO Pro vs CAMEO 4 and CAMEO Plus.
Silhouette CAMEO 4 Pro Video Unboxing
To ensure your 24" Silhouette machine cuts and operates correctly, it's very important to make sure all packing material and tape is removed.
Be especially careful to remove the cardboard and foam piece hidden to the left of the tool carriage.
You'll need to move the carriage to the right to remove all the packing material.
Don't forget the piece of tape on the back of the machine securing the built in vinyl trimmer.
Silhouette CAMEO 4 Set Up
Start by connecting the two power cords. The smallest end plugs into the side of the CAMEO 4 Pro.
With the power cord plugged in, press the Power button on the side of the machine to turn on the machine. The control panel on the right side of the machine will light up.
I would now suggest you plug in the USB cord and connect it between the CAMEO Pro and your computer. This is an optional step as the Silhouette CAMEO 4 Pro does have bluetooth.
Open the Bluetooth settings on your computer and pair the two devices if they don't automatically pair. This should only need to be done on initial setup.
Register Silhouette CAMEO Pro to Activate Warranty
Before you begin using your Silhouette CAMEO Pro, you should activate the 1 year warranty by registering your new cutting machine with Silhouette America. The serial number can be found on the back of the machine. Use it as you go through the registration process on the Silhouette America website.
24" Silhouette CAMEO 4 and Silhouette Studio Software Set Up
Silhouette CAMEO 4 requires Silhouette Studio V4.4.350 - at a minimum - to run. All users - new and existing - will need to install this version or higher for the software to recognize the new CAMEO Pro machine.
Please note: You do not need a
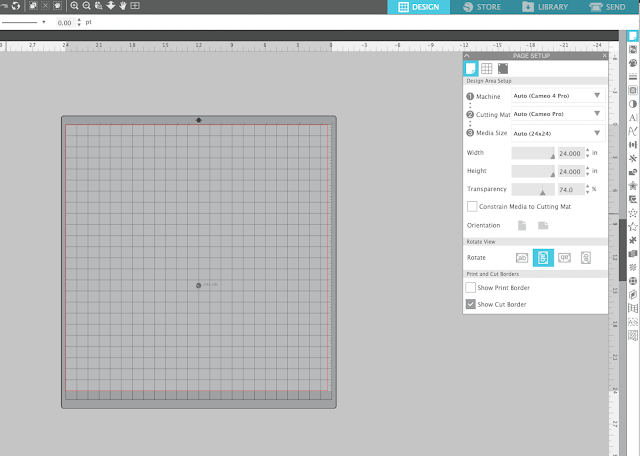
Silhouette CAMEO 4, Plus, or Pro to run this version of the software. Machine-specific features (such as the 24x24" mat option) will not show up unless a CAMEO 4 Pro, for example, is plugged in and powered on.
Existing Users Adding on a CAMEO 4
If you have an older Silhouette CAMEO or Portrait and are adding a CAMEO 4 Pro on you can update the software and basically start cutting with it.Once the machine is connected to your computer via USB and/or Bluetooth and powered on, the software should recognize it in your Send panel's Machine List.
Select the machine to pick it to cut with...once selected, "Auto" settings in the Page SetUp panel will adjust to match the selected machine.
Any software upgrades - Designer Edition, Designer Edition
Plus and Business Edition - should automatically go with the software
update and you do not need to re purchase an upgrade to use with your
CAMEO 4. If the software upgrade becomes de-activated follow this
Silhouette tutorial to find your license key and reactive the Silhouette Studio upgrade.
Create a free Silhouette America account here. This is a necessary and mandatory step.
Next launch the Silhouette Studio software you downloaded and installed on your computer. Start by going to the Library tab along the top right. This will prompt you to sign into the library. Use the same log in credentials you used to create your Silhouette America account.
Note: This post may contain affiliate links. By clicking on them and purchasing products through my links, I receive a small commission. That's what helps fund Silhouette School so I can keep buying new Silhouette-related products to show you how to get the most out of your machine!
Silhouette CAMEO 4 Pro Beginners: Brand New User Set Up
In addition to the steps above to register your CAMEO 4 Pro and install the Silhouette Studio software for the first time, you'll also need to create a Silhouette America account and set up your Silhouette Cloud in your Silhouette Library.Create a free Silhouette America account here. This is a necessary and mandatory step.
Next launch the Silhouette Studio software you downloaded and installed on your computer. Start by going to the Library tab along the top right. This will prompt you to sign into the library. Use the same log in credentials you used to create your Silhouette America account.
You'll want to set up the Cloud right away. Once signed in, your name will appear at
the top left of your library with several default folders underneath.
The sub folder "Free With Machine" within the Design folder is where
the free Silhouette designs that come with the CAMEO 4 Pro can be found.
Designs you import into the
software and those designs you create and save to the library will be
stored in the User Designs folder unless you create and specific a
different sub folder.
Cutting Different Width Materials on the CAMEO Pro
When you're ready to make your first cut with the Silhouette CAMEO 4 Pro you may need to make some adjustments on your machine as well.
Depending on the size of the material and/or the cutting mat you are using, the right roller can be adjusted to make it possible to cut material between 8" wide and 24" wide both with and without a cutting mat.
To adjust the right roller's position along the roller bar on the CAMEO Pro, flip the roller bar lever down.
Move the right roller to line up with the appropriate mark on the roller bar.
In the picture above, I have marked the roller positions in red to make them easier to see. Here's what they look like close up...
After moving the roller to the correct position, flip the roller bar lever back up to lock the roller bar in place and lower the roller so it can grab the mat or material as it feeds through.
CAMEO Pro Mat Support
If you are cutting with the Silhouette CAMEO 4 Pro mat support, hook the lip under the front of the machine so it pops into place. Make sure the machine is still sitting evenly on the surface when the mat support piece is installed.
Adjust it so it's towards of the middle of the machine so it helps support the 24x24" cutting mat.
CAMEO 4 Pro Cross Cutter
The CAMEO 4 Pro cross cutter is found along the back of the machine. Press down the locks on each side at the same time to unfold it before using it.
CAMEO Pro Roll Feeder
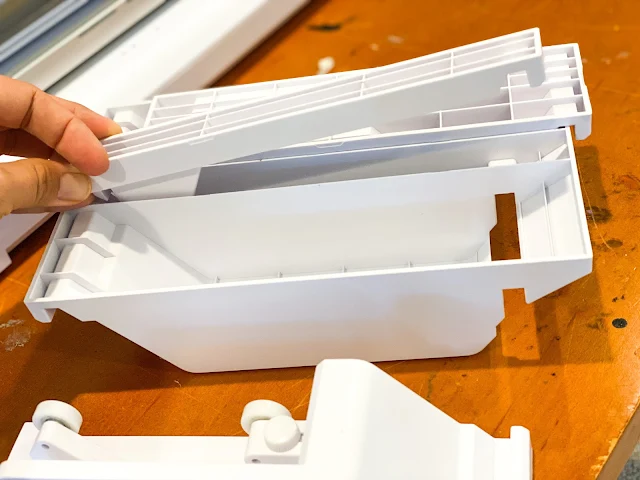
If and when you are cutting rolls of vinyl or HTV you will want to assemble the detachable roll feeder. The roll feeder comes in four pieces. There are two roll holders, an end-piece locking mechanism which helps keep the whole thing in place, and a bar that stretches across all of them.
Hook all four pieces into the lip under the front of the CAMEO Pro and then place the crossbar into place.
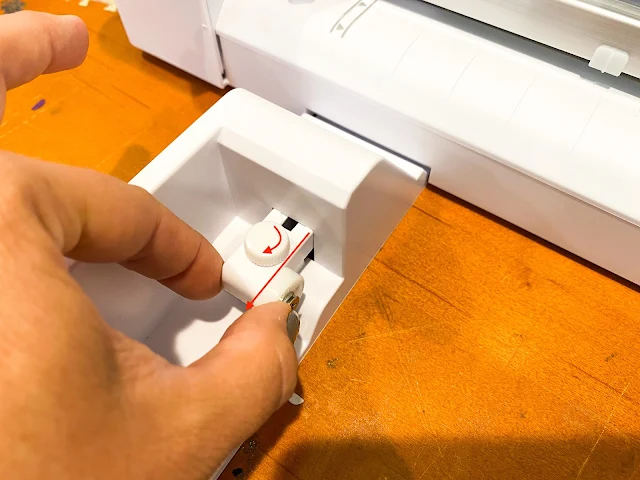
You can adjust the position of the roll feeder cradle to accommodate different length / thickness rolls by turning the lock and and extending the roller extension piece on each the left and adjustable roll feeder piece.
Tighten the knob to keep the extension roller in place.
When you are not using the roll feeder you can nest it together to store.
And your Silhouette CAMEO Pro is all set up!
Keep in mind, all of the free tutorials on Silhouette School Blog are still applicable to the CAMEO 4 - you will find just very slight differences with the advancements of the AutoBlade and tool adapters.
Get Silhouette School lessons delivered to your email inbox! Select Once Daily or Weekly.


.png)


I am at a fork in the road. I need a new vinyl cutter. I bought my first Silhouette product in 2013...a Portrait. Since then I upgraded to a Cameo 3 and have replaced it 2 times already. Hence the reason for a new cutter. Ever since a firmware update, my cutter has never been the same. I have a custom apparel business and need a larger cutter to help with material cost and my time. I LOVE Silhouette Studio and have gotten quite good at it. I am scared to make the jump to a larger, business like cutter. Do I trust I will not have the software issues I did with my Cameo 3 (started this year only...up until then all was great. I just wore my first 2 Cameo 3's out) and purchase the Pro. Do I go with a GCC AR-? Advice?
ReplyDelete