Before I get to the Silhouette Model Maker beginners tutorial I just want to lay it all out there.
Initially, I was not a huge fan of Model Maker. As a beta tester and one who has a pretty good pulse on what Silhouette crafters are looking for - my initial reaction to the software was it's way too advanced for the hobby crafters and designers who are using their Silhouette cutting machines to craft and run small business. Silhouette America admits - and does not apologize - for the engineering-heavy software. It's definitely geared toward educators and the STEM classroom. You will feel that as soon as you open the software. Don't be tempted to shut it down and never go back.
The more I started using ModelMaker the more I realized it's not only very useful in creating 3D shapes and designs, it's also not that hard to use IF you stick to the basics which is what I would HIGHLY suggest Silhouette crafters do - especially until you get over the deer-in-the-headlights feeling.
With that being said - I'm hoping to help you get started with Silhouette ModelMaker quickly. Once you - and I - get the hang of it (I just purchased and started using the full non-beta version on Thursday) I'm sure we'll get more comfortable and more adventurous! And just to give you a little taste of the awesomeness that is ModelMaker I'm sharing the first 3D design I created with you today - for free! You'll find it below.
So here are 10 Getting Started Tips for Silhouette Model Maker Beginners:
1. You can use ModelMaker on a trial basis before you purchase the personal license for the 3D software. The test version allows you to use Silhouette ModelMaker for 15 minutes, but will not allow you to save your designs.2. ModelMaker software is a totally different software than Silhouette Studio. Like the Designer Edition and Business Edition license keys, it's a one time purchase. Unlike Designer Edition and Business Edition, you will need to install a separate software rather than upgrading your current Silhouette Studio software. After you purchase the Silhouette Model Maker license key go to www.silhouetteamerica.com/software and select either the Windows or Mac version of ModelMaker to download.
During the software installation process you may be prompted to enter the password on your computer - this is different than your license key. Enter the password to complete the rest of the installation. Once ModelMaker launches you can use as a trial user or if you have purchased the license you can enter it from the Help menu.
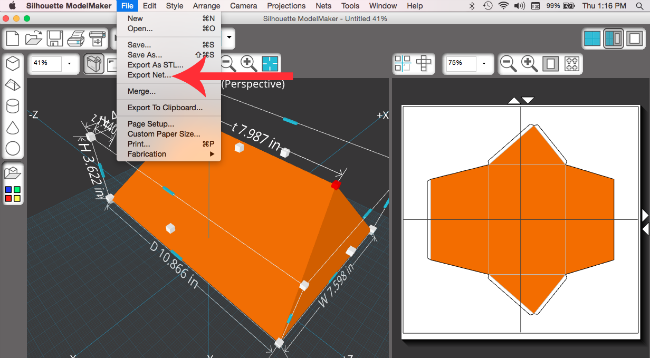
3. Change the work area view to see both the 3D and 2D (flat shape) by clicking the icons on the top right. The icon in the middle will show you both the 3D and 2D flat shape at the same time.
4. If you'd like to change the default measurement units from centimeters to inches or another unit go to the Silhouette ModelMaker menu > Preferences > Units. Change the unit and click Ok.
5. Start with basic shapes - like a box or cube. The Quick Shapes tool is very helpful. Click it with your mouse. Find your desired shape and drag the shape from the QuickShapes folder into the work area.
You can adjust the size of the shape by first selecting it then pulling the squares on any of the sides in any direction.
You can also enter an exact dimension by right clicking the shape and choosing Parameters. There you can manually type in the size of each side of the shape. The maximum size box that will fit on a 12x12 sheet of paper is 3.25"x3.25"x3.25.
At this size the flat design will appear to not fit on a single sheet. Keep in mind the page size in ModelMaker is set to 8.5x11" by default. To change the paper size in ModelMaker go to File > Custom Paper Size and pick 12x12 from the drop down menu.
6. To draw your own shapes in ModelMaker use your mouse to pick a basic shape from the left sidebar then use your mouse to draw out the shape in the work area. Grab the white nodules on the top to change the depth of the design and the red nodules to move the 'fold' lines.
7. You can cut on your Silhouette CAMEO, Portrait or Curio directly from ModelMaker or you can export the file as an SVG and open in Silhouette Studio to make changes, customize or add patterns.To cut directly from ModelMaker click the "Cut" icon along the top tool bar and follow the prompts.
8. To export your design as an SVG file and import into Silhouette Studio go to File > Export NET. Name the file and save to your computer's hard drive.
Then go into Silhouette Studio (you will need Designer Edition to open the SVG) click File > Open.
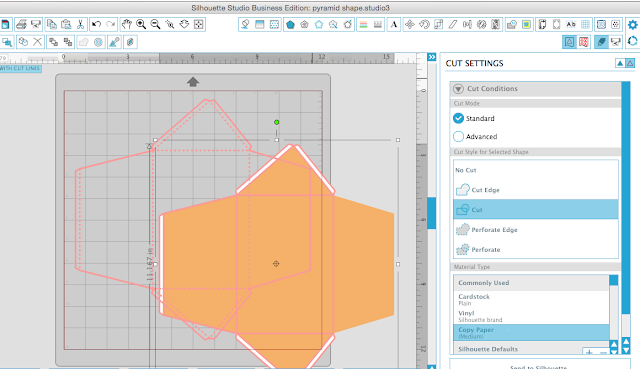
9. When the design opens in Silhouette Studio it will open with several layers. Select the layer with the solid black line > go the Line Style tool > Perforate. These are the fold lines and you want them to cut as perforated lines, not as solid cut lines.
You can choose to either delete entirely or turn off the Cut lines on the solid filled piece (orange here). I prefer to delete it unless I am using it for a print and cut.

10. If you want to add any details to your design such as cutouts do so now. For example with this box shape, I added a heart to the top flap and then added a few other hearts that I could use as embellishments after the design was cut and assembled.
TIP: To fit a larger design on a piece of 12x12 paper, rotate the design slightly.
Finally, cut your design on your paper of choice and assemble using your favorite adhesive!
Want to make the same 3D box? You're in luck. I'm sharing the Free Silhouette Studio 3D box design with you today in honor of Freebie Friday and the launch of Silhouette Model Maker! Please keep in mind this design is for personal use only! If you wish to share it please share the direct link back to this tutorial rather than the link to the file or dropbox. Thanks, loves!
Note: This post may contain affiliate links. By clicking on them and purchasing products through my links, I receive a small commission. That's what helps fund Silhouette School so I can keep buying new Silhouette-related products to show you how to get the most out of your machine!
Get Silhouette School lessons delivered to your email inbox! Select Once Daily or Weekly.


.png)


Thank you,for all you do
ReplyDeleteI purchase the cameo 2 years ago and only took it out in July when I bought your ultimate ebook
Yesterday I cut my first sheet. Didn't work but I'm trying again today. Thank You!
Not holding a candle to your level of expertise and creativity, I can see that this software will make different shaped boxes, but how else would you use this software to justify its price. I have a software program that allows you to make 3D cards (made by Make the Cut) and it seems much more useful to me. I know you have made more than the heart box. Could you show us some more examples of what this software can do?
ReplyDeleteAs always, I so appreciate your keeping us up-to-date on what is happening with Silhouette and how you creatively take it up a notch.
Thanks so much.
David
I'm so excited for this new model maker software. I have been wanting to make my own 3d designs but couldn't wrap my head around how to go about it! Yay silhouette!
ReplyDeleteThis is so exciting!!! I just bought it!! I never would have known about it if it wasn't for this blog. Thank you!
ReplyDeleteHi Melissa do you know if you can import templates into Model Maker? For instance I have a design I purchased from the design store but its too small for what I want it for :-( can I import that into model maker and make it bigger? Thank you
ReplyDeleteHi Melissa, do you know if you can import a file into Model Maker and alter it? I bought a box design from Sil Design store but its too small for what I want to put in it :-( so could I import that file into Model Maker and make it bigger? Thank you
ReplyDeleteThere is the potential here to make a pattern to trace onto materials too thick to use on the cutting machine -- heavy cardboard, mat board, wood. . . . You could build anything.
ReplyDeleteThe announcement for ModelMaker claims it can import and export STL files. I've tried, but can't get them to open - even one I exported from ModelMaker.
ReplyDeleteCan you provide any insight on STL support?
Thank-you so much for all of your information with this new program. I am loving it. Is there a way, after altering a design in SS , to bring it back into MM?
ReplyDeleteGreat tutorial! I will have to look up to see if the price is worth it. Thanx Melissa! Again you are my go to for my Cameo!
ReplyDelete