Copyright Silhouette School 2016. Powered by Blogger.


Silhouette Studio Hack: How to Make Text Bold, Italicized and Underlined

One thing you'll notice as you use Silhouette Studio is a lot of the time the options to bold and italicize fonts is 'greyed out' or unavailable. But that doesn't mean you can't actually make fonts bold, italicized, underlined or given a strike through in Silhouette Studio....you just need to know this Silhouette Studio hack!

silhouette studio hack tutorial cameo beginners underline bold

Let's take each of these font styles one and one to see how the affect can be added in Studio.

How to Make Text Bold in Silhouette Studio

Click the text tool on the left sidebar and then click in the work area to start a text box.

silhouette studio text tool tutorial

Type out your word.

From the Font Style box on the right side, pick your font.

silhouette studio font style tool text tool beginner cameo tutorial

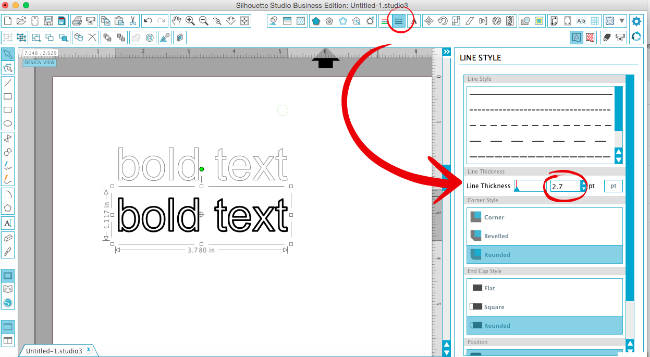
To make the font bold in Silhouette Studio, click the Line Style tool.  Increase the line thickness to give make the text bold.


Use the Fill Color tool and fill the text with the same color as the line color.

making text bold silhouette studio cameo tutorial beginners

Click the Cut Settings tool and click "Cut Edge."

can't bold text silhouette studio work around hack silhouette cameo tutorial

How to Make Text Italicized in Silhouette Studio

*To make the font italicized in Silhouette Studio, you'll need Silhouette Studio Designer Edition.

Click the Text tool on the left sidebar ('A') and then click in the work area to start a text box.
Type out your word.

From the Font Style box on the right side, pick your font.

Select the text by clicking on it.

italicize text silhouette studio tutorial, silhouette studio fonts, italics 
Click the Shear tool and pick one of the degrees to slant or italicze the text.

silhouette studio make text italics silhouette cameo

silhouette studio make text italics, shear tool, designer edition, silhouette cameo tips

How to Underline or Strike Through Text in Silhouette Studio

Click the text tool on the left sidebar and then click in the work area to start a text box.

Type out your word.

From the Font Style box on the right side, pick your font.

Click the Draw a Line tool from the left tool bar.

underline text silhouette studio, silhouette studio tutorial, silhouette studio hacks, silhoeutte cameo tutorials


Select the line and click the Line Style tool.

Increase the line thickness dramatically.

how to understline text silhouette studio tutorial, silhouette cameo, silhouette studio tutorial

With the line still selected, go to the Cut Settings window

Click "Cut Edge" - this will tell the software to cut around the edge of the line rather than a splice through the middle of it.

silhouette studio cutting edge of line
You can use the same concept to strike through text if you are printing or cutting on different color materials...just move the line over the text.

However...if you want to weld the strike through line and the text, you will need to use the Draw a Rectangle tool to create the strike through, as opposed to the Draw a Line tool.

strike through text silhouette studio, silhouette cameo tips, silhouette cameo beginner tutorial


Note: This post may contain affiliate links. By clicking on them and purchasing products through my links, I receive a small commission. That's what helps fund Silhouette School so I can keep buying new Silhouette-related products to show you how to get the most out of your machine!


Get Silhouette School lessons delivered to your email inbox! Select Once Daily or Weekly.


www.silhouetteu.com

1 comment

  1. BRILLIANT!!!!!!!! I would never had thought of that on my own. Thanks!

    ReplyDelete

Thanks for leaving a comment! We get several hundred comments a day. While we appreciate every single one of them it's nearly impossible to respond back to all of them, all the time. So... if you could help me by treating these comments like a forum where readers help readers.

In addition, don't forget to look for specific answers by using the Search Box on the blog. If you're still not having any luck, feel free to email me with your question.