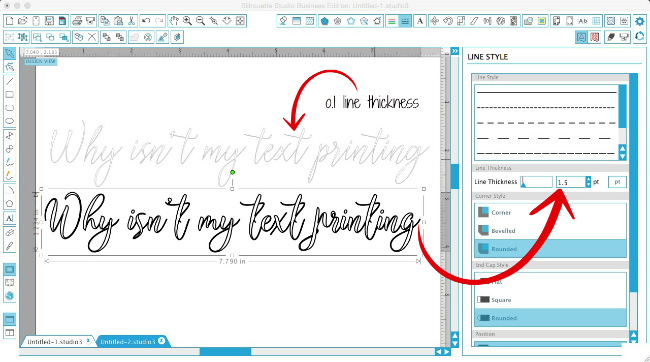
Let's take this example using the beautiful Amigirl Scrip and Azzura fonts from The Hungry JPEG's Crafters Font Bundle. As you can see I have the typed out the text in Silhouette Studio....
...but when I go to print it, as is, this happens. A whole lotta nothin'.
The problem is not the font or your printer, it's actually the weight (or lack thereof) of the line. In Silhouette Studio, the default line thickness is 0.0 because typically you'll be cutting a line with your blade and it will simply splice a line that has no weight.
BUT when you want to print from Silhouette Studio, you need to give those lines a weight if you want them to actually show up on the paper.
To do that click the Line Style window. With the text selected, increase the Line Thickness. Any increase will produce a printed line, but the higher the number, the thicker or bolder the line.
A line thickness of .1 will produce a very faint line when printed, while a line thickness of 1.5 will produce a bold line.
NOTE: Also, if your text or design has line weight but it (or part of it) is not printing, it's because it's outside the print area - as is the case with the missing 'W'. Check the box for Show Print Border in the Design Style window to see the safe printing area.
If your text or design is filled in with a solid fill color it will print the solid color. It will not print the line around the border of each character unless the line has a line weight. This is ONLY important to remember if you want the line color and the fill color to both show and both be different colors.
For example below, the top line of text is red with a barely visible black line (weight 0.0) around it in Silhouette Studio.
The second line of text is filled with red with a black line with a weight of 1.5.
Because the weight of the black line on the top row is 0 it will not be printed at all. The bottom row has a line thickness of 1.5 and therefore you get text that is red with a bold black outline.
The bottom line is - if you don't have a line weight nothing will print on your print and cut designs.
And finally, I couldn't let you go without sharing where I got these two fabulous fonts! They're just two of the eight fonts in the $15 Crafters Font bundle from The Hungry JPEG. What I LOVE LOVE LOVE about this bundle is all eight of the fonts included are specially coded for Silhouette crafters so all the extra characters and glyphs are accessible in Silhouette Studio without the need for any other programs! And of course the commercial licenses are included!
Note: This post may contain affiliate links. By clicking on them and purchasing products through my links, I receive a small commission. That's what helps fund Silhouette School so I can keep buying new Silhouette-related products to show you how to get the most out of your machine!
Thanks for coming to class today at Silhouette School. If you like what you see, I'd love for you to pin it!

Get Silhouette School lessons delivered to your email inbox! Select Once Daily or Weekly.


.png)


Thanks, good tips.
ReplyDeleteBut you also have to say "print cutlines" in the "linestyle" menu. I hope this is correct English!
ReplyDeleteThank you Martine! I couldn't get it to work until I read your comment :)
DeleteThank you, Melissa. Often your tips arrive just at the time whe I need a particular one. The outside line thickness is the one I needed for my project. Makes all the difference.
ReplyDeleteI own the Crafter's Bundle but don't know how to access the extra glyphs, etc. Can you do a post on this sometime? Thanks.
ReplyDeleteYour post is a bit confusing. You are much better off using the bucket fill tool to fill the text with color when printing it. You did mention this, but you didn't show or explain the fill icon. You state, "The bottom line is - if you don't have a line weight nothing will print on your print and cut designs." .. that is not necessarily true. Use the bucket fill tool to fill text with color and it will print. You do not need to change the line thickness at all. It will be a true representation of the actual font. If you want to thicken it a bit, you could change the line thickness slightly and make it the same color as the fill.
ReplyDeleteThank you for this info.
DeleteI'm trying to do a print and cut project and my machine keeps wanting to cut all of the text rather than just the outline shape. Any words of wisdom?
ReplyDeleteOpen the Cut Settings Window. Select the text you want printed, but not cut. Choose NO CUT from the menu on the right.
DeleteMost durable and quality best toner and ink cartridges are available here for all types of printers. Visit begreenink for best deals and offers for all cartridges.
ReplyDeletetoner and ink cartridges
Thank you!! I finally started getting comfortable using SS then it wouldn't print and I couldn't fathom out why. Thank you for saving hours of my life 😂
ReplyDelete