Putting scallops around a square or rectangle is easy; putting scallops around other shapes requires a little workaround (and of course I have one for you) to add scallops to other shapes so that will be Part 2.
Start by opening up Silhouette Studio to a new work area.
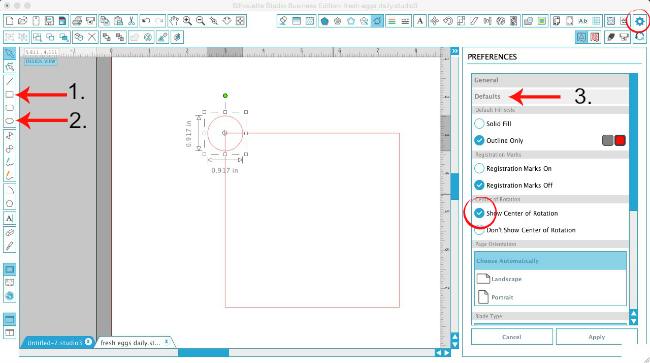
From the left sidebar use the Draw a Rectangle (1) tool to draw a square. You can hold down shift to get a perfect square.
Next click the Draw an Ellipse (2) tool to draw a circle. Again, hold down shift while drawing the circle to get a perfectly dimensional circle.
I usually don't like to keep the center rotation on (that little bullseye looking thing in the center of a shape), but for this type of designing it's actually helpful. If you select a shape and you don't get the center rotation, go to Preferences > Defaults > Show Center Rotation (3).
Now you want to know how big to make the circle so it fits perfect across each edge of the square? There are two options...pick yours!
Option 1: For MATH PEOPLE
I'm not a math person at all...it's kinda scary. BUT if you want to avoid the trial and error of getting the circles to perfectly fit across the square you can use the following equation:
LENGTH OF SQUARE SIDE
(DIVIDED BY)
NUMBER OF DESIRED CIRCLES LESS ONE = Circle Diameter
For instance 5" square / (13 Desired Circles -1) = .416
5/12=.416
Select the square, in the Scale window (blue along the top tool bar below) enter 5" for height/length (be sure "Lock Aspect" box is checked).
Place that circle's center rotation on the top left corner of the square (zoom in if you need to). Pick up below at the *.
Option 2: For NON MATH 'Eyeball-It' PEOPLE
Eyeball the size of the circle to your liking for the size scallops you want. Line the circle's center rotation up with the top left corner of the square.
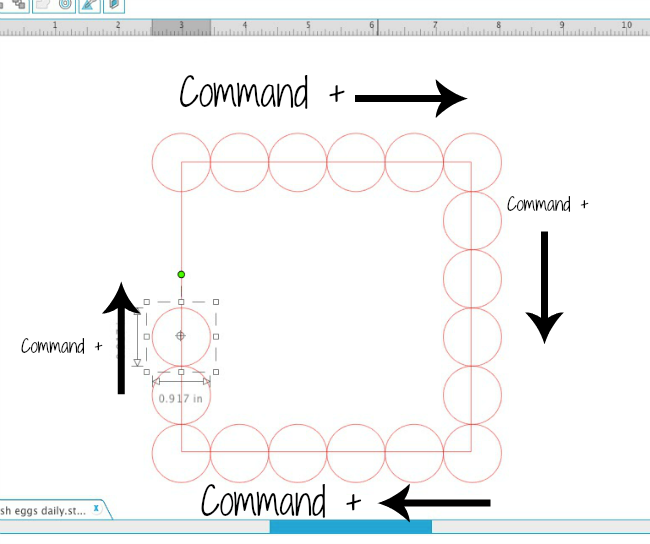
* To quickly replicate the circles across the top line, select the first circle. Hold down COMMAND and press the right arrow key on your keyboard. Every time you press the arrow key a new circle will appear directly next to the previous on.
Repeat until you have circles all the way across the top of the square.
OPTION 2 PEOPLE ONLY: Once you have circles across the top of the square, select the last circle in the line to double check where it's center rotation falls on the box. If you didn't 'eyeball it' exactly and you need to slightly adjust the size of the circles (or the box) to ensure the center rotations of the first and last circle are on the corners, select all of the circles at the same time while sizing.
No matter which way you achieve the correct circle size continue on by putting circles across the other three sides of the box. Select that circle at the top right corner of the box then hold down COMMAND and hit the DOWN arrow key several times. When you get to the bottom of the box > hold down COMMAND + LEFT arrow key. Continue this replicating method until all four sides of the box have circles.

If you want a simple scalloped edge you can select all of the circles and the square > right click weld.
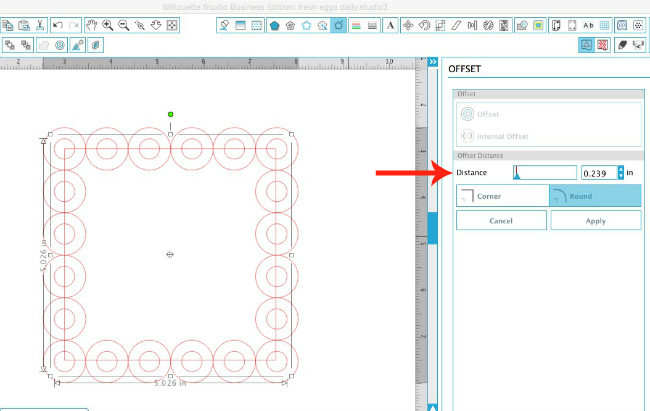
If you'd like a little bit of a fancier scallop, don't weld yet. Select all of the circles, but NOT the square. Pick the Offset tool along the top tool bar.
Click the internal offset and adjust the distance to your liking. Click apply.

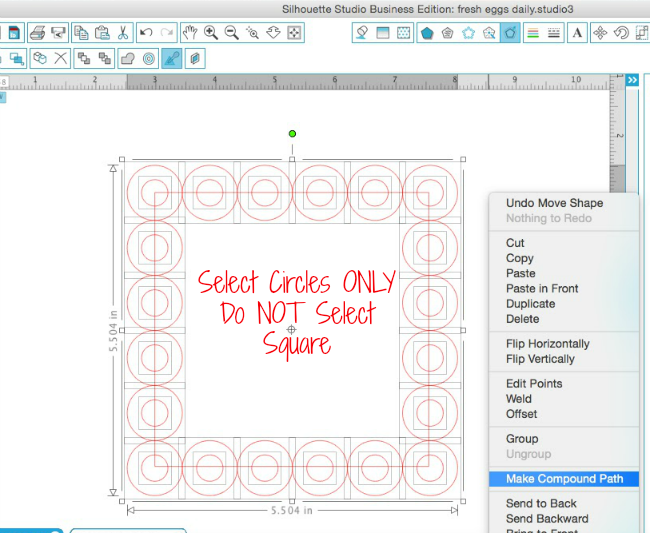
Again, select all of the circles and their internal offsets, but not the square.
TIP: It's easiest to make a big selection box around the entire design and then deselect the square. To do so: Select everything > hold down shift > click the square to deselect it.With only the circles selected make them a compound path: select circles > right click > make compound path.
Now select everything - circles and square and weld them together (select all > right click > weld) to make your scalloped edge.
Ta da!
Tomorrow I'm going to show you a workaround to add a scalloped edge around any other shape such as a circle...and I promise, no math involved!
Note: This post may contain affiliate links. By clicking on them and purchasing products through my links, I receive a small commission. That's what helps fund Silhouette School so I can keep buying new Silhouette-related products to show you how to get the most out of your machine!
Thanks for coming to class today at Silhouette School. If you like what you see, I'd love for you to pin it!

Get Silhouette School lessons delivered to your email inbox! Select Once Daily or Weekly.


.png)


Thanks for all the great post! No command key on my Windows 10 keyboard :(.
ReplyDeleteI haven't tried if it works in this case yet, but "Command" on Mac equals "Alt" on PC
DeleteUSE YOUR ctrl KEY
DeleteThank you Karen! CTRL worked perfectly.
DeleteBrilliant Tutorial After Months and months of Trial and error by me .. thank you xxx
ReplyDeleteGreat tutorial. Thank you.
ReplyDeleteI was having a little trouble aligning the circle at the corner of the box.
I created a new box, scaled it to 5.416", then centered the two boxes and grouped them. I made the rows of circles by using the replicate row command because I had not read Karen's comment yet. Then I duplicated and rotated the circle to get all four sides. Then I used the alignment commands to align the circle row with the larger box on the left and top. Then I aligned as needed for the bottom row and the left and right column of circles. Now I have to try the math thing on a different size and see how it goes.
Looking forward to the scalloping circle tutorial.
Thank you again.
Huh I like your second method. Never was a math person and still am not. Thanks for sharing. Have a good weekend.
ReplyDeleteVERY helpful Melissa! Thanks so much!
ReplyDeleteThis is a great tutorial, thank you. however, I am struggling a little to select the circles and not the square:) Do I need the business version to do this please? I have tried holding the key down to deselect the square but am struggling a bit - probably being a bit thick:):)
ReplyDeleteAny help would be much appreciated and thank you
You can do these steps on any edition of the Silhouette Studio software:
DeleteClick outside the whole set of shapes (circles and square), then (still holding down the mouse button) drag a box over the whole thing (let go of the mouse after this). Then, press and hold the SHIFT key, and, while holding that down, click just the square (I found it easiest to click the line where it passes through one of the circles). All of the circles should still be selected.
Alternatively, you can press and hold SHIFT while clicking on each circle individually.
Hope this helps! =)
Thank you I will give that a try when I open the programme again
Delete