Find the Center of a Shirt for Decal Placement
The first thing I do is find the exact center of the shirt. The easiest and fastest way to find the center of a shirt is to fold the shirt lengthwise lining up the shoulder seams at the neck. Be sure the bottom hem is aligned too.
Fold the shirt in half at the bottom of the arm pit (the shirt will not be folded evenly in half). Press the shirt with an iron or heat press to create the two creases.
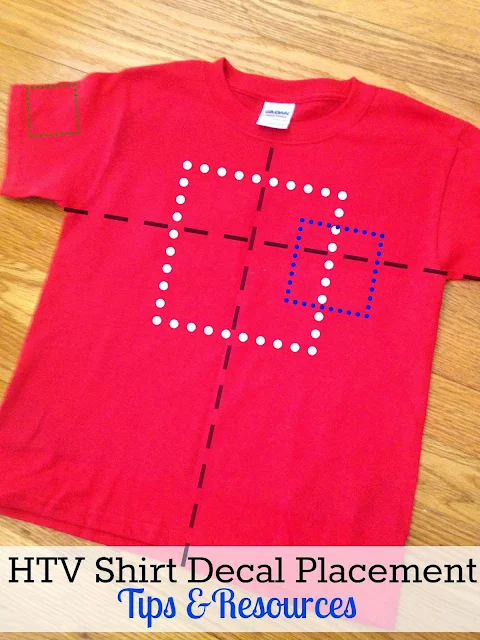
When you unfold the shirt the crosshairs mark the exact middle of the (upper) shirt. The vertical line is the most important, in my opinion, because once you find the middle of your decal you can easily center your design along that line.
Fold your Heat Transfer decal in half - with the carrier sheet sides together - and crease it. This will give you the exact center of the transfer.
Now you can line up the crease on the HTV shirt decal with the crease on the shirt.
HTV Pocket Decal Placement
If you are adding a pocket-area design to a shirt that does not have a pocket it can be confusing where the design should be located. To find the correct placement for a heat transfer vinyl pocket size decal, lay the shirt out flat. You want the design on the left side of the chest.Looking at the shirt, at the seam where the right shoulder hits the neck opening draw a visual line down...at the same time from the right armpit seam draw a visual line in. Where these two lines meet is where the pocket HTV design should be placed. It may seem like this pocket decal placement is too far towards the center of the shirt, but any further to the right and the design will start to creep under the arm slightly.
Back Heat Transfer Decal Placement
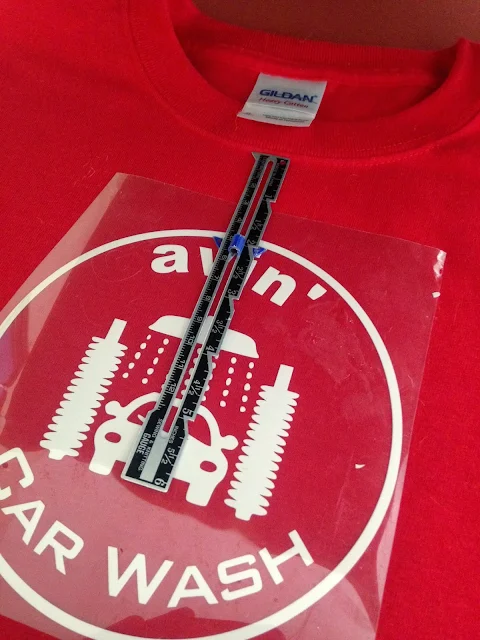
Back designs should be placed using the center crease and four inches down from the center of the neckline.There are more information on applying to backs of shirts and other size shirts in this tutorial.
Recommended HTV Decal Sizing
Another common question is what size should the HTV decal be. I think it all depends on the size of the shirt and if it will be worn by a child, youth, man or woman. I make children's pocket size decals 3"x3" and adults about 4"x4" making the design slightly large for XL and XXL men's shirts.Centered designs for children I typically make between 5"-6" and 7.5"- 9" for adults. 123Stickers.com has some good guidelines for design sizes as well.
Just remember...the cardinal rule of HTV measure twice, press once. And if you do make a mistake don't worry, you can remove HTV with this little trick.
Oh and if you're in need of Heat Transfer Vinyl - check out the single sheets, rolls, and bundles at Swing Design! Use code SISER25 to get 25% off!
What tricks do you use for placing decals on shirts? Share your secrets in the comments.
Note: This post may contain affiliate links. By clicking on them and purchasing products through my links, I receive a small commission. That's what helps fund Silhouette School so I can keep buying new Silhouette-related products to show you how to get the most out of your machine!
Thanks for coming to class today at Silhouette School. If you like what you see, I'd love for you to pin it!


.png)


Thanks for the tutorial! Now I just need a sale to purchase a heat press.
ReplyDeleteAmazon has heat presses on sale cheap.I bought the swing away but didn't like it.I then bought the lift up and love it
DeleteIf I am pressing a logo for a women's V-neck shirt. Do I still need to go down 3 inches
ReplyDeleteabout an 1.5 inches
DeleteIt's all i've been looking for.
ReplyDeleteThanks for these tips Melissa! I basically just eyeball everything but your method is more exact.
ReplyDeleteGreat tip.
ReplyDeleteDo you have an updated link for transfer express? For placement examples? It says the link doesn't exist anymore.
ReplyDeleteDanielle the link is on their website - http://www.transferexpress.com/recommended-image-sizes
ReplyDeleteThank you for the information! Is the decal placement the same on the back of a t-shirt as it is the front?
ReplyDeletethanks for all these AWESOME tips :) already did this a little bit but more eye balling.. so now I can be more precise and confident with my placement.
ReplyDeleteHow large should I make a decal for the back and a pocket design for a 3X shirt, please? Thank you!!!
ReplyDeleteWhile processing the design size is the biggest problem that every t-shirt designer has facing. I hope this post describes the right fact.
ReplyDeleteThanks for the info. Pretty close what I have been coming up with. Nice to know that I have been close. All the shirts I have been doing have came out looking good.
ReplyDeleteWhen doing an 2x or 3x shirt would you make the size of the pocket bigger
ReplyDeleteI'm just started working with vinyl. I sew primarily and make baby bibs and cloths, etc... My biggest problem is that people have TODDLERS! Can you imagine! LOL
ReplyDeleteI've decided to start making Mommy & Me/Dadddy & Me shirt sets for toddlers and some onsies as well. Since this is not the center of my business I can't really justify a heat press right now. Maybe at the end of the year. I have a really good iron and I've purchased a Teflon sheet. I've also gotten Sisser heat-transfer vinyl. Do you have any other tips to prevent peeling in the long run?
This is SOOOOO helpful! Would love your recommendations for back placement? (I have a sense of size, though I always prefer to keep the same size if possible for kids and adults when I do a mixed group. Except for maybe the XXL and above.) For the chest design, it depends on the logo/shape for anyone asking sizes above. I prefer 3" x 3" but it can be up to 4" x 4" - I definitely go smaller if it's a youth shirt. For the back, I'm more a fan of 9" x 9" - 10" x 10" vs up to 12" x 12" but then again, it depends on the size. :)
ReplyDeleteI was looking for back placement as well.
ReplyDeleteThank you so much! You answered all the questions i was asking myself as a first time HTV user. Wonderful info that we can defiantly modify your suggestions to our liking like design size. Again thank you so much for all of your help! :-)
ReplyDeleteHave you posted another one that was black and white. It had a spot under the arm over about 3 inches and down 8 o4 10 inches? Diane
ReplyDeleteI need to put something on the belly of a maternity shirt. How do I find the spot that will he the center of the belly and is there a trick to working with the ruched sides?
ReplyDeleteI'm making my first customer order t-shirt tonight. Thanks for the how-to on figuring out where to put my image. I really appreciate all of your hard work! Thank you <3
ReplyDeleteThank you so much for this tutorial! I am a newbie to htv and your website helped me get answers to about all of the questions I had.
ReplyDeleteI am doing a set of family shirts for a birthday party. The Mom wants all of them to have pocket size decals. the size of the shirts are 18M, 3T, 5T, 8, and Adult Medium and XL
ReplyDeleteWill all the Kids but a 3x3 Size?
Hi Jamie! We just responded to your FB message. From this it sounds like the shirts don't have pockets already? You could always cut the 3x3 for the other kid's shirts and see if it looks too big on the toddler shirt.
DeleteHow about placement on sleeves for long sleeve shirts? Thanks in advance!
ReplyDeleteThis is for short sleeves but it is the same general idea: https://www.silhouetteschoolblog.com/2020/08/htv-sleeves-seam-placement.html
DeleteHi, here's my dilemna . . . Have to do multiple shirts using htv for a family reunion. The names on the shirts are all different lengths. For example name on top of first shirt is "Liam" with 4 other smaller names below (family tree, sort of). The next one has a name of "Stephanie". How do I set it up so these shirts look alike? Do I decrease the font on shorter names? Not sure how to handle this. Any help/
ReplyDeleteHi there! You could do something like this: https://www.silhouetteschoolblog.com/2015/01/silhouette-studio-word-art-tutorial.html
ReplyDeleteAre there any guidelines for putting a design or lettering on the back of the shirt?
ReplyDeleteYou'd use the same process as the front but when you're measuring from the back collar you'd add the distance from the top of the collar to the front collar and add the 3 inches.
DeleteThanks for the information Melissa! I've always wondered how to measure for the back of the shirt and information was not available anywhere.
DeleteThank you for this handy guide. One question: recommended size for back decal?
ReplyDeleteHey there! It really depends on the design. I'd double probably make it the same size as the design for the front.
DeleteDo you adjust for women's t-shirts? So the left chest placement doesn't sit right on the breast bump?!
ReplyDelete