Let's start from the beginning though. The Iron Ons come in 8 x 11.5" sheets that can be run through your inkjet printer. They're great for more complex and colorful designs that would be hard, if-not impossible to achieve with regular heat transfer vinyl. For instance, this pair of shades has a slight grading effect in the lenses. You're not going to get that on regular HTV, which is where SQ1 Iron Ons save the day.
I found my design on PicMonkey. PicMonkey.Com > Design > Overlays (butterfly) > Sunglasses. The little crown next to the glasses indicates they are part of PicMonkey's paid upgrade service, Royale. If you're not into paying $33 a year for access to all the designs, fonts, and layouts that's cool - just pick another one of the FREE options - there are tons!
The glasses were originally a tan color, but I used the color editor to turn them a shade of pink since this onesie is for a baby girl. Make sure you change the background to transparent by clicking on the top "Basic Edits" Icon (top icon on the left side...looks like a crop tool) > Canvas Color > Transparent. This just makes it a lot easier to trace the design in Silhouette Studio.
Save the design to your desktop. It will save as a .PNG file if you have a transparent background. If not you will get a .jpeg file. Either way...open Silhouette Studio and drag your deisgn into the work area. If you're not sure how to do this click here for a tutorial on bringing any JPEG, GIF or PNG into Studio. Once the design is in Studio, you can resize it if necessary before tracing.
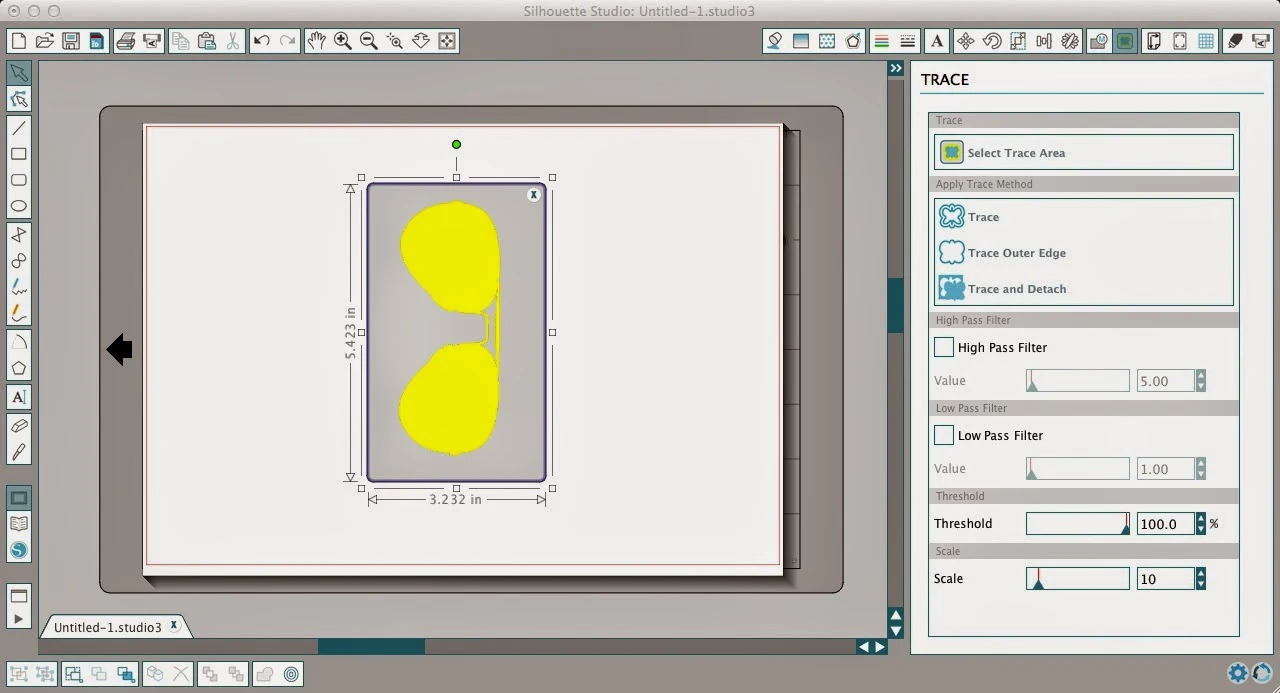
Now let's do a trace. Click on the "Open the Trace Window" icon (highlighted in blue along the top right tool bar below). Click Select Trace Area. Then draw a box around your design. Uncheck high pass filter and move the threshold bar toward 100 until your design is filled in yellow. Now pick the type of trace you want. Originally I went with 'Trace" but the nose bar thingy between the lenses was such a thin cut line I decided to "Trace Outer Edge" instead.
After I've traced, If I move the design a little bit you can see my trace line...
I gotta move it right back exactly where it was or the print and cut won't work accurately! It's a good idea to group the cut line and the image so they stay together especially if you are going to resize any more or move the image around the work area.
Before you print be sure to add the registration marks and make sure no part of your design is in the gray area. Click the Add Registration Marks icon then select "Type 1 CAMEO/Portrait" from the drop down menu.
Remove the sheet from the printer and place it on your Silhouette Cutting Mat. Send it to cut like a regular print and cut design. I use the cut settings for smooth HTV, but you will need to increase the thickness. My blade was on a 5, however you may not need it that high. This blade has been well loved. :)
After the design is cut out just peel up the excess iron on sheet.
Now remove your design from the mat and place it where you want to iron it on. There's no backing or anything to be removed.
With your iron pre-heated to the cotton setting, press your iron down hard directly onto the design for a good 15-20 seconds. You don't need a cloth or anything between the iron and the design like you do with regular HTV. After the 15 seconds, the design should be set, but if any areas are not down completely, add a little more time and a little more pressure.
That being said...this is real life and this mama ain't got time to hand wash my clothes let alone my kids'! For a shirt I made my son, I flip it inside out and wash and dry it like I do the rest of the laundry: in the machine! It's been through two or three loads and it looks just the same as it did the day I made it!
In love with Iron Ons already? Be sure to check out my tutorial on the Square1 Printables, too! You can make wall decals and other print and cut vinyl-like designs!
Disclaimer: I received samples of Square1 Printables and Iron On sheets, but all opinions are 100% my own.
Note: This post may contain affiliate links. By clicking on them and purchasing products through my links, I received a small commission. That's what helps fund Silhouette School so I can keep buying new Silhouette-related products to show you how to get the most out of your machine!
Thanks for coming to class today at Silhouette School. If you like what you see, I'd love for you to pin it!


.png)


did you use a normal printer?
ReplyDeletewow ! what nice look with glasses. really heat transfer is impressive.
ReplyDeletecan you use a heat press?
ReplyDelete