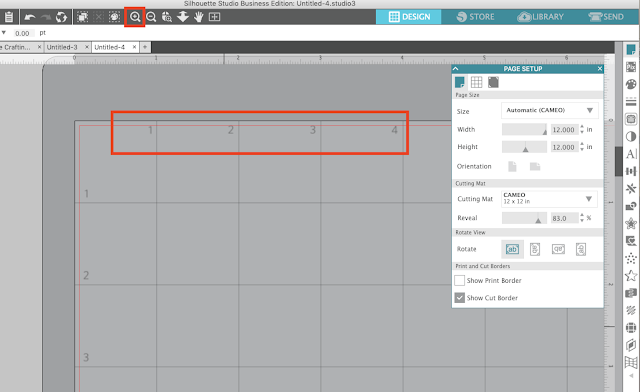
The grid boxes on the virtual mat are super helpful so you can correctly place material on the cutting mat in the same boxes where your design is in Silhouette Studio.
Granted, they could make them a little bigger...but they're there!!
So if you're working in Silhouette Studio and you don't have the grid lines revealed this is what you're work space looks like. Just plain ol' white.
When it's time for lining things up you can reveal the grid lines by sliding over the Reveal bar in the Page Set Up panel to reveal them on the cutting mat.
The boxes correlate perfectly with Silhouette cutting mat...each square on both the mat and the virtual mat is one square inch.

Now here's where the grid box numbers come in handy....
If you have a project that requires you cut several different colors of the same type of material you can cut them all at once, but you have to properly line up the material on your mat. The material has to be covering the exact same squares as the design in Studio or you'll end up missing the material when you cut.
These itty bitty numbers make it much faster and eliminate the need to keep counting and double checking that the boxes are properly matched up when placing your material on the mat!
Note: This post may contain affiliate links. By clicking on them and purchasing products through my links, I receive a small commission. That's what helps fund Silhouette School so I can keep buying new Silhouette-related products to show you how to get the most out of your machine!
Thanks for coming to class today at Silhouette School. If you like what you see, I'd love for you to pin it!


.png)


Thanks for the tip.......better late than never. Love the idea of no more counting!
ReplyDeleteI never tried the "reveal" option, and now I can see through the page to see the grid and the numbers. This is going to be so helpful. Thank you!
ReplyDeleteWhy does the screen have to get so dark to reveal the numbers? It makes it very difficult to see!
ReplyDeleteThank-you! Great tutorial, I have wondered why there were no numbers on the Silhouette grid. In the past I just manually counted the squares. This is so much easier.
ReplyDeletedo you have to have the designer program
ReplyDeleteMy icons across the top right are not the same as yours. I do not have a 'page setting' icon. I have updated my Silhouette Cameo and it says that I have the most current version. Any suggestions?
ReplyDeleteIf you have the basic software that came with the machine than it is the icon to the left of the registration marks window. It is called Design Page Settings. It is the option under Cutting Mat called Reveal. Just found it myself :)
DeleteThank you so much, Monique! I was playing around with the Reveal and it looked like it was just making the mat a darker shade. I didn't realize the numbers were showing up.
DeleteWow! I knew this had to exist!! Thank you, thank you!
ReplyDeleteOooooh!!!!! Thank you SO much!!!!!
ReplyDeleteThank you so much.
ReplyDeleteThis is so fabulous!! I count and re-count all the time!
ReplyDeleteActually, they could make ALL the light blue darker, also. I had found these numbers, but agreed, they are very faded out. Thanks for posting.
ReplyDeleteThanks so much!
ReplyDeleteThank you!!! Ah!!
ReplyDeleteThank you!!! Ah!!
ReplyDeleteI guess I am just stupid. When I zoom my mat no numbers. What am I doing wrong.
ReplyDeleteHOw can you make it stay like that Every time u go back the mat solid white again I hate that!!
ReplyDeleteThis comment has been removed by the author.
ReplyDeleteGREAT!!!!!!!!. THANKS. MELISSA I SEE IN YOUR SCREEN THAT YOU HAVE RULERS UP AND RIGHT SIDE, HOW CAN I SHOW THEM IN MY SCREEN? IT WOULD BE VERY HELPFULL FOR ME. THANKS SO MUCH. ANA.
ReplyDeleteDay totally made!!!! thnx a million
ReplyDeleteOMG! Thank you so much! I always had to count and would end up wasting material if I didn't do it just right! You are so awesome!
ReplyDeleteSuper great tip! Thank you so much! But in my newer version it is called transparency now ... but it is the same place as described.
ReplyDelete