Santa Sacks are hugely popular this time of year. If you're unfamiliar, they're personalized bags from "Santa" that can be filled with gifts and left under the tree. For me, it's just another way to keep my 3 and 6 year old's believing in Santa.
I've seen people making the Santa Sacks on pillow cases - great idea. I prefer, however, the heavy duty cotton laundry bags. I get these extra large (36 x 24") cotton laundry bags - they're sold on Amazon for about $8.
Now there are approximately 20,456 different ways you could decorate these Santa sacks and today I'm going to show you just two. I look for inspiration on Pinterest, Pottery Barn, catalogs, and google image searches and then come up with designs that way combining my favorite elements.
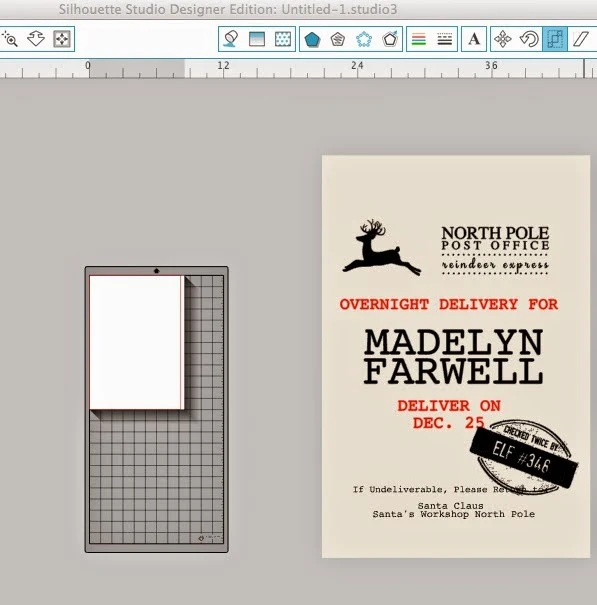
As I shared Friday on the blog, I do all my designing in Silhouette Studio using mock ups. (If you haven't read through that tutorial yet, I suggest you do since it will be very helpful with this project.) It's a great way to create and see what the finished product will look like before actually cutting anything. It also helps get the sizing and layout exactly right.
First let's talk about this postage stamp bag. I don't usually like to gush over my own work, but I mean I am seriously IN LOVE with how this all came together. Look at that precious stamp! (I somewhat doubted how the stamps would trace with all those tiny areas, but they came out perfect!) I got the stamp design, squiggly postage mark, 'elf' stamp and reindeer from PicMonkey. Check out this tutorial if you need details on using Picmonkey designs in Studio.
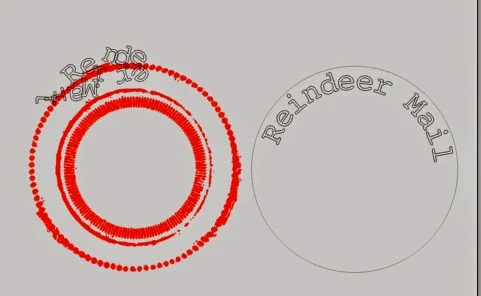
To add the words in the post mark I created a circle that was the exact same size and use text to path to curve the words. Then I deleted the circle and moved the words into the post mark.
NOTE: The reason I couldn't curve the words right in the post mark is because, as you can see on the left, all of the letters were trying to curve around all these tiny little smear marks. But if you create the text curve separately (right) and then move it into place after it's a path, this will not happen.
The reindeer outline was achieved with my 'coloring book style' technique explained here since the original design was a solid silhouette.
My original plan was to have the entire Santa sack boxed out with three rectangles, but what I quickly realized was the HUGE amount of wasted vinyl - indicated by the black areas - in all that open space. I abandoned that idea after the first cut and modified my design in Studio. No one will ever know...
The elf stamp is also from PicMonkey and the font I put in there is Stampete - another PicMonkey font.
It actually weeds far easier than you'd think...especially if you add weeding lines...which I HIGHLY suggest you do.
For the second bag I created a different design that didn't require nearly as much wasted vinyl. The dotted line in the North Pole Post Office decal were created with the rhinestone tool in Silhouette Studio as explained in this tutorial on making polka dot shapes in Silhouette Studio.
Reindeer Express is actually the 'Samantha' font. After I typed out the words I used the character spacing bar in the tool window to space out the letters. You can see the letters are spaced 143.3 % rather than at 100%.
Again, the entire design was created and laid out in Studio before any cutting was done.
TIP: You could create a freezer paper stencil and make your Santa Sack that way, but I think the easiest, fastest and most professional-looking way to do these is to use heat transfer vinyl
When it was finally time to cut, I cut all my same-color pieces as the same time. Don't forget to mirror your text and images if you are cutting on HTV.

As I mentioned above, I would definitely recommend adding weeding lines to make weeding about 20 times easier. I put mine about every two inches. I find the best cut settings for HTV are the default cut settings in Studio, with the blade on a 3 instead of a 2 and a double cut.
While your stencil or vinyl is cutting, prepare your bag. This can be done with an iron or a heat press. I use a heat press and it's very fast. If you don't have one - no worries..maybe you need one, maybe you don't - this will help you figure out if you really should invest in one. Anyway, press your bag so it's nice and flat. Then find the exact middle by folding the bag in half and pressing length-wise. See the seam I created?
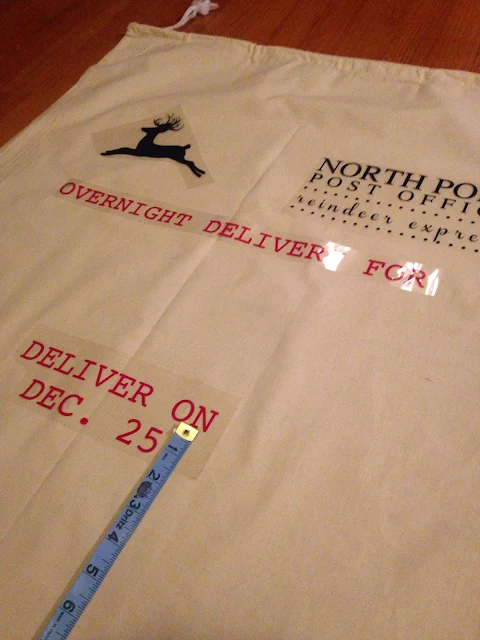
Because these are so large I lay it all out on the floor....
Weed and cut apart your HTV pieces. Use the mock up you made in Silhouette Studio to lay out your pieces on your bag. I start at the top and measure down to make sure everything is exactly straight.
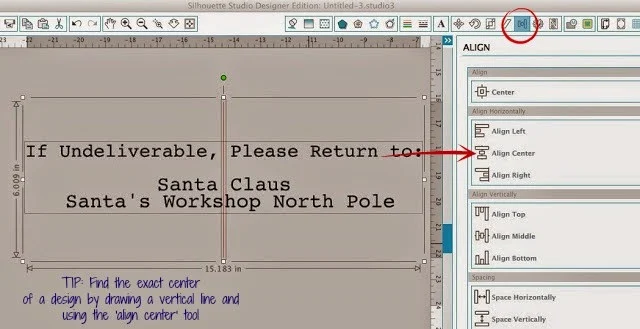
For pieces that needed to be exactly centered I have a little trick up my sleeve. Go back into Studio and draw an straight line (shift + draw a line). Move the line so it's on top of the piece that needs to be centered. Then select both the line and the text at the same time and from the align tool click "center horizontally". This will move the line to the exact middle of that piece of text. Look closely and use the cut piece and align it in the exact same spot along that folded center line you created.
No problem - just press half of the design for the full time, then move the bag over to get the rest of the design pressed into place. After all of the designs are put onto the bag, remove the carrier sheets.
Tie on a pretty ribbon and fill 'em up with gifts from Santa!
I'm so excited about how these Santa Sacks came together. I just know the kids are going to love them!
Thanks for coming to class today at Silhouette School. If you like what you see, I'd love for you to pin it!


.png)


Im here from Pinterest and I am in absolute LOVE over this!!! Ive never heard of them before and I was wondering (Since I dont have half of the tools to do this) do you all have an Etsy page or do you to order these?!
ReplyDeleteOr I mean, it would probably help if I could type correctly hahahha. What I meant to say was, do you have an Etsy page or do you have somewhere where I can order one*
DeleteI purchased plain bags (http://georgiabags.com/collections/wholesale-cheap-canvas-laundry-bags) and then I made my own special santa sacks. It was great. :)
ReplyDeletethanks
I am new to the this. Why does my vinyl not have the clear back as yours?
ReplyDelete