Heat transfer vinyl is a special type of vinyl that can be cut on the Silhouette cutting machines which can then be applied to fabric be it clothing, pillow covers, bags, etc with heat and pressure. Youc an use a heat press or an iron - although a heat press is highly recommended if you're doing a lot of HTV projects or selling at all!
Silhouette Heat Transfer Vinyl Tips for Beginners
I suggest keeping your first heat transfer project a simple one, by working with something easy like a t-shirt that has a big open area and is easy to iron or heat press. You may also want to test out HTV vinyl on an inexpensive piece first until you get the hang of it. I got this shirt at the craft store for just $1.Heat Transfer Vinyl Basics for Beginners
You can buy sheets of heat transfer vinyl at places like Swing Design, Amazon, or Expressions Vinyl. I would recommend using a quality HTV like Siser Easyweed or Chemica brand. These are the best heat transfer vinyl brands for quality and they cut very easily and consistently on Silhouette CAMEO and Portrait.If you start by cutting a smooth HTV like Easyweed - which comes in a lot of colors -you'll learn the basics and feel more confident when you start experimenting with glitter heat transfer vinyl, stretch HTV, flock, and layering heat transfer vinyl for multi-color designs!
Most heat transfer vinyl - with the exception of some patterned HTV - comes on a clear carrier sheets. The HTV must be cut (in reverse) and weeded while still on the carrier sheet. The clear carrier sheet will be removed after the HTV is pressed onto the surface of the shirt.
Silhouette CAMEO and Heat Transfer Vinyl Supplies and Tools
Gather all your supplies before you get started. Here's what you'll need:- Heat Transfer Vinyl
- T-Shirt or other fabric where you want to place the heat transfer
- Hot Iron or Heat Press
- Thin cotton fabric like a handkerchief or sheet or a Teflon Sheet
- Vinyl weeding tool such as a hook
- Silhouette cutting mat
Heat Transfer Vinyl Designs: How to Set Up for HTV in Silhouette Studio
This is a Silhouette Studio V4 tutorial for HTV
Any designs purchased from in the Silhouette Store will be saved in your Silhouette Cloud folder in the Silhouette Studio Library. To access these designs, open your library and scroll down to your Cloud folder. If you do not have a cloud folder, you'll need to set up the Silhouette Cloud to access all Silhouette Design Store designs.
Find your design in your library and double click it to open the design in the work space.
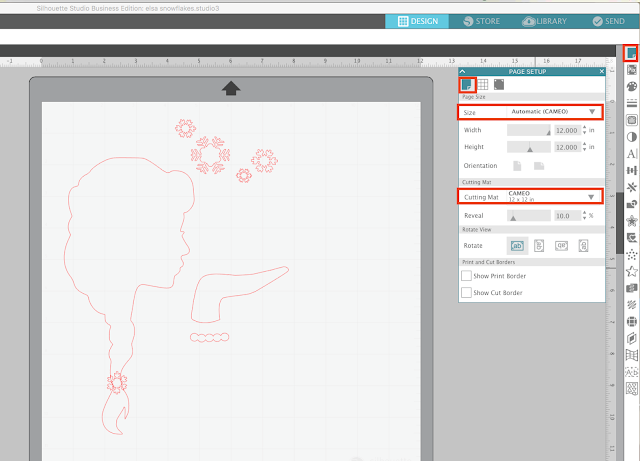
Once it's in the work area, click the Page Setup tab make sure the page size is "Automatic - CAMEO" (or Automatic - Portrait). Further down the window pick "CAMEO 12x12" for the cutting mat size.

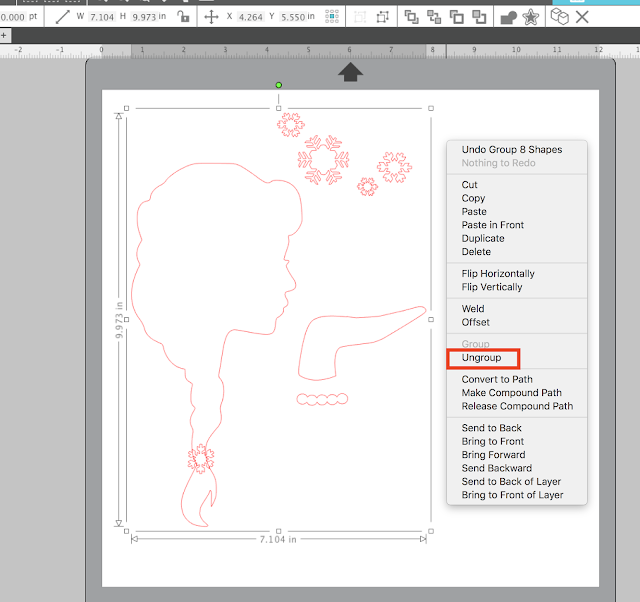
If your design is grouped together and you need to re-arrange it you will need to select the design > right click > ungroup. Ungrouping a design in Silhouette Studio will put individual selection or bounding boxes around the shapes making up the larger design.
If your design needs to be sized, size all pieces at the same time by selecting all shapes then pulling the corner nodule.
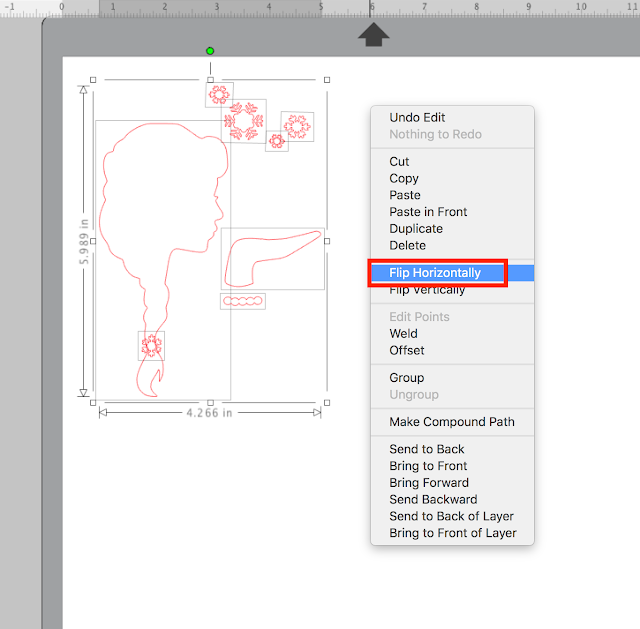
The most important thing to keep in mind when cutting Silhouette heat transfer vinyl projects is that the design needs to be mirrored before cutting. HTV needs to be cut in reverse so that when it's flipped onto the shirt and applied it's correctly oriented. To mirror or flip a design in Silhouette Studio, select the design > right click > Flip Horizontally.
Now you're ready to cut.
Go to the Send panel at the top right of Silhouette Studio. In the Material menu select Heat Transfer Vinyl, Smooth from the list of materials. This will then display the recommended cut settings along the bottom of Silhouette Studio.
Make sure you have bold red cut lines around your design which will appear when "Cut" is selected. The tool should either be the Autoblade (default for the Silhouette CAMEO 3) or the Ratchet Blade.
If you are using the ratchet blade you will need to manually adjust the blade depth on the blade by using the built in ratchet on the front of the machine to change the blade depth.
Place the HTV onto the Silhouette cutting mat with with the shiny side (carrier sheet) of the HTV down. This will put the adhesive side or the back side of the HTV up - which is why you are cutting in reverse.
Place the top edge of the cutting mat gently against the rollers and then left edge lined up with the line and arrows on the left side of the machine. Hold it in place with one hand while clicking "Load" or "Load Mat" on the touch screen.

This will pull the mat and HTV under the rollers and into the correct starting position.

Go back into Silhouette Studio and from the Send panel click "Send" .
When the design is finished cutting, unload it from the machine and weed it. Before sure to leave the actual heat transfer vinyl design ON THE CLEAR BACKING!!!
Take your extra piece of material - the sheet, handkerchief, or teflon sheet - and lay it down on top of the htv backing. Now press your iron (or heat press) down on top with a lot of pressure for about 45-60 seconds.
If you're using a heat press the recommended time and temperature for Siser Easyweed is 305 degrees for 20 seconds. Flip the shirt inside out and press again from the back side of the HTV for another 20 seconds. This draws the HTV vinyl further into the shirt to make sure it doesn't peel.
Remove the iron and the extra fabric and slowly peel up a small area of the clear backing. If the vinyl does not stay on the shirt, lay it all back down and add more heat and pressure from the iron. If the heat transfer vinyl does stick, and it should, slowly peel away the backing.
Wondering how to cut a multi-color HTV design with Silhouette CAMEO? Check out this tutorial on how to layer heat transfer vinyl.


.png)


Hello was wondering which htv vinyl you recommend for monogram tshirts/sweatshirts? I literally just pulled my cameo out of the box and i am starting from knowing absolutely nothing about this. I noticed that there are several dif htv to choose from. I want to purchase the right one as when I do get good at this I want to sell Monogram tshirts etc to keep up my nasty little monogram habit! lol! anything you can tell me or show me is so appreciated. Thank you!
ReplyDeleteI can't get my design traced
ReplyDeleteIs the top of the vinyl you use sticky when you remove the backing?
ReplyDeleteHow do you make use of all of that extra HTV? Can you stick it back onto the backing and cut again? Thanks!!
ReplyDeleteTEST CUT!!! grrr! Should have totally made test cuts! I just wasted about 1 sqft of HTV because *I* failed to make a test cut. I guess that a blade setting of 2 (on my blade) isn't enough. I too must have a dull blade -- whomp, whomp!
ReplyDeleteWish I read this first. But that's what I get for diving in head first into another project, yet again. :-\
You sound like me....exactly like me. Lol
DeleteI opened a brand new blade for my first heat transfer project and I had to set it to 7 to get the right cut. It's not about dull blades or new ones, the pre-loaded settings just aren't enough for the material.
ReplyDeleteYou're right! This was first time doing this and I put in a new blade. Had to set it to 6. Maybe it has something to do with quality of the vinyl...Silhouette's vs. others. I used Easy Weed.
DeleteThank you for all your help! This was got me started :)
ReplyDeleteThis comment has been removed by a blog administrator.
ReplyDeleteHello, I'm new to the group. I'm trying to find a tutorial on subtracting a picture to fit inside of an ornament for a print and cut Any help would be appreciated.
ReplyDeleteI'm having issues with my HTV staying on after a wash. I don't have a heat press, just an iron. I press it under a thin towel (think flour sak towel) and then after it's good and stuck I peel off the backing and press it again. All seems well and good and then you wear it and wash it and the vinyl starts peeling up. You can re-iron it but it will only stick until the next wash. Any ideas?? I feel like I am pressing hard and long enough and on the hottest setting. People always ask me to make them shirts but I don't want to make someone something and have the vinyl peel off after a wash. I would be embarrassed by my work.
ReplyDeleteI don't know if it's acceptable but anyone who may have info is free to email me personally at shellielatham@gmail.com. I don't know if I will get a notification from this forum. I have avoided working on my project to-do list because of this issue.
I have heard pre washing without fabric softener using clean and clear All detergent helps and to make sure you press VERY hard with the iron on a firm surface my ironing board is too squishy. It takes longer to iron by hand, also you could try using parchment paper instead of a towel it may transfer the heat of your iron better.
DeleteI tried ironing from the inside with the last shirts I did so we will see if that helps. I will try the pre-washing and see if that helps as well. I plan on buying an actual heat press within the next couple months so hopefully this will no longer be an issue. Thank you for your reply.
DeleteI started my t shirt printing with an iron and as well as you the quality was bad I than bought a heat press and the rite transfer paper and I come up trumps for more info on this topic please visit http://wwwfranklinehan.blogspot.com.au
DeleteThe issue that you raised in your blog is really very serious, and most of people lose the quality and integrity of such subjects, when they try to pen it down. But, your job is well done.
ReplyDeleteThanks
start school
This was a HUGE help!!! Thank you so much!!!!
ReplyDeleteI just got a Cameo Silhouette and I have not been very successful. Im using HTV and it has ALWAYS cuts right though the backing! I dont know what to do! the recommended settings dont work!
ReplyDeleteHave you checked your blade to make sure you are not cutting on the wrong setting? Like I use a 1 for regular HTV and a 4 for glitter. If you are using a higher number than necessary it will cut thru your backing, and your mat too!
Deletejust got my silhouette and I'm eager to try EVERYTHING! I've been on several blogs over the last week and I just had to leave a note that your how to is nicely written and easy to understand . good work!
ReplyDeletesilhouette HTV doens't need additional transfer paper?! I just bought a roll of transfer paper for HTV projects!! oh my! Also, for HTV projects do I always want to mirror my image to the wrong side so when I apply, it applies the right side? Hope that makes sense. I just ordered my first order of HTV!!!
ReplyDeleteIf the design has 2 colors, do you cut the entire design in both colors or is there a way to separate the design?
ReplyDeleteCan you tell me the transfer sheet, can you tell me how to determine the top from the bottom. Because I put mine the wrong way and messed up some previously layered vinyl. I looked at the transfer sheet and really couldn't tell up from down. HELP any tips would be wonderful.
ReplyDeleteOne of many tips I will read before unboxing my cameo. Just got it yesterday, still in the box. I am too afraid to get started! Silly right?
ReplyDeleteI'm finding that parts of my image are cutting just fine, others aren't going through the HTV and other spots are cutting completely through the backing as well.
ReplyDeleteI've found that a well-used mat can cause that. Also, the black strip on the machine under where the blade travels can cause that too. If that strip is worn or cracked at all, it should be replaced. It's an easy fix.
Deletethank you for this blog! I feel I am much more comfortable with HTV and this is where it all started!
ReplyDeleteThanks for sharing all of your helpful tips! I recently discovered your blog and it has been so helpful to me as I am just starting up my silhouette-based home decor business. My daughter can't wait for me to try out my HTV on a new T-shirt for her. :)
ReplyDeleteI am new to the Silhouette Cameo I received for Christmas, and here it is August, and I am still trying to figure out why, when I cut with HTV Easy Weed vinyl, the mat slips around and it is being cut, and ruins the entire cut. What is odd, the first two smaller cuts went perfect, but when I need to cut out a larger object, the mat twists and turns and ends up cutting all over the place! I am beyond frustrated with this entire ordeal...help, please.
ReplyDeleteAm I crazy? I can't find a check box for using the cutting mat....
ReplyDeleteThe cutting mat option isn't in the 'cut settings' window, it's in the 'design page' window. Also, it's not a check box, it's a drop down line menu because you have to choose which size cutting mat you're using.
DeleteI ordered the cameo starter kit from Amazon, and none of the designs I made using the sample vinyl that came with it stuck to the shirts and I used different shirts. Could this be related to the quality of the sample pieces. I have additional vinyl coming from a different provider but I wanted to try it out on samples before I ruined pieces I spent decent money on.
ReplyDeleteWas your starter kit HTV? Most of the sample sheets that come in these bundles are standard oracle 651 (Permanent) but not htv unless specified as such. You can only use htv on apparel, regular adhesive vinyl will not stick to it.
DeleteI have read all comments and they all have given me a better understanding on the Silhouette. I have installed on my computer but still haven't taken the step to actually using it. Thanks everyone
ReplyDeleteThank you so much for this tutorial. It helped my first attempt at using HTV (and only second attempt at using the Silhouette) go perfectly!
ReplyDeleteI can't seem to get it to print on HTV without registration marks. No one else seems to have this issue, what am I missing? thanks!!
ReplyDeleterecommended settings for htv glitter?? i tried just what comes up on autoselect. I couldnt see anything to weed. Tried 4 3 23 and it messed up and cut random lines leaving pieces of the plastic overlay stuff to my mat?? Newbie please help!
ReplyDeleteI have the silhouette curio and when I go to the website it doesn't say the heat transfer tape can be used on this machine. It says that the htv can be used with the cameo or the portrait. Is this true? Do I need a whole new machine?
ReplyDeletegreat idea!! the information is really helpful. I would love to try them. thanks for sharing.
ReplyDeletegreat idea! thanks for sharing. I liked your design I would love to try them!
ReplyDeleteHi. I am frustrated that I believe I am trying everything correctly; but when cutting on auto the blade is cutting through the vinyl plus the plastic overlay that it is called to stick to???? What am I doing wrong?
ReplyDeleteSee if this fixes it https://www.silhouetteschoolblog.com/2017/01/silhouette-cameo-3-not-cutting-heres-why.html
Delete