You can easily create a pattern for an impressive string art project right in Silhouette Studio. We've shown you how to do this before (check out that blog post here) if you had Silhouette Studio Designer Edition.
Creating the Pattern
Open Silhouette Studio and import your design for the string art pattern. In this case, we are using a scripty font to create a monogram.
You can grab this lovely script font to use in your project when you pick up the Script Font Bundle at So Fontsy. It is one of 27 beautiful scripty fonts to choose from in this bundle and it's 89% off! Now, that's beautiful!
Extra-large shapes and letters work best for a string art project. We sized our letter to fit on an 8.5 by 11-inch piece of copy paper.
Select the letter or shape and either open the Line Style panel or click the line style box in the top quick-access menu. Click the down arrow to reveal more line style options.
Change the line style from a solid to a dashed line by clicking on the dashed line. We found the "medium density" dashed line worked really well for this project.
Then, increase the line thickness - you can increase it to as much as you want as long as it's above 0. Here, the line thickness has been increased to 2.00 pt.
Nailing the Pattern
Next, print the letter or shape on a thin piece of copy paper. If nothing printed on the paper, check to ensure you have changed the line thickness to above 0. We've written a whole blog post about this topic - how to fix it if your text or shape isn't printing.
Secure the printout to a thick, wooden board with a couple pieces of low-tack painters tape. This pine plaque comes from Michaels and measures 11 x 14 inches and is 11/16th of an inch thick. You can prep the wood board as you like, either with paint or a stain, just make sure it's sealed (if necessary) and dry before securing the printed pattern.
Use the dashed lines printed on the pattern as your guide to place your nails. Tap a nail into the center of each dashed line. You may find it easiest to start with the innermost parts of the design first (like a hole in the letter or shape) and work your way out.
If you are having trouble holding the nail with your fingers, use a clothespin or pair of pliers to hold the nail in place while you tap it down with your hammer.
Try to get the nails as straight as possible, but if they're a little crooked, it's okay. But make sure to tap the nails in securely. The string will put tension on the nails and if not securely in place, the nails could come out.
Remove the Pattern
Remove the printed pattern by ripping it straight up off the nails. A pair of tweezers can be helpful to help get under the paper ...
... and to remove any small bits of paper that might stick around the base of the nails.
Start to String
Take a spool of string and tie the end to one of the nails using a double knot. Try to position the knot on nail so it is facing to the inside of the letter or shape. That way, the string art design will hide it and the beginning of the string as well.
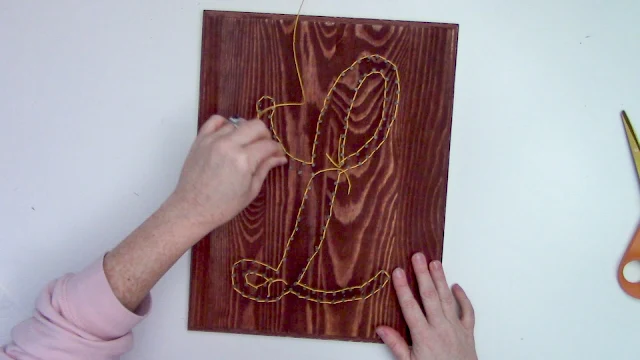
Then, start stringing! I found it effective to start by outlining the letter first. For the sharpest outline, wind the string around the outside of the letter or shape. Then, start zig-zagging the string from nail to nail - I didn't use a rhyme or reason to it, just started winding the string to fill in the shape.
Be careful the string does not unwind off the nail. Make sure it's sitting securely under the head of the nail. You may need to press the string down under the head with your finger first, then pull it firmly, but not super tight.
Wind the string over the letter or shape several times to get good coverage with the string.
When you are done, leave yourself about 12 inches or so of string before cutting it off the spool. This way you'll have enough of it to work with as you tie it to one of the nails with a double knot.
Weave the tails of the knot under the string art design to hide then. And, if necessary, trim off any excess string off the tails if they stick out.
Now enjoy your handy work and grab the Script Font Bundle from So Fontsy to use the same font as used in this project. Then, you can use all 27 of the fonts in the Script Font Bundle to create an unlimited amount of beautifully scripted projects!
Note: This post may contain affiliate links. By clicking on them and purchasing products through my links, I receive a small commission. That's what helps fund Silhouette School so I can keep buying new Silhouette-related products to show you how to get the most out of your machine!
Get Silhouette School lessons delivered to your email inbox! Select Once Daily or Weekly.


.png)


No comments
Thanks for leaving a comment! We get several hundred comments a day. While we appreciate every single one of them it's nearly impossible to respond back to all of them, all the time. So... if you could help me by treating these comments like a forum where readers help readers.
In addition, don't forget to look for specific answers by using the Search Box on the blog. If you're still not having any luck, feel free to email me with your question.