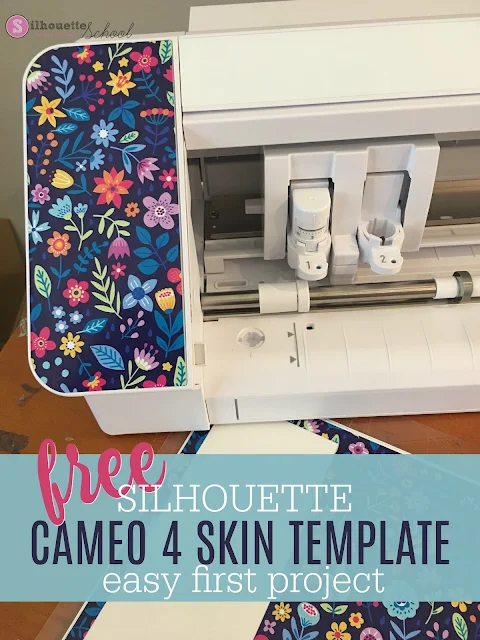
The free CAMEO 4 skin template is perfect for the left sliding front panel...and it's a great first Silhouette CAMEO 4 project!
All you need to do is head over to So Fontsy and download the free Silhouette CAMEO 4 design to your computer.
This makes a great Silhouette CAMEO 4 vinyl project since it's just a single solid cut.
Start by opening Silhouette Studio. Remember you must use Silhouette Studio V4.3.240 or higher to run your CAMEO 4.
Go to File > Open and find the .studio file (or SVG which is included in the free download) you downloaded on your computer. Click it to open in Silhouette Studio. It will open in the Design area.
Do not resize the cut file at all. It's perfectly sized to fit the CAMEO 4 front left panel which slides out to the left for tool storage.
Design Panel: Preparing a Design to Cut in Silhouette Studio
Click the Page Set Up tool on the right sidebar. Check that the following settings are selected:
Machine: Auto (CAMEO)
Cutting Mat: CAMEO 12 x 12
Media Size: Auto (12 x 12)
To limit waste, move the design to one of the corners of your virtual cutting mat. Most people place it in the upper left corner of the cutting mat.
Finally from the Page Set Up panel move the Reveal bar all the way to the right, if it's not already. This will turn on the grid lines.
Notice the blocks that are your design is covering. These are the same squares on the actual Silhouette cutting mat where your material needs to be placed. (We'll get to that part in a moment).
Preparing Your Silhouette Mat and Blade to Cut
Before moving to the Send panel, make sure your CAMEO 4 is powered on and connected to your computer. Also be sure your CAMEO 4 AutoBlade is inserted and locked into the left tool carriage (Carriage 1).Take your material (I'm using vinyl) and place it on the sticky, gridded area of the Silhouette cutting mat (be sure to remove the blue cover to expose the sticky area).
If you are not using a full sheet of material make sure the scrap piece is covering those same boxes on the mat where your design is covering in Silhouette Studio.
Place the cutting mat so the top edge is gently resting up against the rollers and the left edge is aligned with the gray lines and arrows on the left side of the CAMEO 4. Hold it there gently while you click the up arrow on the touch panel. The mat will be pulled under the rollers.
Send Panel: Selecting Your Cut Settings and Material
Back in Studio open the Send panel. Because of the auto tool detection feature, the software is able to detect the blade you have in the carriage and update the recommend cut settings. However, you will still need to select your material.I would suggest you cut the skin out of vinyl, printable vinyl, or printable waterproof sticker paper. Change the material type from the Material list and then the cut settings will update for the selected material.
The design should have a bold red line around it. These are the cut lines. If your design does NOT have bold red lines, select the design and click "Cut" as the Action.
First Silhouette CAMEO 4 Cut
At the bottom of the Send Panel click "Send". The AutoBlade
will first begin tapping to adjust to the recommended blade setting then the cutting will begin.

When the cutting is complete click the down arrow on the touch panel to remove the mat from the machine.
Now you'll need to remove the excess vinyl around your design. This process is called weeding. You can trim around your design with scissors before using a hook tool to remove the extra vinyl around the design.
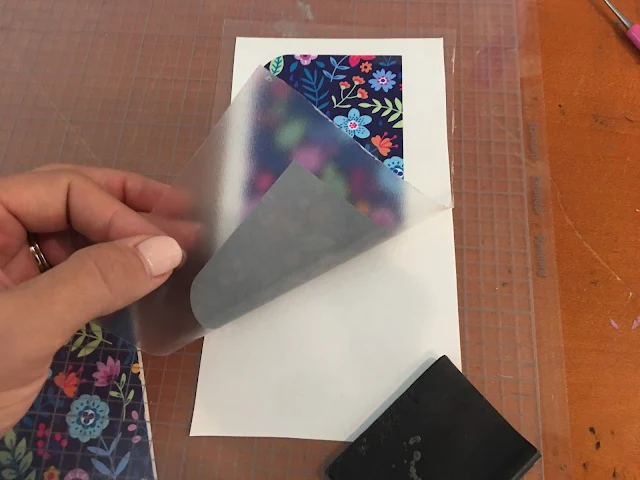
For vinyl you need a transfer material - I prefer transfer tape - to move the vinyl decal from the backing to the surface. Cut a piece of clear transfer tape, remove it off the backing, and then carefully lay it over your CAMEO 4 vinyl skin.
Use a scraper to burnish the tape onto the vinyl and then peel up the tape from the corner so the vinyl comes with it...and exposes the adhesive on the back of the vinyl.
Carefully position the CAMEO 4 skin over the left panel lining up the top edge.
Press down from there. When the entire vinyl skin has been applied, again burnish it. This time peel the transfer tape up from the corner leaving the vinyl behind on the CAMEO 4.
I love the little pop of color covering the tool carriage storage slot is..and it's so easy and quick with this free CAMEO 4 vinyl skin template!!
When the cutting is complete click the down arrow on the touch panel to remove the mat from the machine.
Now you'll need to remove the excess vinyl around your design. This process is called weeding. You can trim around your design with scissors before using a hook tool to remove the extra vinyl around the design.
For vinyl you need a transfer material - I prefer transfer tape - to move the vinyl decal from the backing to the surface. Cut a piece of clear transfer tape, remove it off the backing, and then carefully lay it over your CAMEO 4 vinyl skin.
Use a scraper to burnish the tape onto the vinyl and then peel up the tape from the corner so the vinyl comes with it...and exposes the adhesive on the back of the vinyl.
Carefully position the CAMEO 4 skin over the left panel lining up the top edge.
Press down from there. When the entire vinyl skin has been applied, again burnish it. This time peel the transfer tape up from the corner leaving the vinyl behind on the CAMEO 4.
Finally, if you think you're gonna be tricky and reverse the image to cut a second skin for the right panel ... STOP RIGHT THERE! That is the touch panel and you definitely don't want to cover that with anything.
Don't forget! You can get commercial use freebies every week at So Fontsy - just keep an eye on the Freebies section as they swap out every Friday! Here's a peek at this week's new freebies!
Note: This post may contain affiliate links. By clicking on them and purchasing products through my links, I receive a small commission. That's what helps fund Silhouette School so I can keep buying new Silhouette-related products to show you how to get the most out of your machine!
Get Silhouette School lessons delivered to your email inbox! Select Once Daily or Weekly.


.png)


Love the vinyl you used! Such a pretty pattern. Saw it one of your other videos last nigh so had to look at this post to learn more about. Thanks for all your great information thinking about trying a cameo again, haven't had one since the one but thinking the 4 would be fun to try!
ReplyDeleteThanks for this! Can't wait to give it a shot when my order comes in! May I ask, where did you find fun vinyl like that?
ReplyDeleteExpressions Vinyl has some great choices for patterned vinyl https://shrsl.com/2p66v
DeleteI am not one who likes to decorate things that I purchase. I like the look of the clean white machine. I am a total newbie and I am looking for the best places to purchase the types of materials to make stickers, and I'll probably start doing some HTV. I'll check out the resources that came with my machine as I have so much to learn.
ReplyDeleteCheck out onlinelabels.com for a huge variety of sticker papers! For HTV check out Swing Design: https://shrsl.com/2ibee Happy crafting!
Delete