It all starts in Silhouette Studio with making sure you have a design that's designed in a way that it will not be flopping over along with cutting the right material.
A solid design is typically no problem, but when you start making cake toppers from intricate designs like a monogram or a wedding cake topper you need to consider the design itself.
The most challenging designs are those that are pre-made because if they're designed correctly, they should already be welded together. Look at this Happy 2018 design I have, for example.
If I cut this design for a cake topper it would have no chance of standing up straight even though it's one continuous piece. But...if you know how to manipulate it a bit you can make it a little more topper-friendly.
This beginner method of making cupcake or cake toppers is to make a large offset around the design so you have two layers where the solid offset holds the more delicate design.
Fill your original design with a solid color to help you visualize the design easier while you're working with it.
Open the Offset panel.
With the original design selected, click "Offset". The default offset distance of .125 is likely not going to be large enough. Increase the Distance by sliding the slider bar or manually adjusting the distance.
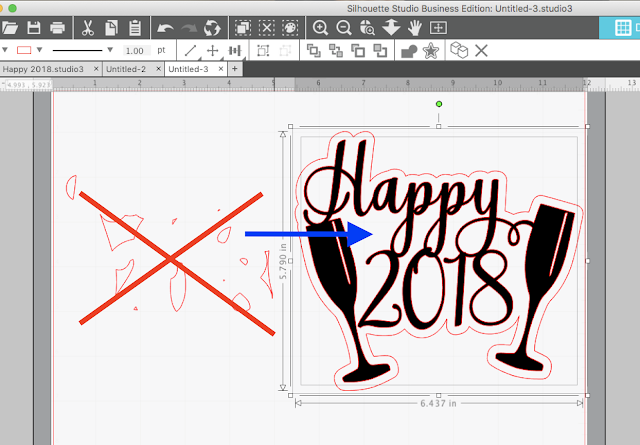
Keep in mind, any overlapping areas of the offset will auto-weld. Click Apply when you're ready.
You're not done yet, we want to remove any internal pieces of the offset layer so you have just one solid piece. To do that, select the offset line only > right click > Release Compound path.
Now select both the offset and the original design (hold down shift while you click on both to select) and pull them away. This will allow you to pull the main offset piece and the original design away, leaving the 'bits' behind. After doing so, delete all of the little bits by selecting them and clicking "delete" on your computer keyboard.
The final step is to make a mirrored duplicate of the offset piece of the topper. This is necessary if you don't want the back side of your topper to show the back side of the paper. To do make an exact mirror copy, select the larger offset design and open the Replicate window. Pick the option to mirror right or mirror left.
This will create an exact mirrored copy which you can later glue to the back of front piece so you can sandwich the cake topper sticks between.
When you're ready to cut the pieces, move to the Send panel. Place the two offsets on the work area to be cut. The design itself should be off the work area so it doesn't cut yet (assuming you're cutting it on a different color material).
Send the offsets to cut. My favorite type of glitter cardstock is the Best Creations brand.

It cuts really cleanly on the Silhouette cutting machines using the default cut settings for Cardstock, Glitter.
After the cutting is complete, swap the designs out on the virtual cutting mat so you can cut the actual design.
The final step is to assemble the cake topper.
I find the easiest way to do this is to run one offset piece and the detailed design through a Xyron. This will put an even layer of adhesive on the back without making a mess. If you don't have a Xyron, you can use hot glue.
Before you put the back and front offset together, sandwich two small wooden dowels (or toothpicks for cupcake toppers) between them. They should stick to the adhesive from the Xyron as well.
And here's a look at the back...this is why you made a mirror copy of the offset...so it looks pretty from the front and the back!
Note: This post may contain affiliate links. By clicking on them and purchasing products through my links, I receive a small commission. That's what helps fund Silhouette School so I can keep buying new Silhouette-related products to show you how to get the most out of your machine!
Get Silhouette School lessons delivered to your email inbox! Select Once Daily or Weekly.


.png)


Hello Melissa, I love the design and the helpful tips you provided. Can you tell me what's the name of the font you used in the design Thanks
ReplyDeleteThe So Fontsy Font :) https://sofontsy.com/collections/so-fontsy-design-shop/products/so-fontsy-commercial-use-font
DeleteThank you for the info. I just love this design.
ReplyDelete