This Silhouette tutorial will show you exactly how to make glitter fills in Silhouette Studio so you can create realistic glitter mock ups!
How to Make a Glitter Fill in Silhouette Studio
The first thing you want to do is snap a picture of the sheet of glitter HTV or vinyl. You can do this with your phone by emailing the image to yourself and then downloading on your computer.Open up Silhouette Studio and go to your Silhouette Studio Library.
In the Local Users area of the Library you'll have four main folders. Among them is a Patterns folder. Mine has a + on it because I have created sub-folders to organize the custom patterns I import into Silhouette Studio.
Double click the Patterns folder to expand it and view the sub folders or to open the main folder.
Importing Custom Pattern Fills in Silhouette Studio
Now drag the photo you took of your glitter HTV into the Patterns folder in your Silhouette Studio library.Go back into the work area in Silhouette Studio.
Open up the Silhouette design you want filled with the glitter pattern.
Keep it in the work area while you open the Fill Color panel from the right sidebar. The third tab at the top is the Pattern Fill tool. The patterns at the top of this window are the default patterns that come with Silhouette Studio. Below that are the custom patterns imported into Silhouette Studio. If you have sub-folders in the Patterns folder your patterns will be organized into groups this way.
Filling a Silhouette Design With a Glitter Pattern Fill
Select the design in the work area, that you want filled with the glitter pattern and click the glitter fill swatch from the Fill Pattern window.And now your design is filled with glitter rather than a solid color.
If it's not "glittery" enough for you (you can see it's 100% in the above screen grab)...click on the "Advanced options".
Move the Scale Pattern bar to the right. The glitter effect will increase as the pattern is enlarged.
Silhouette Studio Image Effects Tool to Change Colors
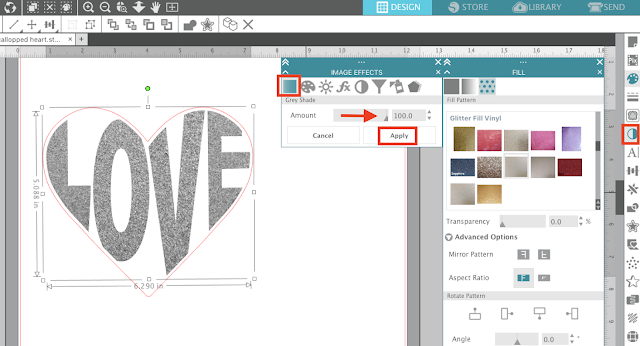
I went one step further and used the Image Effects tool to get a silver glitter instead of gold.The heart was filled with the pink glitter pattern fill.
I would also suggest you change the line color to transparent.
Filling the design this way in Silhouette Studio gave me a very realistic idea what my design would look like once it was actually cut on glitter HTV and applied.
And in case you're wondering...yes, I have finally found a glitter heat transfer vinyl that can be layered!
Note: This post may contain affiliate links. By clicking on them and purchasing products through my links, I receive a small commission. That's what helps fund Silhouette School so I can keep buying new Silhouette-related products to show you how to get the most out of your machine!
Thanks for coming to class today at Silhouette School. If you like what you see, I'd love for you to pin it!


.png)


Super cool ❤️❤️❤️❤️
ReplyDeleteHelp ... This is awesome but when I try this tutorial it give me a small no symbol on the file as I try to transfer it into my pattern folder. The glitter image is saved as a .png. It will allow me to put in my library folder. Can you tell me what I may be doing wrong. Thank Tanya
ReplyDeletecan you save glitter images like off of Google and use that rather than send pictures and save?
ReplyDeleteApparently, this only works in the designer edition. I cannot add anything to my regular version using these steps. Any suggestions?
ReplyDeleteYou have to buy Designer Edition as Melissa stated in the second paragraph of her article. "You will need Designer Edition for this tutorial...if you don't have it - it's totally worth the $30 or so bucks it will set you back for these 13+ reasons." I agree with her, it is totally worth the cost.
ReplyDeleteSo, I followed directions in the article and when I go to the patterns they are just black squares. Now if I double click on it, it will open as the jpeg pattern. How do I get it to display the actual pattern like it does for the pre-installed patterns or like you have it on your screen shot that is listed above?
ReplyDeleteTIA
I have designer edition and it wont go to the patterns either....help?
ReplyDeleteThank you so much. it is very useful. Thanks again
ReplyDeleteI have Designer Edition and this will not work for me either. I have even tried to open the design in silhouette and save that way. It grays out patterns and will not allow me to save to that folder
ReplyDeleteHey there! You should have that folder accessible even in Designer Edition. I would try logging out of your library and logging back in. Alternatively, it could be a bug with the specific version of Silhouette Studio you're running. Either make sure you're on the most recent version or try version 4.3.370 in the legacy versions.
Delete