I don't think a week has gone by where I haven't gotten an email from a Silhouette School reader asking how to determine how much vinyl will be needed for a project. The issue usually arises with large size projects or with a large volume - such as a dozen shirts that need HTV.
Today I'm going to show you how to easily figure out how much vinyl or heat transfer vinyl you need for a project. I'm going to demo this Silhouette tutorial using a large wall calendar that I cut on chalkboard vinyl (I'll be sharing the free cut file for the calendar next week).
The first thing you want to do is create your design in Silhouette.After the design is created, determine the appropriate size you need to cut it - for instance, measure the wall space or the shirt where the decal will be placed. My chalkboard calendar needed to be about 36 x 24".
To adjust the size in Silhouette Studio, select the entire design - making sure to include all elements of the design. Pull the design in or out using one of the corner selection boxes or type in the desired size in the Scale window.
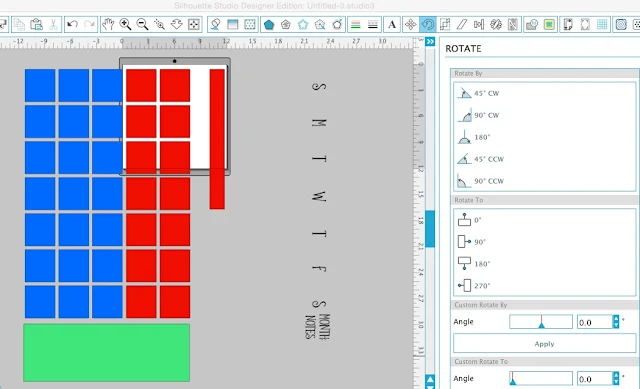
My calendar had to be rotated and cut in several sections. You do not need to color code your sections, I just did this so you could more clearly see mine.
Basically you will create groups based on how much of your design can fit across the 12" cutting area. The length does not matter because for a large design like this, you will most likely by buying your vinyl by the yard. Group the first section so all of the pieces stay in the correct spot.
NOTE: Adding layering registration marks to this size design will waste a lot of vinyl in the process. I prefer to go old school style and measure each section out while I apply to the wall.
Repeat the process to create as many 12" wide sections as necessary. Put the subsequent sections below the top group. (In this case I am not including the text because it was cut on different vinyl so I do no need to account for it when ordering my chalkboard vinyl.)
Now...you need to adjust the mat and material size. You can do both from the Page Settings Window. For a design this large you will not able able to cut with a cutting mat, but I would suggest you invest in a Silhouette roll feeder, rather than cut with nothing. The roll feeder will pretty much guarantee your design does not slip out from under the rollers on your CAMEO or Portrait and mess up your cut.
'Roll Feeder' is not an option in the Cutting Mat pane of the Page Settings window so select "No Mat" from the drop down menu.
The same process would be done if you needed to cut multiple designs for a large volume order....
Thanks for coming to class today at Silhouette School. If you like what you see, I'd love for you to pin it!

Get Silhouette School lessons delivered to your email inbox! Select Once Daily or Weekly.


.png)


THIS is amazing! I have been searching for a large "dry erase" board. One where I could fill with colored post its and stuff! It never occured to me to make one to stick on my wall. Looking forward to the file!
ReplyDeleteThanks for taking the time to discuss this, I feel about it and love learning more on this topic. If possible, as you gain expertise, would you mind updating your blog with more information? It is extremely helpful for me.
ReplyDeleteraze 2
raze 3
return man 2
strike force heroes
strike force heroes 2
run 2
run 3
sports heads football
sports heads soccer championship