

Did you know you can use Silhouette Studio files with craft laser engravers and cutters?!
If you're proficient and comfortable in Silhouette Studio there's no reason you can't design in the Silhouette software and then cut or engraver on a Glowforge or xTool laser. Read on to learn how to use Silhouette Studio files with a laser.
Silhouette Studio is one of the most under rated design softwares. It has a full suite of powerful design tools including vectorizing (tracing), offsets, layers and much more. It's ability to export in many different file types and it's extremely affordable price - even for the most advanced version of Silhouette Studio Business Edition - makes it a great choice even if you don't have a Silhouette cutting machine. I use Silhouette Studio to design for sublimation, laser engraving, ecosolvent printing and cutting, even DTF and DTG.
Silhouette Studio is one of the most under rated design softwares. It has a full suite of powerful design tools including vectorizing (tracing), offsets, layers and much more. It's ability to export in many different file types and it's extremely affordable price - even for the most advanced version of Silhouette Studio Business Edition - makes it a great choice even if you don't have a Silhouette cutting machine. I use Silhouette Studio to design for sublimation, laser engraving, ecosolvent printing and cutting, even DTF and DTG.
Before you begin designing in Silhouette Studio with the intention of exporting to another software program you'll want to make sure you have Silhouette Studio Business Edition. Business Edition will give you the ability to export files in SVG, PNG, JPEG and PDF format. One of these formats can almost always be used every other program.
Laser engraver software for the xTool and Glowforge can easily import SVG files so that's what we'll be converting to eventually.
How to Design in Silhouette Studio for Craft Laser Engravers
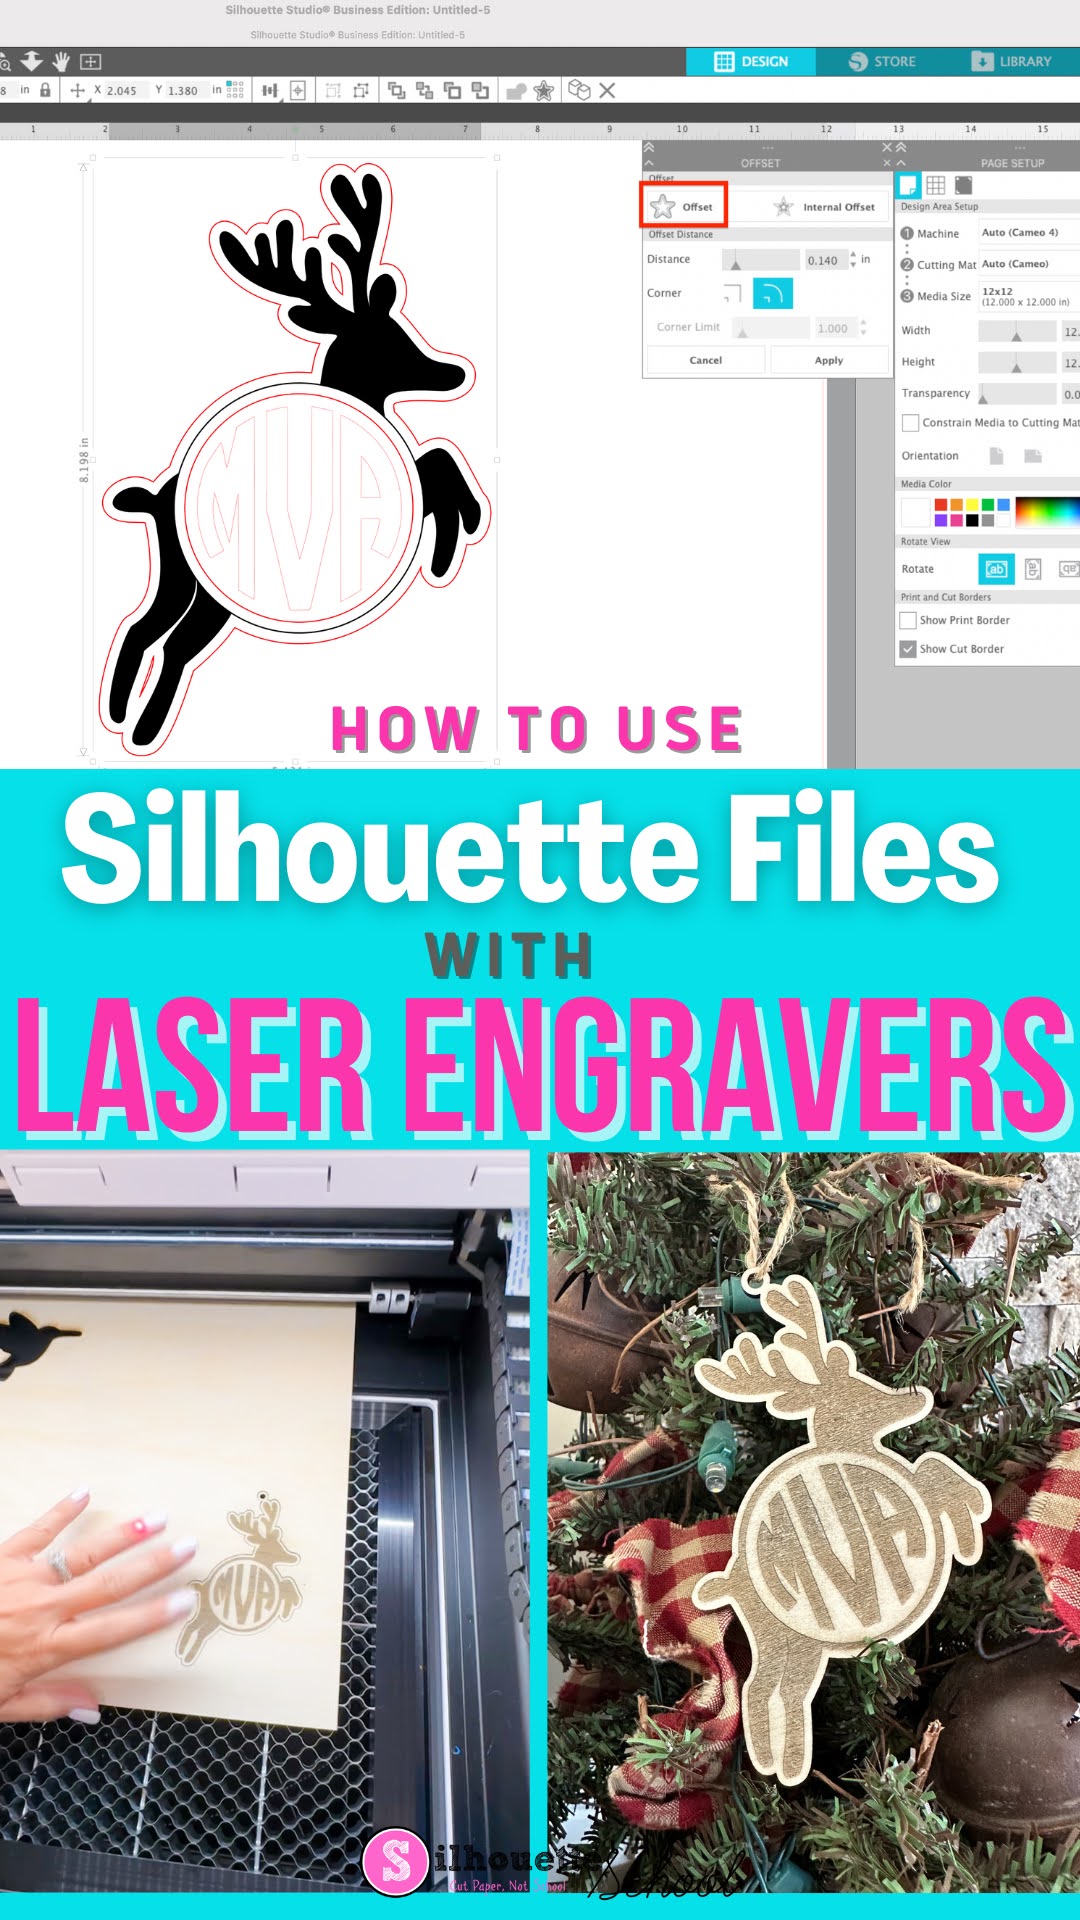
Start in Silhouette Studio by opening your file. I am using this monogram Christmas SVG design from So Fontsy. If you do not have the option for the SVG, you can import a PNG or JPEG.

This file could be easily imported into Glowforge software or xTool's Creative Space, however because those programs have limited design tools, Silhouette Studio will be easier to add the monogram, offset, and hole for the ornament's ribbon.
The center area is intended for a round monogram, but a single letter or year in that space would work too or a Christmas quote. I am using a circle monogram SVG alphabet to add my monogram.
Size the monogram so it fits in the circle by selecting the monogram and pulling in or out at one of the corners.

How to Design a Contour Cut for Laser Engraving
For this example I want my craft laser engraver to engrave the entire design, but then contour cut around it.
To create the border, select the main part of the design and use the Offset tool from the right sidebar.

If you get extra cut lines, like around the inside of the circle and antlers you can delete them. Select the Offset line > right click > Release Compound Path.

This will release the cut lines so you can access them individually. I highlighted the unwanted cut lines in blue so you could more easily see.
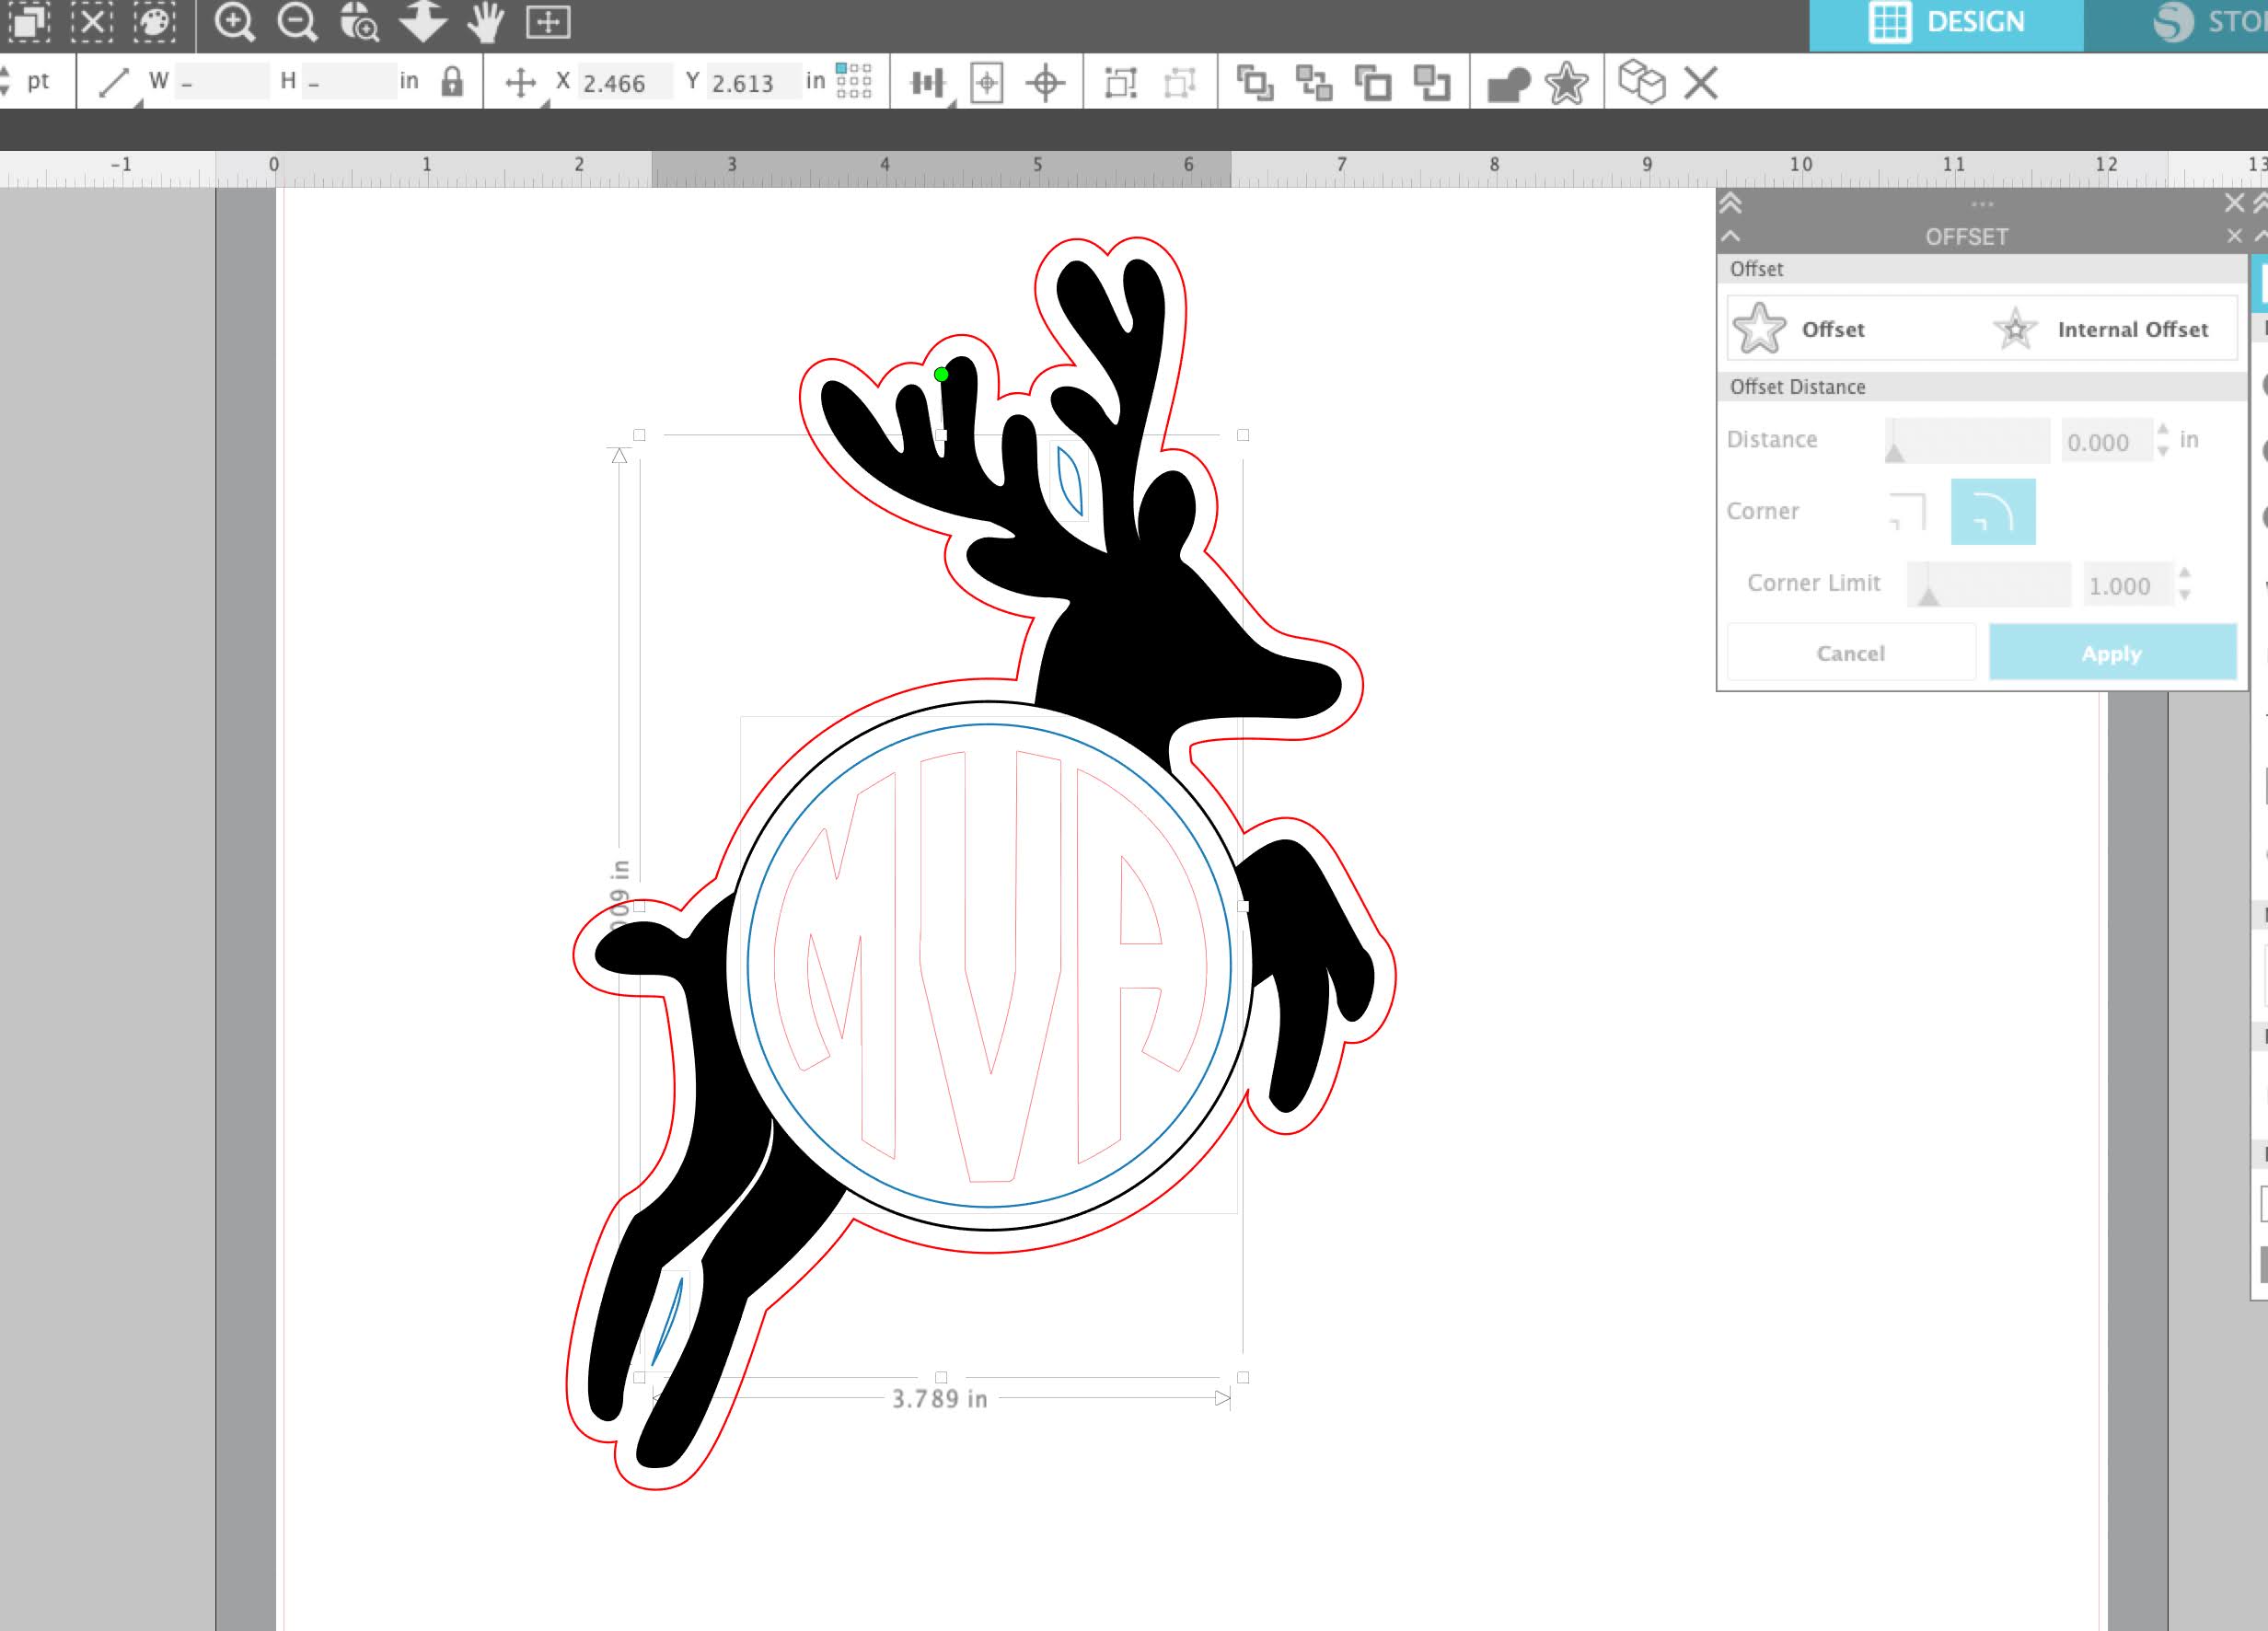
Once selected click Delete on your keyboard or right click > delete. 

Designing an Ornament in Silhouette Studio
To design this as a Christmas ornament we need to add a hole for the ribbon. Use the Flexishapes tool on the left sidebar and select the shape that looks like a donut.

Use your mouse to draw out the shape, when place it over the contour cut line (offset line).

Select the "donut hole" and the offset line only > right click > Weld.

I find it easier to size my design in Silhouette Studio than in the laser software because the ruler options are easier to use.
To scale the design > select the entire design. Either scale it by pulling in or out at one corner and watching the dimensions change or manually enter the desired dimensions in the height and width boxes along the Quick Access Tool Bar.

How to Export Silhouette Studio Files for Laser Engraving and Cutting
This step is optional - but you may also want to group all of the engraving lines together (in this case I changed them all to blue) and make a separate group for the cut lines (red). The groups will be treated as different layers in your laser software.
At this point you are ready to export your design. Select the entire design and go to File > Save Selection As > Save to Hard Drive.

Change the file type to SVG. remember, this option will only be possible if you have Silhouette Studio Business Edition.

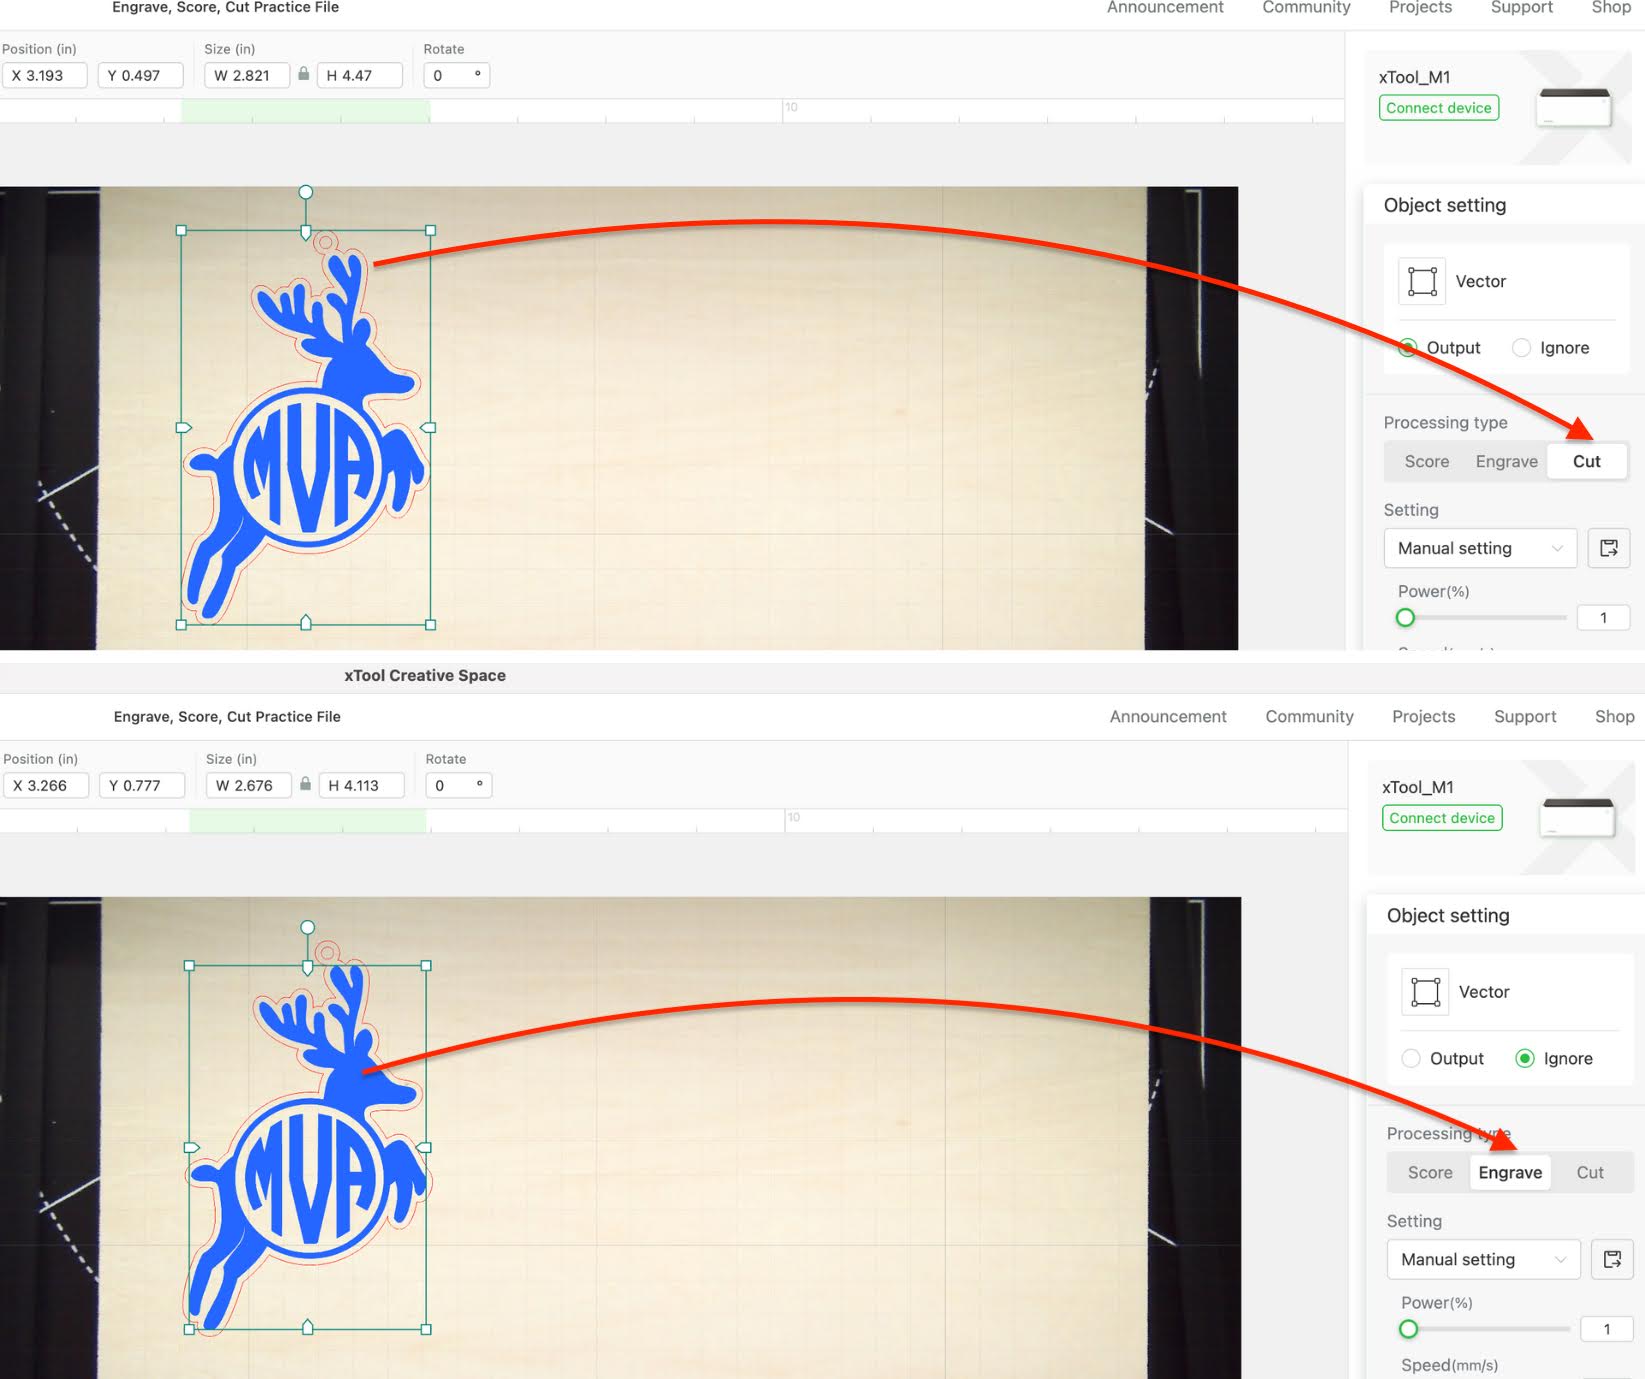
Importing Silhouette Studio Files to xTool Creative Space (Works for Glowforge too)
Now go over to your laser engraving software. I am using xTool's Creative Space and import the image. In Creative Space it's File > Import Image and select the SVG.

You can see the file comes in perfectly sized! Now just select each line or layer and choose the type of processing you want.
In this example, I want the offset line to "Cut" and the reindeer and monogram to "Engrave."
You can even go one step further, before you export, and create laser engraving mockups in Silhouette Studio to see how your design will turn out before you engrave and cut. I'll be sharing a tutorial on that option soon!
When you're ready hit start and let the XTool M1 Laser Engraver engrave the wood and then cut it to make a custom ornament.

If you've ever tried to cut basswood with your silhouette CAMEO 4 and the Kraft Blade you know how difficult it can be..but clearly the XTool can do it with ease!

Tie a ribbon or some twine through the hole and you've created a custom wood ornament.

Want to learn more about laser engraving with the XTool M1 or P2 laser engravers? Head over to the laser headquarters!

Note: This post may contain affiliate links. By clicking on them and purchasing products through my links, I receive a small commission. That's what helps fund Silhouette School so I can keep buying new Silhouette-related products to show you how to get the most out of your machine!


.png)


I was making coaters. I created a monogram design on Silhouette Studio, saved it as an SVG (on my comuter it shows up as a HTML?), and made a set a great coasters. I went to try again with another name for the monogram, saved it as an SVG, but this time I got a message saying that Silhouette designs will show up with a dotted line?! I ignored it and went on to engrave the coaster, but it did indeed only do the outline even though I chose engrave and it was in a dotted line. What do you think I did wrong?
ReplyDelete