My love for inkjet printable heat transfer vinyl runs deep and now there's yet another reason why!
We tested transferring a printed pattern onto flocked HTV and it works - opening up the possibilities to make your own patterned flock heat transfer vinyl! I bet this would work on glitter HTV too!
The process involves printing a pattern onto StarCraft Inkjet Printable Heat Transfer Material for Lights. Normally, this printed pattern would then be pressed and transferred directly onto fabric. Instead, you'll press and transfer the pattern onto Siser white stripflock heat transfer vinyl.
The result is a smooth and seamless pattern that is slightly raised from the fabric due to the distinctive dimension of the flocked HTV. Here's how to do it!
Open Silhouette Studio and Offset Your Design
First, open your design in Silhouette Studio. Any design will work, but we are using this Let's Stay Home design which is one of 433 SVG designs in the Bundle of Bundles 3.0 over at So Fontsy.
You get a little bit of everything in this bundle - a fall bundle or
two, a wine glass bundle, a full alphabet mandala bundle, several
Christmas bundles, and a whole lot more for 89% off.
Size the entire design to fit on your project - this is what you'll cut into the flocked HTV.
Size the entire design to fit on your project - this is what you'll cut into the flocked HTV.
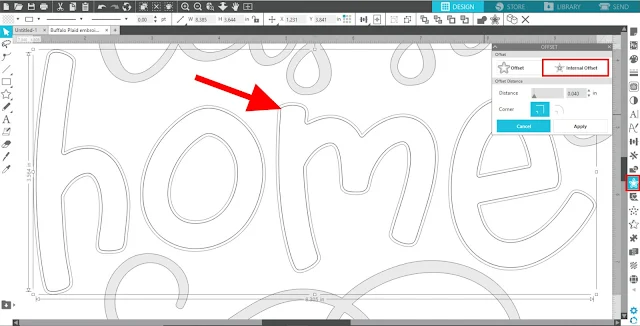
Next, open the Offset panel and make a small internal offset of the shape or text you want to have a printed pattern on it. This offset is going to be the printed pattern area. By making the patterned area just slightly smaller than the flocked HTV, it's much easier to line up the pattern on the vinyl for pressing.
Add a Fill Pattern
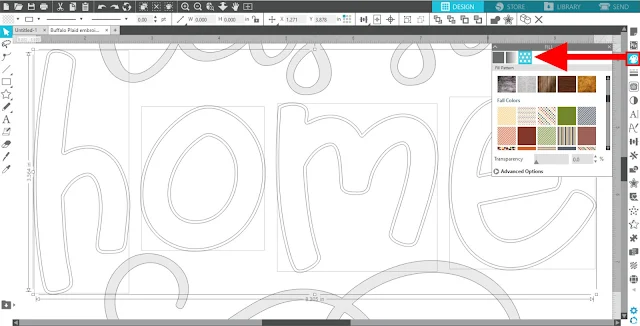
Now we need to fill the internal offset we created so open the Fill Panel and apply your desired pattern to just the internal offset.


You could transfer just about any pattern you wanted onto the flocked HTV. There are many options to choose from already preloaded in Silhouette Studio, but you could also transfer custom patterns - like photographs or digital patterned paper like those found in the Massive August 2020 SVG and Fonts Bundle or the Mini-Patterns Starter 5 Buck Bundle! I'm going to use the buffalo plaid pattern that is included with
this "Let's Stay Home" SVG file.
Check out this blog post for how to add custom pattern fills in Silhouette Studio if you need a refresher.
After filling the internal offset, do not forget to MIRROR the entire design! Do so by right clicking the design > then Flip Horizontally.
Pull the area you just filled with a pattern away from the rest of your design. This part you need to print and cut while the rest of the design will just be cut.
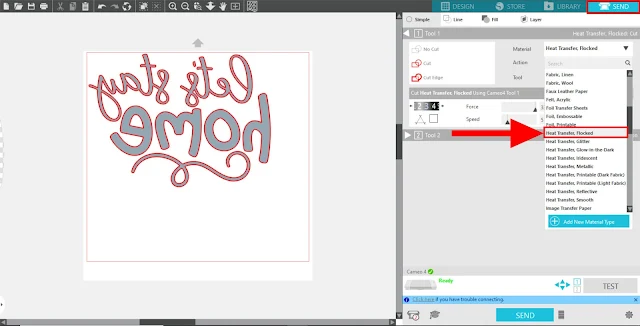
Cut the part of the design on white flock HTV using the Heat Transfer, Flocked settings, weed and set aside for now.

Print and Cut
Working now with just the patterned area of your design, open the Page Setup panel. Turn on Registration Marks and arrange just your patterned design within the print and cut area. You don't have to rearrange/rotate the letters of the design, but you may be able to save more of the transfer material if you do.
Load the printable heat transfer material into your inkjet printer so it'll print correctly. You cannot use a laser printer for this material. Send the design to print by clicking the Printer Icon on the top tool bar in Silhouette Studio.
If you're using version 4.4 or higher of Silhouette Studio, you'll get a print preview before printing.
If you're using version 4.4 or higher of Silhouette Studio, you'll get a print preview before printing.
Place the Starcraft Inkjet HTV for Lights onto your cutting mat and load it into your Silhouette. Then, send to cut from Studio. I used the same cut settings as the "Cardstock, Plain" material setting.
For more help with Print and Cut, check out this blog post for a Beginner Silhouette Print and Cut Tutorial.
After cutting, carefully lift the cut pieces off the mat. As for any unused areas of the transfer material, save those scraps! Check out this blog post to learn the hack to using scraps for print and cut projects - the post talks about printable vinyl, but it also works for transfer material.
Press Flocked HTV and Printable HTV
Now it's time to press. Arrange your fabric (or whatever you're pressing onto) on your heat press and apply the cut and weeded flocked HTV with the carrier sheet side up.
Press the vinyl for about 5 seconds at 375 degrees F.
Remove the fabric from the heat press and allow to cool before peeling away the carrier sheet. Set the carrier sheet aside for now, but do not throw it away.
Arrange Printed Pattern on Flocked HTV
Take your printed design and arrange the patterned transfer paper pieces onto the flocked vinyl, face down so the printed side is in contact with the HTV. Because the patterned piece was cut with a small internal offset, you can center the transfer material by keeping an even border of flocked HTV around it.
Take the HTV carrier sheet and press it back down over the entire design - covering the entire area of flocked HTV and securing the transfer material pieces in place.
Press One Last Time
Carefully, put the fabric back onto your heat press, and press for 30 seconds at 375 degrees F. Let cool slightly, then carefully remove the carrier sheet and then the backing of the Starcraft inkjet Printable HTV. I found this easiest by using a pair of tweezers and leaving the fabric on my press - the warmth from the press kept the transfer material paper pliable and easy to remove.
Removing the transfer material reveals your awesome pattern! And that's all there is to it. Doesn't the buffalo plaid pattern with this design look so festive?!
So, grab the design used for this project and start craftin'! The design comes from the Bundle of SVG Design Bundles from So Fontsy - you'll be sure glad you did!
Note: This post may contain affiliate links. By clicking on them and purchasing products through my links, I receive a small commission. That's what helps fund Silhouette School so I can keep buying new Silhouette-related products to show you how to get the most out of your machine!
Get Silhouette School lessons delivered to your email inbox! Select Once Daily or Weekly.


.png)


Thank you for this tutorial on using the print and cut with the flocked HTV and the Inkjet printable paper
ReplyDeleteCan this method be used on clothing you will wear and wash?
ReplyDelete