Using the simple trick explained in this Silhouette tutorial, you'll save time by knowing exactly where to align the different colors of your HTV design and save money because this trick is designed to save as much HTV as possible.
This technique works well with linear designs using two or three different colors of HTV, but the HTV is not layered on top of one another. For example, lines of text in a quote or a subway art design. And you'll actually be doing something we usually try to avoid - cutting through the HTV carrier sheet.
The adorable design used for this baby onesie comes from the Christmas in July SVG Bundle over at So Fontsy. You can get a jump start on your holiday attire, decor, gifts, and signs now! This bundle contains more than 260 festive designs, 1 font, and 2 mock-ups, all for 90% off. So, what are you waiting for? Check it out at So Fontsy right now!
How to Set Up Multi Color Designs in Silhouette Studio
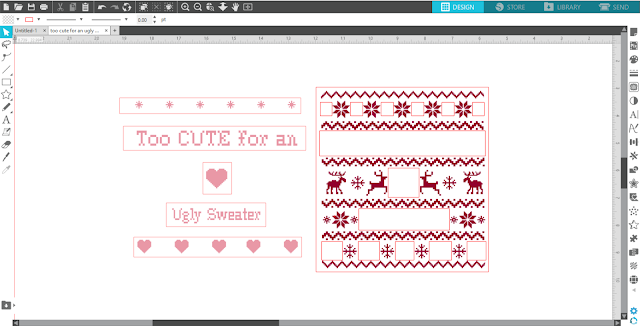
To get started with this project, ungroup the different elements of the design, and re-group them together by color.Open the Select by Color Panel to select all the pink elements. Then, right-click on them and select Group from the drop-down menu.
Repeat for all the red elements.
Next, use the Draw a Rectangle tool to draw one large rectangle around the entire design.
Then, draw rectangles around the pink parts of the design. You can keep the words of each line in one rectangle - you don't need to do them each separately. Make sure the line color of the rectangle is a different color than the line color of any other piece in the design. This is very important.
Make the rectangles tight around the shapes, but do not overlap any part of the design and do not overlap any of the inner rectangles with the outer rectangle. Leave a small gap between the edges of the inner rectangles and the edge of the outer rectangle. What we are doing is creating rectangles that will be cut through the red HTV's carrier sheet so we can place the pink pieces in and press all at once.
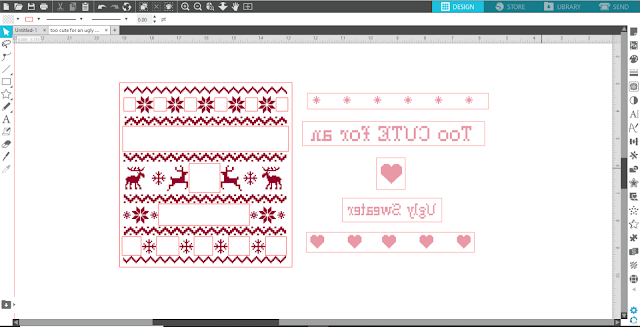
Tip: Since this design contains many of the same elements, you can save time by copying and pasting the same rectangle over and over.Next, select all the pink elements and move them off to the side. Then, draw rectangles around the pink elements again. This time, however, just put one big rectangle around the line of stars and another around the line of hearts - keeping them together in one rectangle makes it so much easier and faster to line them back up for pressing.
Mirror everything by selecting it > right-click > Flip Horizontally.
Cutting by Line Color
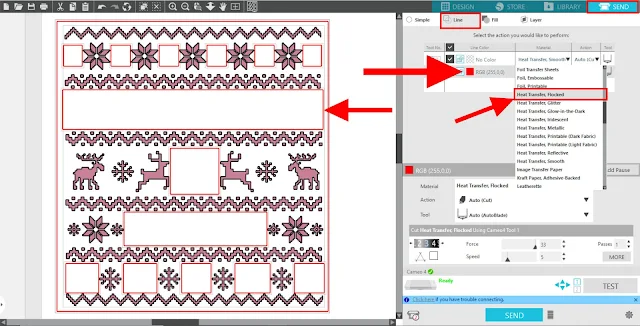
Go to the Send panel in Silhouette Studio and click the Line tab so you can cut by line color. You should have two different colors in the table - one line for the pink and red elements (No Color, meaning no outline color), and then the red color (for the red line color of the rectangles).Select Heat Transfer, Smooth for the material setting for the No Color elements, but for the red rectangles select Heat Transfer, Flocked. The Flocked setting will cut these lines straight through the HTV carrier sheet, which is exactly what we want.
Load your mat with red HTV like Siser Easyweed. For this technique, you must cut on a mat. I would also suggest you use an Autoblade for this project so the Silhouette CAMEO 3 or 4 will automatically re-adjust the blade depth for you between the cuts.
Send to cut.
Weeding and Applying Layered HTV
Then, weed the design cut into the red HTV. Your red piece now has areas cut out of it where you can place the pink pieces allowing you to line them up and press at the same time.
Repeat the cutting by line color with the pink HTV with the same cut settings - HTV Smooth for the pink elements and HTV Flocked for the rectangles. You can rearrange the pink elements and their rectangles to save more space on your HTV.
After cutting, weed the pink HTV and remove the weeded pieces from the cutting mat.
Now, the weeded red and pink HTV pieces fit together kind of like a puzzle. This makes lining up the entire design very easy - since there are holes cut into the red HTV that show you that one of your pink HTV pieces will fit in there.
Pressing Multi Color HTV in One Press
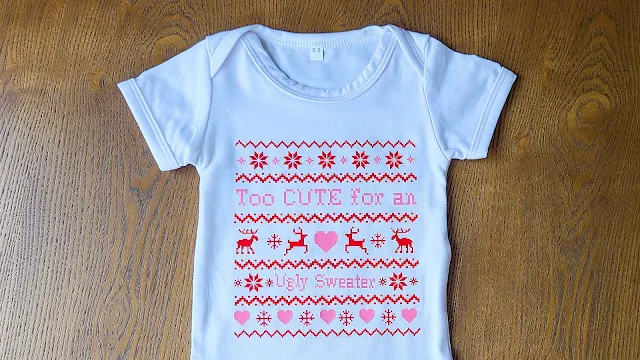
Lay the red HTV down first onto your onesie. Then, take the pink elements and put them in between the rectangular gaps to complete the design.Make sure that all the HTV (particularly the pink HTV) lays directly on the fabric of the shirt. It's okay if empty areas of the carrier sheets overlap, but pink HTV should NOT be laying on top of the red HTV's carrier sheet.
Tip: For a onesie, it's best to use a pressing pillow for even pressure from your heat press.
Press the HTV, and remove the carrier sheets.
Isn't this onesie just so cute? It uses one of the designs from the Christmas in July SVG Bundle at So Fontsy. Start your Christmas crafting now!
Note: This post may contain affiliate links. By clicking on them and purchasing products through my links, I receive a small commission. That's what helps fund Silhouette School so I can keep buying new Silhouette-related products to show you how to get the most out of your machine!
Get Silhouette School lessons delivered to your email inbox! Select Once Daily or Weekly.


.png)


This comment has been removed by the author.
ReplyDeleteThis tutorial is very confusing.
ReplyDeleteSo cute!!
ReplyDeleteAwesome! Thank you!
ReplyDeleteBrilliant! I love that you figure out these helpful tips for us!
ReplyDelete