


The trick is to pull out your hair dryer!
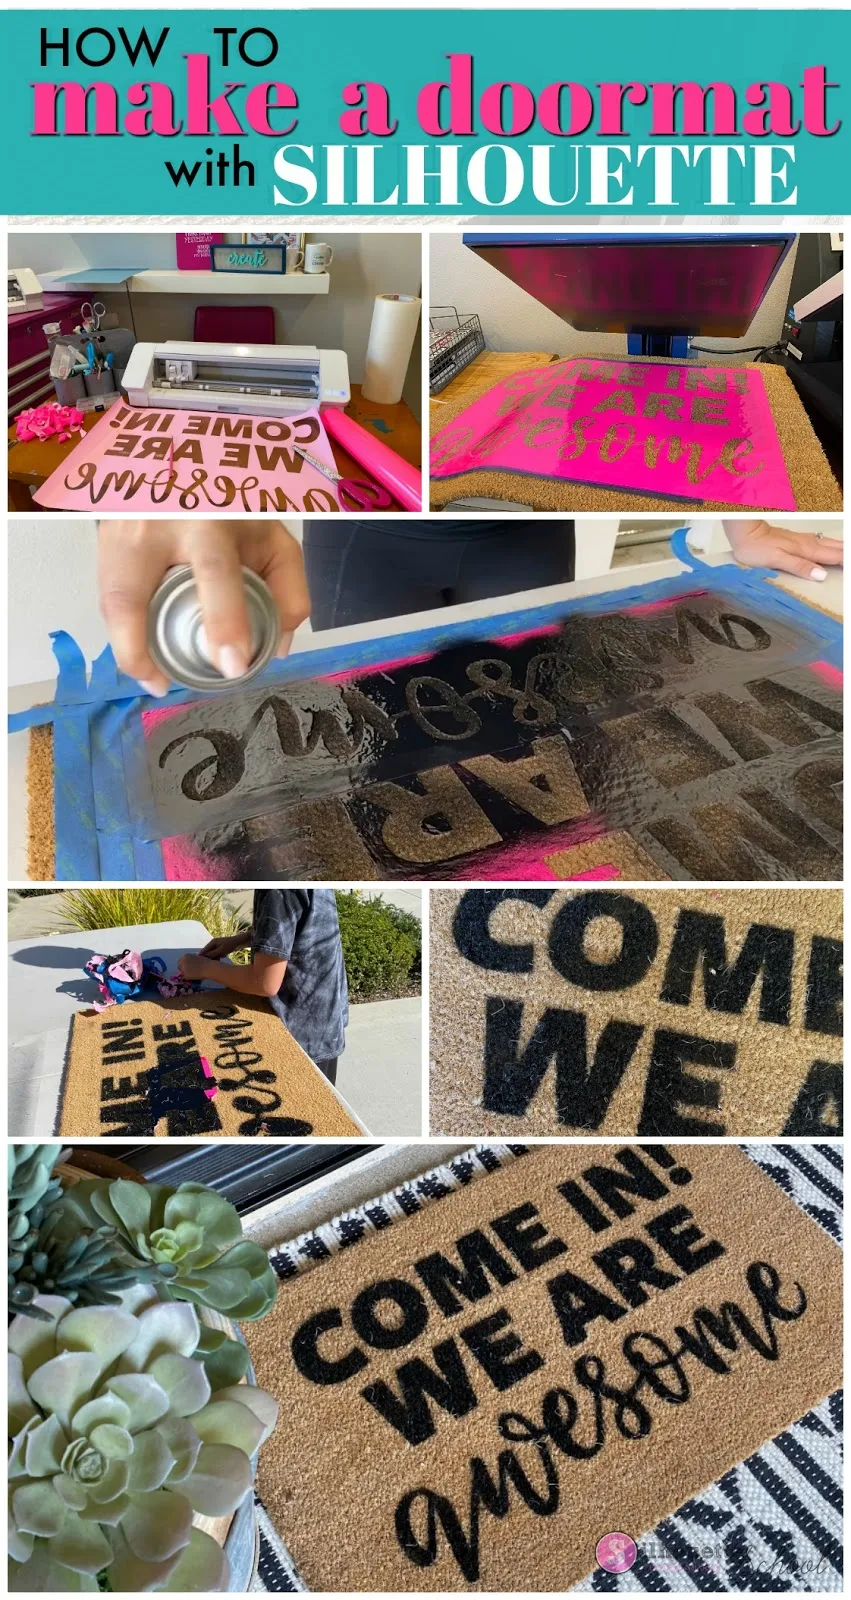
Adhesive vinyl isn’t just for decals! You can cut vinyl with your Silhouette Cameo to make the perfect stencils for creating your own DIY doormat! From cutting the stencil to sealing the paint, here are some tips to help make the process go more smoothly.

Permanent adhesive vinyl like Oracal 651 makes great stencil material because it produces such crisp paint lines. It doesn’t really matter what color vinyl you use to cut your stencil, just consider using a vinyl color that contrasts with your paint color. For example, if you’re using black paint on your doormat, cut the stencil from a lighter colored vinyl, and it’s so much easier to see where you’ve already applied painted.

For an 18 x 30-inch doormat like this one from Target, one sheet
of 12 x 24-inch vinyl is the perfect size. You can choose to cut with or without a mat. In Silhouette Studio, change the Media Size to 12x24.
Also, changing the orientation to Landscape may be helpful with a project like this - although that's a personal preference. Check the box next to “Show Cut Border” so you can resize your doormat design to fit within the Cameo's cutting area. Then, send to cut!

Also, changing the orientation to Landscape may be helpful with a project like this - although that's a personal preference. Check the box next to “Show Cut Border” so you can resize your doormat design to fit within the Cameo's cutting area. Then, send to cut!

This doormat SVG design comes from the Doormat Bundle at
So Fontsy which includes 34 doormat quotes (all of which I need!!)

Cut your design on vinyl.
Before unloading the vinyl, test weed an area to check how it cut. Remember to weed out the positive, not the negative pieces since you’re making a stencil, not a decal. Only remove the pieces that you want painted onto your doormat.

If your test weed shows you didn’t get a nice cut, you can send it back through the machine to cut again. Once you're happy with the cut, unload and weed the rest of the vinyl stencil.
One of the biggest challenges you may face with this project is working with a large piece of vinyl and transferring it onto the doormat. But here are some tips to make it go much more smoothly.
Before applying your transfer tape over the vinyl, lay down a couple long strips of blue painter’s tape (or other low tack tape). Note: I found that I probably only needed the masking tape on the left and right sides of the stencil, the two in the middle weren’t really necessary.

Run the tape vertically across the vinyl and make sure the tape extends well beyond the top and bottom edges of the stencil (this will be very important later). You want about 6 inches or more of extra tape extending over the top and the bottom of the stencil.

Then, cut a piece of transfer tape (like Oracal MT80P Transfer Tape) just slightly longer than your
vinyl stencil. Stick just the edge of one side of the tape to your work surface under
your vinyl stencil. This edge will act as a hinge while you peel away the white transfer
tape backing.

Once released, use a scraper to press the transfer tape over your stencil.


Once released, use a scraper to press the transfer tape over your stencil.

Next, roll back the edges of the masking tape onto themselves so you can more easily move the whole thing to the side to set your doormat on your work surface with a piece of poster board or stiff cardboard underneath it. This way, if you need to move your doormat for any reason, you’ll have a firm surface you can grab to keep the mat flat while you move it (and won't distort the stencil).

Now, center your stencil design on your door mat (the transfer tape and vinyl backing are still on at this point). Use another strip of masking tape to tape down one edge of the vinyl stencil.
Lay the tape vertically across that stencil's edge and adhere the masking tape to the work surface below the doormat. Again, this will act like a hinge so you can peel off the transfer tape (with the vinyl stencil) from the vinyl backing.

Keep one hand on the vinyl backing while you peel up the transfer tape and vinyl. When you’ve peeled back the stencil, move the vinyl backing away and lay the vinyl back down flat on the doormat. Re-center the design if it has moved. The vinyl doesn’t stick very well to the coir material so it’s really easy to make little adjustments.

Now, unroll the masking tape strips and secure firmly to the work surface underneath the doormat. This is important because the masking
tape will hold down the vinyl stencil while you remove the transfer tape from the vinyl. You may need to
initially hold down an area of the vinyl onto your doormat while you peel off the
transfer tape. Once that area of the vinyl has fully released from the transfer
tape though, it’ll lay flat on the doormat.


Once the transfer tape is completely removed, begin peeling the
masking tape off the vinyl. Work
carefully, so you don’t stretch out the stencil.


Next, here's the secret for super crisp paint lines, use a blow dryer! Apply warm heat and low air flow for just a second or two to “melt” the vinyl into the mat. Move the dryer away, and then press straight down on the vinyl.

You’ll see the vinyl crinkle as it takes on the texture of the doormat. Pay particular attention to the edges of the stencil so those stick down really well. And be careful not to blow away any free standing pieces (like the middles of the letters).

Once the vinyl is sufficiently stuck, it’s time to begin
painting. You’ll want to use durable outdoor paint and stencil brushes with short,
stiff bristles for this project.


Tap a little paint onto your stencil brush and “pounce” the paint onto the surface of the mat. Move the brush up and down only – do not swipe it side to side. This keeps the paint from bleeding underneath the stencil. And as long you only move the brush up and down, you can press the brush's bristles into the coir mat for more solid paint coverage.

Apply a light first coat, then go back and reapply more paint.

Three coats of paint are probably all you need to get good coverage. After the final coal of paint, let dry for about 20 minutes.

Now remove the vinyl stencil to reveal your design. Tweezers can be helpful to remove the middles of the letters, but really the vinyl lifts up really easily.


And then there your have it! Your own DIY doormat! Fun to spruce up the
house for spring or to give as a housewarming gift.


And if you're interested in the HTV and spraypaint doormat tutorial you can check it out here. Try it both ways and decide which way you like best!
Both doormat SVG designs are from the 34 door mat Doormat Bundle over at So Fontsy!
Note: This post may contain affiliate links. By clicking on them and purchasing products through my links, I receive a small commission. That's what helps fund Silhouette School so I can keep buying new Silhouette-related products to show you how to get the most out of your machine!
Get Silhouette School lessons delivered to your email inbox! Select Once Daily or Weekly.


.png)


Thanks for this tutorial. What type of transfer tape are you sing, mine would not let go of the vinyl.
ReplyDeleteThanks for a reply,
Laura H.
Tape Technologies Medium Tack
DeleteHello, can spray paint also be used for this
ReplyDeletePeople have great luck with the spray sealant- Flex Seal!
Delete