This beginner tutorial will walk you through your first 15" Silhouette CAMEO Plus cut from Silhouette Studio setup all the way through cutting.
I have had a blank doormat from Target sitting in my closet for a few weeks waiting for me to paint it with a cute doormat saying! When I measured the doormat and saw it was 30 x 18 I realized a design of at least 14" wide (and almost 24" long) would best fit the mat! And that's how I found the perfect first Silhouette CAMEO 4 Plus project!
If I had tried to cut the doormat stencil on one of my 12" Silhouette CAMEO machines, I would have had to either make it smaller or cut it in pieces and assemble. But with the 15" machine, I could easily cut the stencil all in one piece. This is the beauty of the 15" Silhouette - you can make larger stencils and decals for wood signs, doormats, walls, shirts, and more without the need to break up the design and then reassemble.
There are a lot of different ways to paint your own doormat. Since HTV was the only 15" wide material I had on hand that's what I decided to use. So if you're wondering "Can you use HTV on a doormat?" the answer is YES!!!
Silhouette Studio for Silhouette CAMEO Plus
If you haven't already set up your Silhouette CAMEO Plus do that first including installing the correct version of Silhouette Studio to run the 15" CAMEO. This tutorial will walk you through step by step how to set up your CAMEO 4 Plus and install the software.
If you do not install the correct version of Silhouette Studio, your Silhouette CAMEO Plus will not show up in your machine list and the mat and 15" options won't appear in the Page Setup Panel.
Silhouette CAMEO Plus Software Settings
With the cutting machine powered on and connected to your computer by USB or Bluetooth, start in the Send panel of Silhouette Studio. Make sure the Autoblade is in Tool Carriage 1.
From the machine list select an available CAMEO 4 Plus machine. The tool and action should automatically adjust due to the auto tool detection.
Move to the Design area. Open the Page Set Up Panel. Select the machine as the CAMEO 4 Plus. In this case, because our design is going to be longer than the CAMEO 4 Plus cutting mat, we need to change the cutting mat option to "None".
Pick "Custom" as the material size and type 14.6" for the width and any number larger than your design's length. I'm just going to enter 35 because I know my design can't be longer than 30". Pick portrait for the orientation.
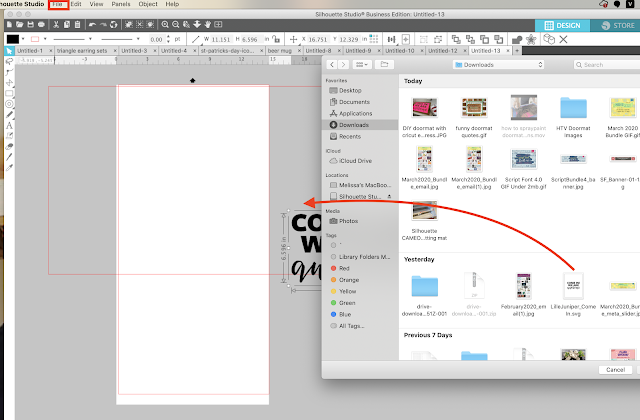
Open up your design by either dragging or dropping or going to File > Merge. If you are using an SVG you will need Silhouette Studio Designer Edition which is a one time upgrade of about $28. If you do not have Designer Edition you'll need either the DXF or the JPEG or PNG (tracing required).
I am using one of the funny doormat quotes from So Fontsy's Doormat SVG Bundle: Come In! We are Awesome.
The design needs to be resized to fit the mat. To know how large to make it, use the Draw a Rectangle tool to draw a rectangle with the exact dimensions of your doormat. The blank doormat I have from Target is 30x18" so that's the size I draw my box. Use the Zoom Out tool on the top tool bar to zoom out so you can see the complete design.
Select the doormat SVG design by clicking it and dragging it into the rectangle. With the design selected still, grab a corner nodule and pull in a diagonal direction to enlarge the design proportionally. Because we are cutting with the 15" CAMEO our design can be at least 14.6" wide and up to 60' (FEET!!!!) long. I find the perfect size to be about 14.2" x 24".
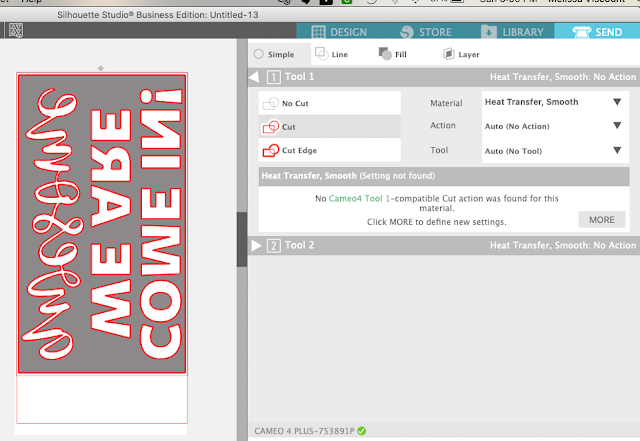
Since this stencil is being cut on HTV we need to mirror the image. To do that select the design > right click > Flip Horizontally.
The final step is to rotate the entire design so it fits on cutting mat. You can select the design and use the green rotation handle at the top of the design or you an open the Transform panel and rotate the design 90 degrees. Position the design on the virtual cutting mat.
Cutting Without a Mat on Silhouette CAMEO 4 Plus
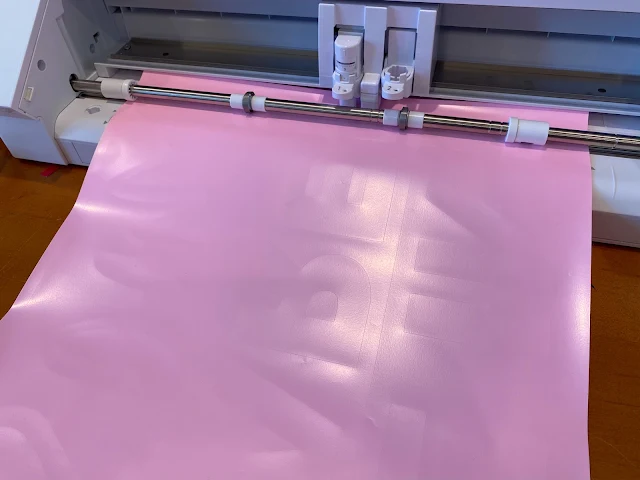
To ensure the HTV stays securely under the rollers during cutting without a cutting mat on Silhouette, the right roller needs to be moved in to the left one notch. Flip the roller lever bar forward (down). Press the gray lock button on the right roller and slide the roller to the left until the teeth snap in. Flip the lever bar back up to lower the roller bar and rollers.
Grab your piece of heat transfer vinyl and with the shiny side down (remember we cut in HTV in reverse) line up the left edge with the line guide on the left side of the machine. The top edge should be gently resting against the rollers. Hold it there with one hand, while you press the up arrow on the touch panel to load the material.
Return to Silhouette Studio and from the Send panel ensure your design has bold red lines around it. If it doesn't, select your entire design and click "Cut" to turn on the cut lines.
Pick Heat Transfer Vinyl, Smooth from the material list. My preference is to increase the default cut settings by increasing the Force to 14 to get a better cut.
When you're ready click "Send" to send the design to cut.
Weeding a Silhouette Stencil Design
When the design is finished being cut, I would suggest you not unload it until you make sure it's cut cleanly. Using a weeding tool, try to remove one letter. If it weeds easily you can unload the material from the cutting machine by pressing the down arrow (unload) to remove your Silhouette stencil.Congrats you've just successfully accomplished your first cut with Silhouette CAMEO Plus!
Tomorrow I'll have Part 2 of this tutorial which is actually making a doormat with Silhouette CAMEO Plus (or a 12" Silhouette cutting machine!)
Note: This post may contain affiliate links. By clicking on them and purchasing products through my links, I receive a small commission. That's what helps fund Silhouette School so I can keep buying new Silhouette-related products to show you how to get the most out of your machine!
Get Silhouette School lessons delivered to your email inbox! Select Once Daily or Weekly.


.png)


No comments
Thanks for leaving a comment! We get several hundred comments a day. While we appreciate every single one of them it's nearly impossible to respond back to all of them, all the time. So... if you could help me by treating these comments like a forum where readers help readers.
In addition, don't forget to look for specific answers by using the Search Box on the blog. If you're still not having any luck, feel free to email me with your question.