So how do you use the Silhouette Mint? This beginner tutorial will walk you through everything you need to know so you can create you first stamp with the Mint. If you're looking for an honest Silhouette Mint Stamp machine review you can find it here.
The basic Silhouette Mint Stamp bundles includes the Mint stamp machine, Mint Studio software, several bottles of stamp ink, a power cord, a USB cord to connect the Mint to the computer, and a few stamp sets including bases and the printing sheet. There are also larger Silhouette Mint bundles that include more stamp kits and extra inks!
The Mint requires a separate software program than the other Silhouette cutting machines. You can download Mint Studio free from Silhouette America's website. Once you plug in your Mint machine and power it on, the free stamp designs you get with the machine should show up in your library. You can also import your complete Silhouette Studio library into Mint Studio which I explain in detail in this tutorial.
To create your first stamp with the Mint open up Mint Studio.
Click on the Stamp Settings tool along the top tool bar and select the stamp size that matches the base you are going to use to create your stamp. I am working on a 45x45mm stamp. Once selected, your work area will adjust to the appropriate size.
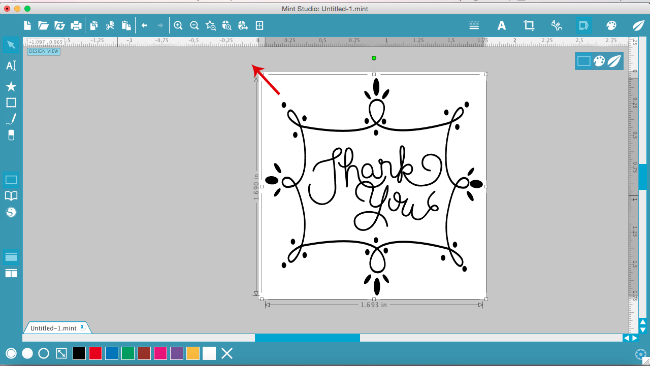
Now go to your Mint library and open your stamp design. I picked the Thank You frame which was one of the free stamp files included with my mint. I will say that while the Mint can print any design perfectly...stamping tiny text left me underwhelmed. My suggestion is to pick or create a stamp design that includes large or bold text.
Once you have your design open in Mint Studio, size it so it fits on the virtual stamp sheet. You can do this by selecting the design and pulling the corners in or out to scale. You can also group and ungroup the design if you want to move things around.
Since this is a basic beginner Silhouette Mint tutorial we won't worry about any of the stamp filters, effects or fill colors right now. Now we're ready to start printing our stamp.
Plug in and power on the Silhouette Mint.
When you're ready, in Mint Studio click the Send to Mint tool along the top tool bar. You will notice that when you do this your design is automatically mirrored in the software. This is essential for the stamp to be correctly oriented with stamp.
Click "Start Mint" in Silhouette Studio.
Be sure you are using the EXACT same size stamp sheet as what you have selected in Mint Studio otherwise your stamp will not print correctly.
Take your rubber stamp sheet - still on the cardboard and still with the plastic overlay - and place it in the slot in the back of the machine with the arrow side going in first. It will go in at a slight angle.
The Mint stamp machine will automatically begin feeding the stamp through the machine and will spit it out the front of the machine in less than 30 seconds.
Remove the stamp sheet from the Mint.
To remove the rubber stamp from the cardboard base, fold the cardboard back along the perforated line and peel it away.
Remove the rubber stamp from between the cardboard and the plastic liner.
If you haven't already, remove the cap from the stamp base. Peel off the protective liner to expose the adhesive and place the rubber stamp onto the base.
Now it's time to ink your new stamp! You can ink your stamp with one color or with multiple colors of the Silhouette Mint Ink.
Squeeze a generous amount of ink onto the stamp on the raised areas. After you've inked your stamp let it sit for about 10-15 minutes.
You'll want to stamp off the excess ink on a piece of paper.
If you are getting any shading around your stamp, gently wipe away the excess ink from the rubber stamp.
Your DIY self-inking stamp can now be used over and over without re-inking.
The final step is to stamp onto the sticker for the cap of your stamp base...this is just a little reminder for you so you know which stamps you have without having to remove the lid every time.
Note: This post may contain affiliate links. By clicking on them and purchasing products through my links, I receive a small commission. That's what helps fund Silhouette School so I can keep buying new Silhouette-related products to show you how to get the most out of your machine!
Get Silhouette School lessons delivered to your email inbox! Select Once Daily or Weekly.


.png)


I LOVE your tutorials on all things Silhouette, but they have not updated the Mint software in forever. Is this a dead product for the company? The software was so buggy yesterday, I had to restart it ten times and after hours online today, their only solution was to downgrade to a lower version. Do you have any words of advice?
ReplyDeleteHey there! Unfortunately, downgrading to a previous version would be my recommendation as well.
DeleteI am having trouble removing the liner from the stamp in order to place it on the block. It doesn’t seem to want to come off.
ReplyDelete