Let's talk today about how much I love freezer paper for stencils, shall we?! I'm not the only one who thinks this stuff is great.... Gabriella from
The Single Yet Married Mom blog shares my love for freezer paper. She's here today to share a fun tutorial on how to use a freezer paper stencil to make custom t-shirt designs.
Hi! I'm Gabriella from The Single Yet Married Mom blog. I have had my Silhouette Cameo since Christmas of this year, and I have to say - I am
obsessed. From designing signs and nursery art, using it to address letters in fancy
calligraphy, to even applying vinyl on fabric - this thing does it all; and I've yet to
even really skim the waters with this awesome machine!
I have been dying to get my sewing machine out and doing some fabric appliques,
but I haven't gone out to get any new fabric in a while. What I do have lying around
my house however, is a ton of acrylic paint. I really think I have 2 of literally every
color that was available in Michael's! I also have a large amount of freezer paper on
hand - so I thought, why not paint onto fabric? I really love the ease of vinyl, but
sometimes a little diversity in my closet would be nice.
I decided that my first acrylic paint fabric artwork would be for my best friend's
daughter. Not only does this momma LOVE the White Stripes (and maybe a slight
obsession with Jack White), but her favorite song is Jolene. The White Stripes had a
vinyl record released with an image of Meg White (at least, it REALLLLY looks like
her) and the name "Jolene" in her hair. I decided that's what I would do on a baby
onesie. EPIC.
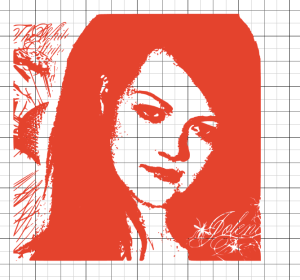
Now, before you assume you'll need fancy Adobe Illustrator to do a nice trace of this
image, you are so wrong! Here is a screen shot of a trace from Silhouette Studio. If you need a refresher on
tracing photos, check out this tutorial on Silhouette School.
Pretty awesome, right!
Now here's what you'll need to complete this project:
- Water
Acrylic Paint color(s) of your choosing
- Textile Medium (helps make the acrylic paint permanent on the onesie, and will give
it a smooth make, so it won't crack after you've put it in the dryer and wash multiple
times!)
- Foam brush
- Freezer paper
- Iron
Baby Onesie (pre-wash if you want, just don't use any fabric softeners)
- Silhouette machine

After you've traced your image, go ahead and cut it on freezer paper with your Silhouette. In Melissa's ebook,
The Ultimate Silhouette Guide, she recommends cutting the freezer paper with the shiny side down with cut settings: Blade: 1, Speed 3, Thickness 2.
Carefully weed the design.
Make sure you read the instructions on your textile medium when mixing this with
your acrylic paint. Mine says 2:1.
Place your cut out freezer paper stencil onto your fabric (shiny side down), and iron
on your freezer paper. This allows the freezer paper to adhere to the clothing so you
can be a bit messy with your paint, and it will help prevent bleeding.
You can also
prevent a lot of bleeding by using a small quantity of paint at a time. Don't slather it
on there. Patience is a virtue here!
Using a foam brush, dab your paint onto the fabric until you have reached your
desired look. I would wait about 3 hours to make sure the paint has dried onto the
fabric, and then you can peel off the freezer paper.
Again, slow and steady wins the
race.
My fabric medium also suggests ironing over your new image (after you've peeled
off your freezer paper stencil) for about 20 seconds.
That's it! You have your awesome new design.
Wear it around proudly :)
That's it! You have your awesome new design.
Thanks for coming to class today at Silhouette School. If you like what you see, I'd love for you to pin it!




 Today Silhouette School monthly contributor Kati Farrer is here to explain how to turn any Silhouette design or cut file into a stencil friendly design.


 I decided that my first acrylic paint fabric artwork would be for my best friend's
daughter. Not only does this momma LOVE the White Stripes (and maybe a slight
obsession with Jack White), but her favorite song is Jolene. The White Stripes had a
vinyl record released with an image of Meg White (at least, it REALLLLY looks like
her) and the name "Jolene" in her hair. I decided that's what I would do on a baby
onesie. EPIC.
I decided that my first acrylic paint fabric artwork would be for my best friend's
daughter. Not only does this momma LOVE the White Stripes (and maybe a slight
obsession with Jack White), but her favorite song is Jolene. The White Stripes had a
vinyl record released with an image of Meg White (at least, it REALLLLY looks like
her) and the name "Jolene" in her hair. I decided that's what I would do on a baby
onesie. EPIC. After you've traced your image, go ahead and cut it on freezer paper with your Silhouette. In Melissa's ebook, The Ultimate Silhouette Guide, she recommends cutting the freezer paper with the shiny side down with cut settings: Blade: 1, Speed 3, Thickness 2.



.png)