You can cut small vinyl text with your Silhouette CAMEO...and not actually pull your hair out.
But just how small can vinyl lettering be cut? In this blog post I'll share some some tips on how to successfully cut even the smallest vinyl letters.
I was cutting vinyl names to fit on these
3" lip gloss containers if that gives you any idea just how small the letters need to be.
There's no certain font you need to pick for small text because we're going to apply a few other tricks that should help you cut pretty much any font in any size.
I'm using the Nighty Wolf font from
So Fontsy's Exclusive Crafters Bundle. you can grab the full bundle or just snag the font here
(although in this case the entire bundle is less than just buying the font)
Download and install the font on your computer and then restart Silhouette Studio. The font will be in your text style list.
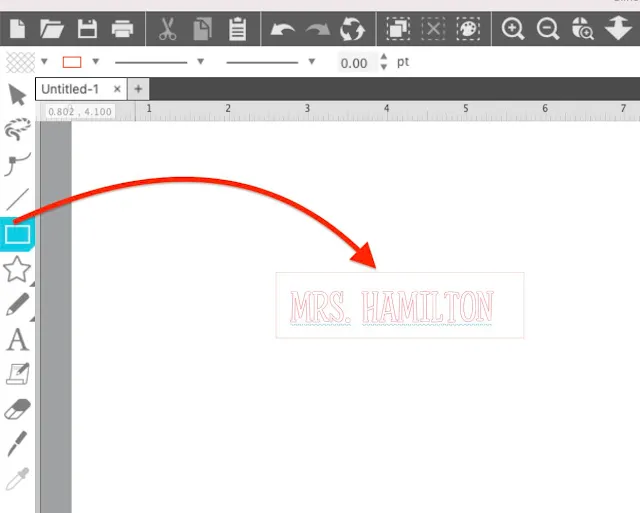
Click the Text tool on the left sidebar to begin a text box and then type out the text. If you haven't already measure the surface where your small vinyl text is going to be applied. In this case the area is about less than 3" by 0.5" inches.
Add a Weeding Box Around Small Text in Silhouette Studio
Use the Draw a Rectangle tool to draw out a rectangle that is the same size as the surface area. Now pull the font into that text area and scale or size the line of text.
This not only ensures the text will fit in your space, but you've also created a weeding box.
Thicken the Font By Increasing the Line Weight
Select the text and increase the line weight. The line weight itself will be determined by the font. You want to make sure that thickening the line doesn't distort the font itself.
The reason thickening the font is helpful is because the blade is cutting the edge of the letters further apart. With very thin and small fonts the blade is almost going over the same area twice. So thickening the font will put more space between where the blade has to pass on the up and the down allowing more surface areas to stay on the vinyl backing.
When you increase the line weight (instead of adding an offset) you are still able to edit the text as a font including changing the font style and font size.
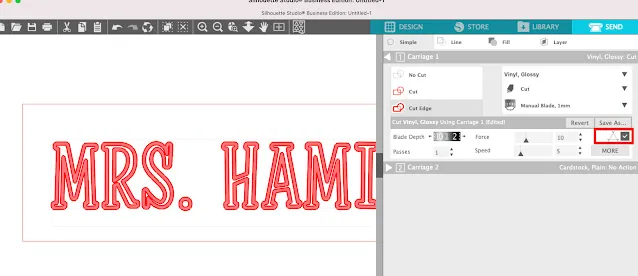
Now move to the Send panel and make sure the Cut Action is set to "Cut Edge" this will ensure you cut on the outside of the increased line weight thickening your letters a bit.
Turn on Segment Line Overcut
The biggest reason that small vinyl letters don't cut well is because when the blade turns it catches the corners. To avoid that you want to turn on Segment Line Overcut which will make the blade lift up and turn instead of the tip of the blade staying in the vinyl and rotating.
The Segment Line Overcut option is found in the Send panel to the right of the Force setting. It's unlabeled (why???) but looks like a triangle with extended sides. You want to check the box to turn on Segment Line Overcut.
Slow Down the Cut Speed...But Not Too Much
Cutting slower will help you cut small letters but cutting too slow can also cause issues if the blade is dragging too long in the vinyl. Set your cut speed between 2 and 4 for small vinyl letters.
Increase the Force...to 14
You do not want to have to struggle, yank, or pull the vinyl when weeding so you need to make sure the force is deep enough to cut through vinyl completely separating it so there are not snags or areas that are not completely cut.
Increasing the force to 14 when cutting adhesive vinyl (no matter what size) will pretty much ensure this.
VIDEO Tips: How to Cut Small Vinyl Letters and Designs
A full video tutorial on how to cut tiny vinyl text and designs with Silhouette CAMEO can be found here on Silhouette U. Head over to preview it (or any of the other 500+ videos on Silhouette U..you can also sign up for a 7 day free trial to watch the full video (along with unlocking access to all Silhouette U benefits including 1:1 chat help with me).
Reverse Weed Small Vinyl Letters
After the cutting is complete, keep the vinyl sheet on your cutting mat and weed away the vinyl on the outside of the weeding box.
Do not attempt to remove the weeding box...yet. We are going to reverse weed this vinyl.
To reverse weed, take a piece of transfer tape and place it completely over the weeding box and the vinyl letters. Burnish is really well.
Flip it over and peel away the vinyl backing. You should be left with a vinyl rectangle with the cut letters inside it on the transfer tape.
Use a weeding tool, hook or very sharp tweezers to peel away the weeding box. This should leave your small vinyl text on the transfer tape.
You can weed out the counters (inside of the letters) or wait to do that once the vinyl is applied to the surface - in this case the chapstick containers!
Note: This post may contain affiliate links. By clicking on them and purchasing products through my links, I receive a small commission. That's what helps fund Silhouette School so I can keep buying new Silhouette-related products to show you how to get the most out of your machine!
Get Silhouette School lessons delivered to your email inbox! Select Once Daily or Weekly.


.png)


This is a fantastic article! I have tried cutting small vinyl letters before, with varying results, but your instructions are SO much easier. I especially liked the Reverse Weeding! I love all of your tips, but this is the best one yet! Thank you!
ReplyDelete