Setting up the 24" Siser Romeo to print and cut may seem intimidating, but it's not...and once you understand the process you will realize just how useful print and cut is!
You can print and cut on the 24" Siser machine with the width and length really only limited by your printer. So whether you have a standard 8.5" x 11" inkjet, a 13" wide printer or a 20" ecosolvent printer like the Roland BN-20 or BN-20A you can contour cut on the Romeo.
Follow these steps to set up for your first print and cut with Siser Romeo and Leonardo Design Space.
Launch the Siser Romeo software - Leonardo Design Software and start a new design area.
When the new art board open you'll get the settings panels on the right side.
Check the box for "Print and Cut Job". Once you do this you'll get a drop down menu with standard printed page sizes.
You can select one of the options, but I suggest instead you go into the print page settings and choose your option there. Click the small printer icon to open the printer preferences.
Expand the Paper Size dropdown and select the paper size you are going to print on.
I am going to select the 18.8" x 15" page size that I use when printing on my Roland BN-20A ecosolvent printer.
Once you pick the paper size, you'll see the art board size will change.
Now it's time to open the designs in the work area.
How to Import PNG Images into Leonardo Design Studio
Go to File > Import File.
Be sure to tell the software you are using the image as print and cut file.
Once you make this selection the software will automatically vectorize or create the cut lines for you. This is the same as the tracing process in Silhouette Studio except it's done automatically for you.
Once the file opens in the work area registration marks will be placed around it.
Size and position the design(s) as you'd like.
If you add another file by going to File > Import again the registration marks will expand around the set of designs.
When you're ready click "Send Design." I would suggest you keep the default settings and just click "Send."
This will split the design into the printed design and the cut contour lines.
Now you can select the printer you want to print to from the Printer dropdown list.
How to Print as PDF from Siser Leonardo Design Studio
NOTE: If you want to print to a PDF - which will also include the registration marks - click "Send to Printer" and then pick PDF > Print to PDF.
The image will then be printed. Once the printing is done, now it's time to cut with the Siser Romeo.
You can cut lined material with or without a cutting mat.
Lift the pinch rollers using the lever on the back of the machine and slide in the material sheet or cutting mat. Be sure the registration mark with the little arrow next to it is closest to the tool housing and the left edge is aligned with the gray strip on the machine's left side.
On the machine's touch screen use the arrows to position the blade housing over the area of the bottom left registration mark.
You can also select the material type and make adjustments to the cut settings from the touch panel.
I am cutting Oracal 3165 which is a 4 mil adhesive vinyl so I needed to increase the force a little bit to 33.
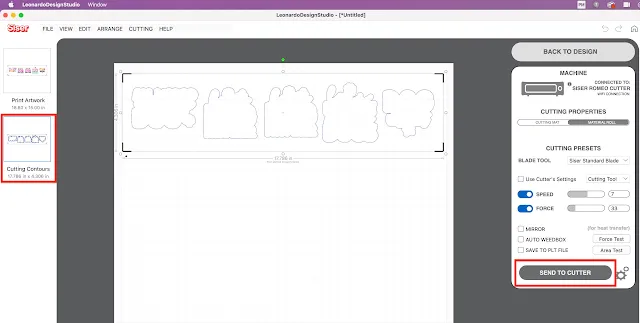
In the Leonardo Design Studio click on the Contour Cutting block on the left and then "Send to Cutter" on the cutting panel to begin the cutting.
The Romeo will first find the registration marks and then begin cutting. The cutting machine is pretty quick so the cutting doesn't take long.
Once the cutting is done you can lift the pinch rollers again to remove the cutting mat or material and then weed away any excess from the printed sheet.
If you're looking for the full start to finish tutorial on how to print with Roland BN-20A and then cut with Siser Romeo, this video explains every step including the Versaworks settings.
Get Silhouette School lessons delivered to your email inbox! Select Once Daily or Weekly.


.png)


No comments
Thanks for leaving a comment! We get several hundred comments a day. While we appreciate every single one of them it's nearly impossible to respond back to all of them, all the time. So... if you could help me by treating these comments like a forum where readers help readers.
In addition, don't forget to look for specific answers by using the Search Box on the blog. If you're still not having any luck, feel free to email me with your question.