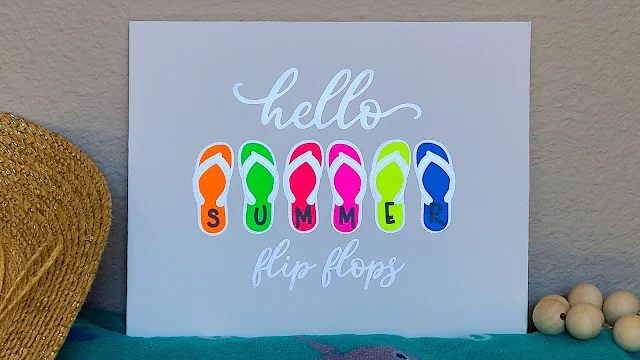
Do you have 1,234,567,890 scraps of the same HTV color? Saving HTV scraps from previous projects is such a good idea when you're working on small projects that just need a little bit of one color.
I'm working on this summery design from the July SVG and Fonts Bundle at So Fontsy. Did you know that this bundle has 102 SVGs, 14 fonts, and 35 earring templates?! It's true, and it's 94% off through the end of the month. So, head on over to So Fontsy and grab the July SVG and Fonts Bundle right now! You don't want to miss this one!
Cutting Your Scraps
I like this scrap trick for designs like this one, where there are multiple elements that are separate from each other - like the 6 flip flops and the words "hello" and "flip flops".Instead of cutting these parts of the design together (which together measures about 7 x 6 inches) on a new 12x12-inch sheet of silver HTV, I had enough usable scraps in my stash to cut each flip flop and the words on a separate scrap piece.
Use the grid lines in Silhouette Studio and the grid lines on your cutting mat to line up the design and the small scraps.
Once everything is cut you'll need to put the design back together. Getting it lined up accurately can be the tricky part.
So, here's a neat little trick that makes it's so easy to line up all the HTV back together again in the right place, and press many pieces of HTV at once, so you're not wasting time pressing one piece at a time.
Trim Carrier Sheets & Print Out Design
On all of your little pieces, trim the carrier sheets of each cut and weeded HTV piece with scissors very closely around the HTV itself. Just be sure to not actually cut through the HTV.This step is important because it will help to keep the carrier sheet from interfering with other HTV pieces while pressing.
Next, return to Silhouette Studio and print out your design in the same size as in your project. It's not necessary to print in color. In fact, it may be more helpful to print the design in black and white. To print from Studio just click the Printer icon on the top tool bar and send it to your inkjet printer.
Slide the printed sheet, under a sheet of parchment paper. The high contrast of the black and white printout makes it really easy to see it from underneath the parchment.
Align HTV
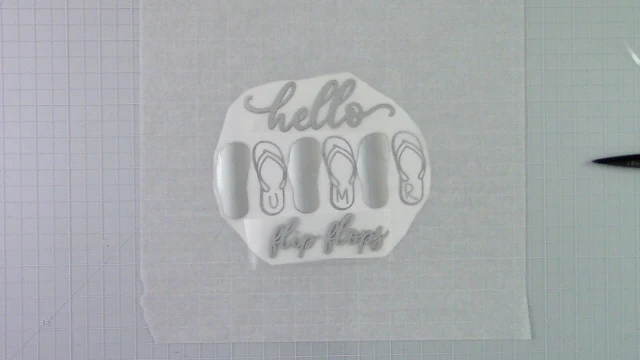
Use the printout as a guide to align your HTV pieces over their corresponding place on top of the parchment paper. This allows you to make tiny adjustments until everything is in just the right spot.The most important thing to keep in mind is that HTV should NOT be laying on top of the carrier sheet of another piece of HTV. That is precisely why we trimmed the carrier sheets so close, so we could align many pieces at once without them overlapping.
Some of these flip flops were really close together, and I didn't want to risk messing up the press, so I decided to press every other flip flop first, plus the words "hello" and flip flops." Then, I'd go back in to press the rest.
Transfer the design to your canvas
Now, you need to transfer all these individual pieces of HTV from the parchment to your pressing surface (in this case a canvas sign from the Dollar Tree). To do that, lay down one large piece of Siser Heat Resistant Transfer Material over all the pieces. This Heat Resistant Transfer Material are basically just a carrier sheet without HTV on them - they have a sticky side to lay onto your pressing surface and are designed to be heat resistant for pressing. These are not the same as the transfer tape you use for adhesive vinyl.If you save the carrier sheets from previous HTV projects, you could use that instead. The individual pieces of HTV will stick to the larger piece of Heat Resistant Transfer Material, and now all you need to do is transfer that one larger piece with all the individual pieces stuck to it onto your canvas and press it.
Center the entire design so that the completed project will be centered accurately when you're done.
Press and Peel Carrier Sheet
I'm using the Cricut Easy Press Mini to press the HTV. I placed a pressing pillow underneath the canvas so I would be able to apply appropriate pressure to the HTV without stretching out the canvas. You could also put a shirt, towels or a book underneath instead.After pressing, remove the large piece of Heat Resistant Transfer Material. The smaller carrier sheets from the individual pieces of HTV may stick to it which means you don't even have to remove them all individually. But if they don't stick, just peel up the remaining carrier sheets. If you're going to reuse this large piece of Heat Resistant Transfer Material (which is what I did), just remove the smaller carrier sheets sticking to it.
Repeat Until finished
To complete this first layer of the design, go back to the parchment and print out and line up the remaining silver flip flops. This time I found one HTV flip flop to be curling up a lot which could interfere with it being lined up correctly. To fix that, I just used a small piece of heat resistant transfer tape to keep it down. Then, with all the other remaining pieces lined up, apply the large piece of Heat Resistant Transfer Material over them.Transfer this piece to your canvas, press, then remove the carrier sheets just like before.
With this first layer already in place, it was very easy to use it as a guide for lining up the remaining layers of the flip flops. So, it wasn't necessary for me to use the printout and parchment anymore. But for more complicated designs, you can keep going back to the parchment and printout to align more pieces of HTV for pressing.
There you have it! Empty out your scrap HTV stash and make your own summer canvas! Grab the design used in this project from the July SVG and Fonts Bundle over at So Fontsy. And there's so much more in the bundle too - check it out!
Note: This post may contain affiliate links. By clicking on them and purchasing products through my links, I receive a small commission. That's what helps fund Silhouette School so I can keep buying new Silhouette-related products to show you how to get the most out of your machine!
Get Silhouette School lessons delivered to your email inbox! Select Once Daily or Weekly.


.png)


No comments
Thanks for leaving a comment! We get several hundred comments a day. While we appreciate every single one of them it's nearly impossible to respond back to all of them, all the time. So... if you could help me by treating these comments like a forum where readers help readers.
In addition, don't forget to look for specific answers by using the Search Box on the blog. If you're still not having any luck, feel free to email me with your question.