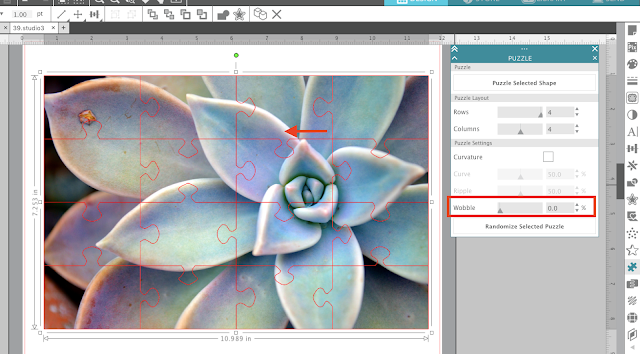
The most popular use for this tool is likely to be to cut photos - whether they are printed on paper, printable magnet sheets or some other material.
Start by opening Silhouette Studio. You can drag in a photo from your desktop, open a photo from your library, or draw a rectangle and then fill it with a photo from your Fill Patterns.
However you get there, you want a rectangular photo in your Silhouette design area.
Once the photo is in your work area, open the Puzzle tool panel from the right sidebar. This tool is available in Silhouette Studio V4.2 Designer Edition Plus and higher.
With the Puzzle panel open, select your photo and then click “Puzzle Selected Shape”.
Once the puzzle overlay has been placed over your photo, you’ll get a bunch of different options in the Puzzle tool panel. You can adjust the number of puzzle pieces by changing the number of rows and columns.
You can also keep the Curvature box checked (to have curved puzzle pieces) or uncheck it to make the puzzle pieces squared off.
Adjusting the “Wobble” will move the location of the “interlocking area” on each puzzle piece.
So how do you go about cutting your Silhouette Studio puzzle designs? You would treat it as a print and cut.
To move forward with printing and cutting, adjust the Page Setup and add registration marks.
Then print to your home printer. Remember the puzzle piece cut lines won’t print (as long as you don’t have a line weight on them). Then load the sheet onto your Silhouette cutting mat and send it to cut. The cutter edge of the design along with the puzzle pieces will be cut.
If you're looking for more free Silhouette V4.2 Tutorials check out the Silhouette School V4.2 Feature Series.
Note: This post may contain affiliate links. By clicking on them and purchasing products through my links, I receive a small commission. That's what helps fund Silhouette School so I can keep buying new Silhouette-related products to show you how to get the most out of your machine!
Get Silhouette School lessons delivered to your email inbox! Select Once Daily or Weekly.


.png)


Hello,
ReplyDeleteI created a puzzle template about a week ago, now when I try to lay an image on top of it, I can’t get the image to show through as a puzzle. Sending to the back or bringing to the front doesn’t work. Please tell me what I’m doing wrong.
Thank you so much
Hey there! The steps above should work. You want to use the fill tool rather than having the puzzle and photo as two separate pieces.
Delete