I figured if Silhouette America isn't going to make one and offer it - I may as well do it myself.
This little thing turned out so cute I figured you all might want to give it a try too so I'm offering the free pattern for the Silhouette Mint fabric cover to you in .Studio format.
Before I just hand it over, I really want to show you that designing this type of file is not that hard! It just takes a little time, practice, and thinking outside of the box. All of which I really push and encourage you to do in my new e-course, The Ultimate Silhouette Guide to Designing in Silhouette Studio.
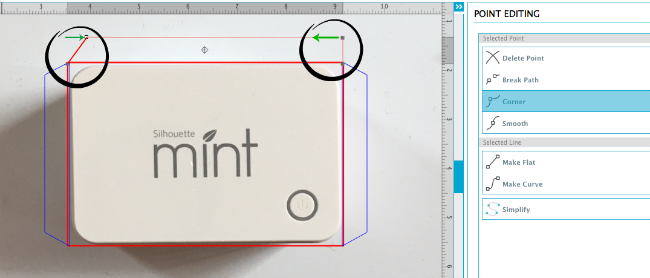
You create this type of design in Silhouette Studio in one of two ways...the first way is using the Silhouette Pixscan mat. This is helpful because once you bring the image into Silhouette Studio, you can simple trace, draw a shape, or drop edit points around the image of the Mint and your cut file will be exactly the right size. New to Silhouette Pixscan? Check out the beginner tutorial.
I actually decided I wanted the top piece of my cover not to have rounded corners. That makes the design even simpler because you're not worrying about gaps where the side pieces attach.
The second option is the old fashion way where you use a ruler and measure the dimensions.
Either way you should end up with a rectangle the same size as the top of the Silhouette Mint - or slightly larger.
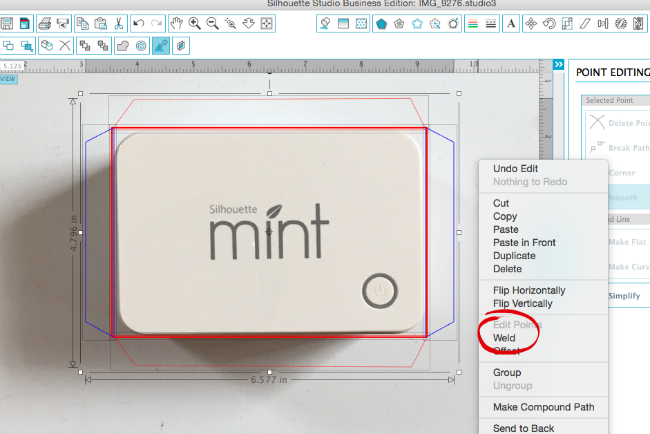
What you need to keep in mind though is that if you're making a 3D design or shape, like we are in this case for the Silhouette mint cover, you need to account for the seams or tabs where the pieces will be put together. To do that, I would simply draw another rectangle on each side, pull the corners in slightly so they don't show when you sew the pieces together.
Once I have the tabs on each side of the original piece...weld it all together.
Repeat the same process for the front/back and sides.
Alright so I've done all the work for you this time - but I'm telling you - you can do this too if you know how to design in Silhouette Studio. And just think..since you own the copyright to the design you create, you can sell them. And yes...the Ultimate Silhouette Guide to Designing ecourse will explain (and show you in the 110 page ebook and 18 video lessons) how to convert your studio files to SVGs. So if I wanted to sell this pattern for the Silhouette Mint fabric cover...I could! But you're lucky because I love you..I'm giving it to you for free.
Open it in Silhouette Studio, making sure NOT to re-size anything.
Grab your fabric and prepare it with Terial Magic before you cut. You can skip any type of fabric adhesive bond like Heat N' Bond.
Place the fabric on your Silhouette cutting mat and load it into the Silhouette CAMEO. Make sure you are using a Silhouette fabric blade or blade that you've designated for fabric.
In Silhouette Studio, select Fabric - Thin Like Cotton as your material type from the Cut Settings window and adjust the blade depth if necessary. Send to cut.
Once the pieces of your pattern have cut weed away the excess material.
Now it's time to sew them together. Let's just be clear: I am not a sewer. I have a sewing machine....the same one I got for high school graduation in 1999. But I can sew a few straight lines...and you can too.
Refer back to the cut file if you need to see exactly where to cut.
Repeat on all sides. Fold the bottom edge up and press it. You can sew across the bottom to hem it if you'd like. Now sew the edges of the sides together - again making sure to sew the right sides together.
Flip your Silhouette Mint Dust Cover right side out and place it over your Mint stamping machine when you're not using it!
Is that not the cutest thing ever!!! It's all in the fabric...and the designing.
And if you're looking for dust covers for your other Silhouette Cutting machines...you can grab them here.
Note: This post may contain affiliate links. By clicking on them and purchasing products through my links, I receive a small commission. That's what helps fund Silhouette School so I can keep buying new Silhouette-related products to show you how to get the most out of your machine!
Get Silhouette School lessons delivered to your email inbox! Select Once Daily or Weekly.


.png)


I should of thought to make a pattern when I created my own cover for my Silhouette back in 2007, then I revamped it to make one for the Cameo. Great job Melissa!
ReplyDeleteI love it.
ReplyDeleteI can't sew, but I was thinking I would make mine out of paper.
Any tips on modifying the template?
Thank you.
-dondi
Is it regular cotton fabric? Do you know about how much you used? I'm looking forward to making my cover!
ReplyDeleteJust a great big thank you for all your work, help, and projects. Greatly appreciated
ReplyDelete