Hello, I'm Kati! I love to DIY all things in our home and share them at Houseful of Handmade. I love decorating our home, but I am on a budget so I have to get creative to do it. Luckily, I have my Silhouette and use it all the time to create beautiful decor for our home.
My son wants me to add some color to his walls, I really don't want to repaint his entire room since we just did it before he moved in 1 year ago, so instead we decided to stencil one wall. Did you know you can make a DIY wall stencil, with any design you can dream up, with your Silhouette CAMEO or Portrait?
Let's first talk about how to design a repeating pattern stencil in Silhouette Studio.
First you want to set up your work space in Silhouette Studio. I like to use ruler guides to do this. These are a Designer Edition feature... and just one of the many features that make the one time Silhouette Studio Designer Edition worth it.
To put a ruler guide in your work area, you will click on the ruler on the side or top of your work space and drag it into place. Let go of your mouse and the guide will stay where you let go. You can move them if you need to by clicking on the guide and dragging again.
You will want at least a 1/2" border all around the design (to allow for room to paint). On the right side and the bottom you will need a larger space for your registration shapes. These will be the parts of the design that you will use to line up the stencil as you paint. For the side and bottom I put my ruler guide at 1 1/2".
Now it's time to create your design. Make your design fits inside the box created by your ruler guides. Once you are happy with your wall stencil design, use the Draw a Rectangle tool to draw a box behind it that is the size of your design space (from guide to guide). Group the whole thing together by selecting all the shapes > right click > group.
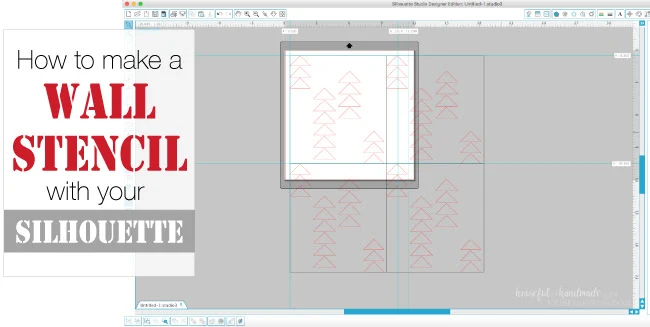
Copy and paste the design so you have 4 identical boxes in the work area. Arrange them so they meet at the corners. This will give you an idea of how your design will look when repeated on the wall. If there is anything you don't like, now is the time to fix it. Fix it in the original design.
Delete the extras and repeat the copy and paste to see how the new design looks. It usually takes me 2-5 tries until I love my repeat.
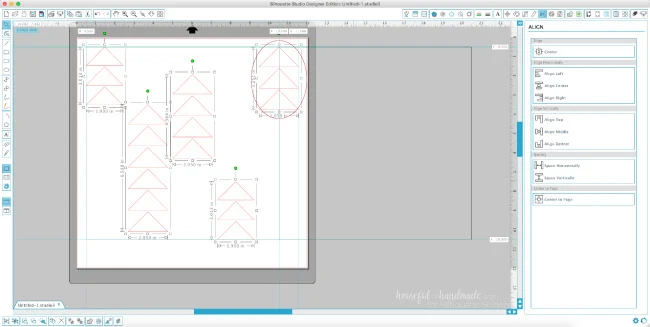
Once you are happy with your design, it is time to create your registration shapes. You will want to create a point on the top and bottom of the design that will help you line up the stencil as you paint. I chose the top triangle on the far left of the design.
However, I noticed that the registration shape was too big for the space I had allowed for registration. To fix this, I moved my registration shape to the edge of the 1/2" guide that I want to keep the entire stencil within (to allow for room to paint) and then readjusted my design so it worked within the space left on the side of the registration shape.

Then I regrouped the original design and smaller box together. I copied and pasted again to check the repeat and was happy with the final design.
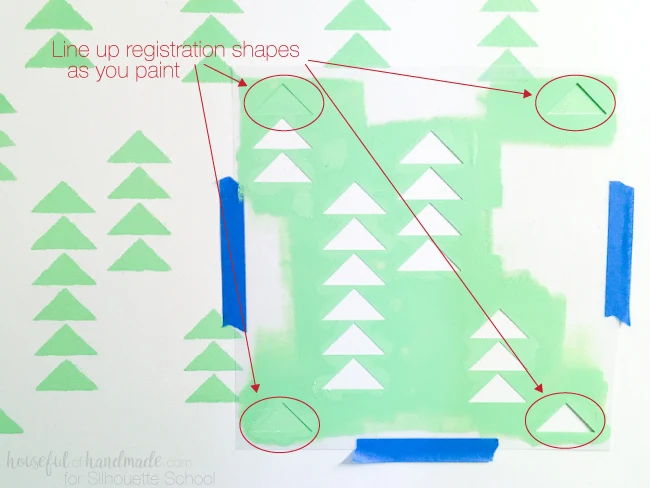
Now ungroup the extra designs that you added to check the repeat. Delete all the extra pieces except for the registration shapes. You should have 3 registration points: one top right, one bottom right, and one bottom left. This will allow you to quickly and easily line everything up as you paint.
Ungroup your original design and delete the box you added behind it. Now your stencil is all done and you are ready to cut.
Cut your re-usable wall stencil out of a thin plastic sheet like this with your Silhouette machine. I used the .007 mil thickness plastic sheet. To cut the plastic sheets with Silhouette CAMEO, I used a blade depth of 9, speed of 3, and thickness of 33, and make sure to check Double Cut.
After you cut your stencil, there is one more step before you want to start painting. Spray the back of your stencil with a repositionable adhesive spray like this. Let it dry a few minutes. Now when you press the stencil to your wall, it will be less likely to move and gap so you will get clean stencil lines.
Hang it on the wall with blue painters tape and get to painting! Just think of all the amazing designs you can create on your walls. For my son's room, we did a plaid pattern and I love how it looks!
Make sure to check out all my tips & tricks for stenciling a focus wall here and see how our plaid wall turned out.

Note: This post may contain affiliate links. By clicking on them and purchasing products through my links, I receive a small commission. That's what helps fund Silhouette School so I can keep buying new Silhouette-related products to show you how to get the most out of your machine!
Get Silhouette School lessons delivered to your email inbox! Select Once Daily or Weekly.


.png)


Hi! My Cameo (3) is not cutting through the material. I ordered exactly what you recommended plus a Deep Cut blade and the settings you suggested. Nope. It will not cut through. Brand new blade. Suggestions?
ReplyDelete