Silhouette School weekly contributor, Becky Dykes, is here this week to give us a beginner lesson on how to use the Tiling Tool in Silhouette Studio Business Edition.
I must admit that we just recently upgraded to Silhouette Studio's Business Edition software. Why? I don't know, I guess I didn't think I needed the extra functions it provided... and of course I was wrong.
So in exploring the extra features, I found one that I knew you guys would like: the Tiling function! So let's take a look at what it does, what you could use it for, and how do you cut with it on your machine.
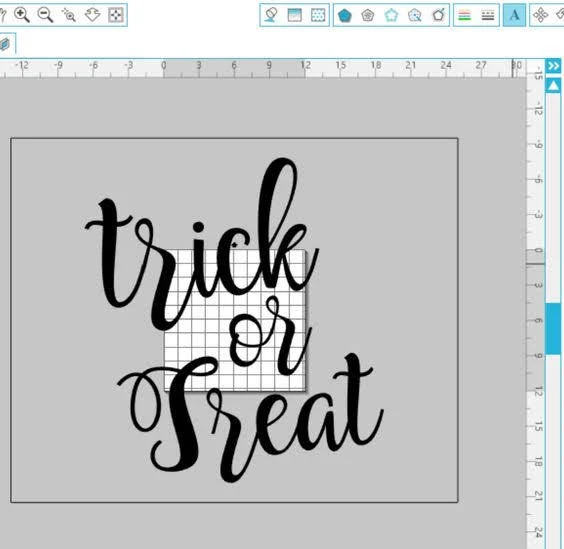
The Tiling function is a way to segment larger cut files into tiles that can be cut by your 12" Cameo. In my test run, I created my design in Silhouette Studio. I was creating a stencil for an oversized sign that was 38" wide by 31" tall.
I created a box around my design to help with sizing, but you can see that my page settings stayed at 12" x 12". This will make more sense when you get further into the process, but you want to make sure to set your page size to match the size of the material you are cutting. In my example, I'm cutting 12" x 12" sheets of vinyl, so my page settings will remain 12" x 12". I also prefer to cut without a mat, so you'll see that reflected on here as well.
In Business Edition, you do have a few extra icons, one of which is Media Layout. When you click the Media Layout icon, your screen automatically expands into two separate views. Don't worry, you'll get a closer look at each one.
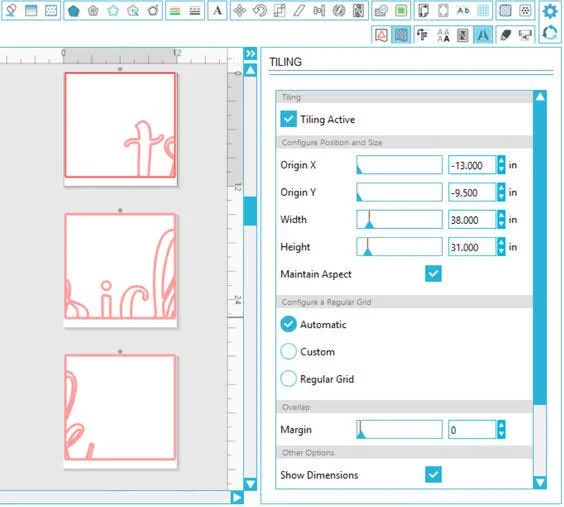
To access the tiling features, click on the Tiling Window. This is one of the icons that expanded in your toolbar after you clicked on Media Layout. To get the full effect of what Tiling is, be sure to check the box for Tiling Active.
So let's look at the windows you have. The first window on the left is your normal design page layout. What you will see has been added is a grid that shows how your design will be cut into tiles. They are even numbered to help you to know what order the tiles will be cut in. In my project, if I keep them in order, it will help me to line them up when I get ready to paint my sign. This grid is also adjustable to reduce unnecessary cutting.
The new window (in the middle) is your Media Layout window. This is where your design will appear as it is going to cut out. Think of it as a print preview for your oversized design in this case. Don't forget that you need to have Tiling Active marked in your Tiling menu. You can then zoom out and see each tile and what is going to cut.
And of course, your Tiling menu options. This is where you can configure the settings for:
- the size of your total project (configure position and size)
- the size of your tiles (configure a regular grid or custom)
- and even create an overlap, which is definitely recommended for a stencil (margins)
- if you want to cut all or just some of the tiles (tiling - all or selected)
Make sure to keep an eye on your "print preview" to see exactly how your changes are impacting your tiles.
When your tiles are just the way you want time, go ahead and jump over to your Cut Settings window and proceed like normal. You will still select the material and cut settings you normally would. You will load your media into your Cameo normally, as well. IMPORTANT NOTE: your media MUST be the same size as the tiles you have selected. Make sure you have your cut page settings set up correctly.
When you are ready, click Send to Silhouette. This will start the process of cutting the first tile. You'll see that the details show Tile #1 (1 of 12).
You Cameo will proceed to cut the entire design for Tile #1, then it will stop and say Job Complete. At this point, you will UNLOAD the first sheet of vinyl (or other material) and reload the next sheet. Below is what you will see in Silhouette Studio. After you load the second sheet of vinyl, you will click Resume Cutting.
Proceed with this process for each tile you have in your design. Try to keep them in order in case you need to look at the design to line them up. Depending on the project you are working on, you can now proceed to line them up!
Get Silhouette School lessons delivered to your email inbox! Select Once Daily or Weekly.


.png)


ow very cool!
ReplyDeleteThis is amazing, I never knew it was possible. Is this only something you can do on a Cameo or would it be possible on the Portrait too?
ReplyDeleteI need to check to see if this is possible with Portrait. :) I will give it a try and report back
DeleteI have the desinger edition but my options do not look like yours. Is this only available on the new cameo? I have the original cameo. Thanks!
ReplyDeleteThis option is available when you upgrade to the Business Edition of the software, it can be cut with any of Cameo machines.
DeleteThanks so much for the tutorial Becky & Silhouette School!!!
ReplyDeleteCan you do a print and then cut with the tiling feature?
ReplyDeleteI think DE does not have any additional design resources. Rhinestones, extra sketch and knife functionality, nesting and shear tools, rulers, and the ability to use svg files are all included. If you update to v4.1, it adds color tracing and a few new features. You can design just like you would in any other program, including adding artwork and text and experimenting with them.
ReplyDelete