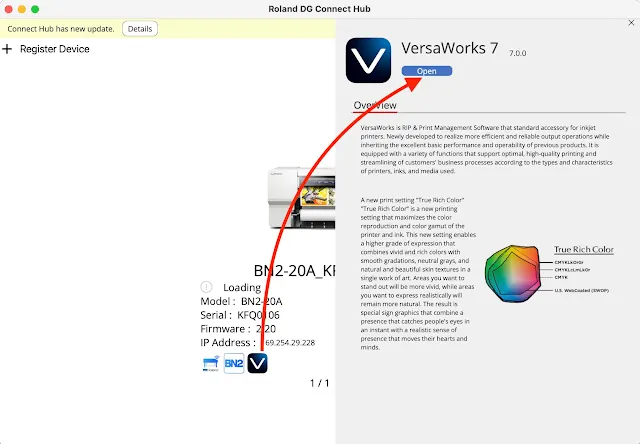
If you're running your Roland BN2 from a MAC thanks to Versaworks 7, the DG Connect Hub looks different than you may be used to.
In this tutorial we'll go over where to find different settings and functions in the new DG Connect Hub and what those buttons mean.
Before we begin it's important to understand that running your Roland BN2 on either a MAC or PC requires a few different pieces of software and utilities.
You need the Roland DG Connect Hub, DG Connect (website), Roland Utility, and Versaworks.
Unfortunately, Flexi Designer, the free design and cut line software that is included with the Roland BN2 does not have a license that works on a MAC...so it's a bit of two steps forward one step back here.
For that reason you'll still need some kind of cut line creation software. I would recommend Affinity Designer since it's pretty affordable and a one time fee. I have Affinity Designer tutorials here as well.
If you haven't already installed Veraworks 7 on your MAC, do that before you continue.
Once you have installed Versaworks 7 on your MAC you'll meed to launch the full package. Start by using your finder to find the "Roland DG Connect Hub". This is the application NOT the website.
When the DG Connect Hub launches, from there you'll have access to everything else. This is basically your desktop portal for all things Roland.
Start by clicking the small Roland icon. If the DG Connect website doesn't open in a browser window click the Open button. You'll be prompted to sign in if you're not already.
To launch Veraworks click the Versaworks icon on the Hub.
Versaworks is the Roland RIP software and print manager. All jobs sent to Roland machines run through Versaworks even if it's just running in the background - like is the case when using FlexiDesigner Versaworks Edition (again not available on MAC)
To open the Utility to set up any new job, material or maintenance click the BN2 icon. Keep in mind if the "open" button is not clickable, connect the BN2 to your computer.
You can also find Firmware Updates in the DG Connect Hub along with your machine's serial number and your IP address.
Keep the Hub open while you're working in any of these programs.
Note: This post may contain affiliate links. By clicking on them and purchasing products through my links, I receive a small commission. That's what helps fund Silhouette School so I can keep buying new Silhouette-related products to show you how to get the most out of your machine!


.png)


No comments
Thanks for leaving a comment! We get several hundred comments a day. While we appreciate every single one of them it's nearly impossible to respond back to all of them, all the time. So... if you could help me by treating these comments like a forum where readers help readers.
In addition, don't forget to look for specific answers by using the Search Box on the blog. If you're still not having any luck, feel free to email me with your question.