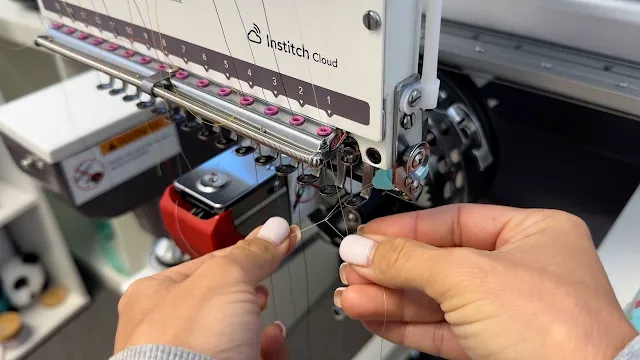
With that said - while this was my first time threading something this complex, Bai makes it surprisingly easy with their pre-threading system.
Do not pull these threads out - however, you do need to gently pull out the knot that's holding the pre-threads together.
These correlate to the needle number on the front of the machine. So spool spot 1 is the thread path that will lead to needle 1 and so on.
Now you're going to take the end of one spool of thread and tie a small knot between it and one of the guide threads. Take note of the thread position you're working with.
Take your time and don't get frustrated. Even experienced embroiderers find multi-needle threading challenging at first.
Understanding Bai's Pre-Threaded System
The Bai Mirror and Bai Vision embroidery machines come with short pieces of thread already threaded through most of the threading path. These act as guide threads to help you pull your actual embroidery thread through all the right places.What Is the Thread Path?
Since there are 15 needles, there are 15 thread paths. Each thread path uses its own spool of thread.
Looking at the area where the spools sit, you'll notice each position is numbered 1-15.
You'll also notice there are 3 rows for thread spools along with three bars with holes.
The spools that are seated in the third or back row will go through all three bars. The spools in the second row will go through bars 2 and 1. And the spools in the first row will go through just one row. Each hole in each bar is also labeled with the thread path number.
Step 1: Using the Guide Threads to Thread the Bai Mirror
To begin threading the machine, go to the back of the machine where you'll see the guide threads are tied in loose knots.
Gently pull these knots apart - they're designed to separate easily leaving each thread hanging loosely and freely.
NOTE: If you're not sure give it a gentle pull and look at the front of the embroidery machine to see which thread is moving.
Do this by twisting the two thread ends together several times, then tie a simple knot.
Place the spool on the correctly numbered position. I'm working with #3.
The guide thread can then be used to pull your new thread through the entire threading path!
Step 2: Pull the Thread Through
Go to the front of the Bai Mirror and find the needle position you're working on - again I'm working with #3 right now.Gently start pulling the guide thread. You'll probably need to apply some pressure, but don't force it as it moves through the threading path.
If you feel too much tension, help the thread along by guiding it through any tight spots. You should see your new thread following the guide thread through all the threading points.
Step 3: Threading the Bai Mirror Needle
Once you've pulled the thread all the way through, you'll need to cut above the knot before you try to thread the needle itself. Cutting the thread, will remove the lead thread and just leave the thread that's connected to the spool.Now you need to thread the actual needle. Even with my readers I had a hard time seeing what I was doing.
My best advice is to use a needle threader. I got a whole pack on Amazon for just a few dollars.
Push the threader through the needle eye from the back. Then put the thread through the threader and remove the threader from the needle. The thread will go with it and thread the needle.
Repeat for All 15 Needles
Now you just repeat this same process for all of the 14 remaining needle positions. It goes much faster once you get the hang of it!I also have a video on the full Bai Embroidery Machine threading process that may also help you you!
Note: This post may contain affiliate links. By clicking on them and purchasing products through my links, I receive a small commission. That's what helps fund Silhouette School so I can keep buying new Silhouette-related products to show you how to get the most out of your machine!


.png)


No comments
Thanks for leaving a comment! We get several hundred comments a day. While we appreciate every single one of them it's nearly impossible to respond back to all of them, all the time. So... if you could help me by treating these comments like a forum where readers help readers.
In addition, don't forget to look for specific answers by using the Search Box on the blog. If you're still not having any luck, feel free to email me with your question.