


If your kids are anything like mine they "need" a new lunch box and backpack set every year...and they "need" to be labeled with something fancier than a Sharpie. I have no idea where this mindset came from. Bahah who am I kidding?
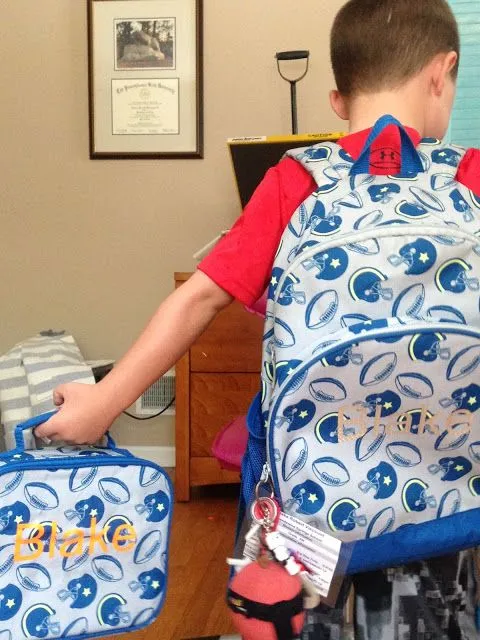
My little guy now wants to vinyl everything from his crayon box to this lunch box. I had to draw the line but I did agree to putting some HTV on his lunch box and book bag, along with vinyl on his pencil box and water bottle.

Tips for Putting Heat Transfer Vinyl on a Lunch Box
Lunch boxes and soft coolers present a challenge because of the thermal material on the inside. It's easy to melt them with heat, but since we need heat to apply HTV it can be tricky. So what's the trick?!The key is lower than normal time, temperature, and pressure.
Start by cutting the heat transfer vinyl like you normally would in reverse.

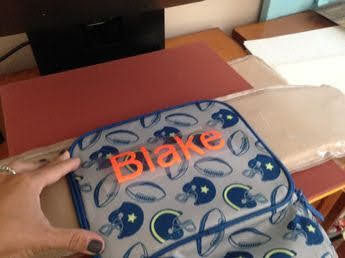
I let Blake pick out the exact colors and fonts he wanted. He also likes to help me load the cutting mat and weed the HTV. He's a pretty good helper, don't you think?!
Place the HTV onto the lunch box and unzip it so you have a pretty flat surface.

Place a pressing pillow on the bottom plate of the heat press first or on the surface where you'll be pressing with an iron. This will help absorb some of the heat.
Finally, place a teflon sheet - folded over double - on top of the lunch box.

Then apply heat for 10 seconds at medium pressure. After 10 seconds check to see if the carrier sheet can be removed without pulling up the HTV. If so, pull the entire carrier sheet off and you should be good to go.
If you need to apply more heat do so in 5-7 second rounds checking if you can cleanly remove the carrier sheet in between each.

Applying heat transfer vinyl to backpacks works the same way - you want about 10 seconds of low heat and medium pressure. The least amount of heat, pressure and time is what you're going for when it comes to putting HTV on thermal lunch boxes and backpacks.
By the way, if you want to get really fancy you can even use you child's own handwriting to label their items! Check out this Silhouette tutorial on how to trace and cut handwriting with Silhouette!
Note: This post may contain affiliate links. By clicking on them and purchasing products through my links, I receive a small commission. That's what helps fund Silhouette School so I can keep buying new Silhouette-related products to show you how to get the most out of your machine!

Drop the Heat Press Temperature for Insulated Lunch Boxes
When it comes time to apply the HTV to the lunch box you want to warm up your heat press or iron to about 270 degrees.Place the HTV onto the lunch box and unzip it so you have a pretty flat surface.
Finally, place a teflon sheet - folded over double - on top of the lunch box.

Then apply heat for 10 seconds at medium pressure. After 10 seconds check to see if the carrier sheet can be removed without pulling up the HTV. If so, pull the entire carrier sheet off and you should be good to go.
If you need to apply more heat do so in 5-7 second rounds checking if you can cleanly remove the carrier sheet in between each.

Applying heat transfer vinyl to backpacks works the same way - you want about 10 seconds of low heat and medium pressure. The least amount of heat, pressure and time is what you're going for when it comes to putting HTV on thermal lunch boxes and backpacks.

Note: This post may contain affiliate links. By clicking on them and purchasing products through my links, I receive a small commission. That's what helps fund Silhouette School so I can keep buying new Silhouette-related products to show you how to get the most out of your machine!
Get Silhouette School lessons delivered to your email inbox! Select Once Daily or Weekly.


.png)


Cute boy and great tutorial! Perfect for back to school season.
ReplyDeleteThe Name looks good on his things, and what a great name It is, my grandson is Blake, Cheers Anna.
ReplyDeleteI had the most difficult time getting vinyl to stick to a plastic pencil box. It kept pulling up. Any trick to preparing the surface? I was using outdoor vinyl.
ReplyDeleteWas the plastic smooth? It should definitely not be an issue on plastic especially if you use 651/permanent vinyl. A scraper to burnish is helpful and so is removing some of the tack from the transfer tape.
DeleteNot a comment on the method, but on the actually putting kids names on things such as backpacks and suitcases. It is very easy for a 'stranger' to approach your child and call them by name. "Hello, Blake". The child is distracted because the person is someone who seems to know him/her. There is the possibility the child would be willing to go with the 'stranger'. Names on books, pencil cases, etc - no big deal. Just saying - a cancerned grandma
ReplyDeleteSadly, I agree with Ann. I do backpacks, but the names are on the underneath side for this reason.
DeleteWish you would talk about using an iron not everyone has a heat press. But good info and will help me apply info to using an iron.
ReplyDeletePretty much all the same rules apply for using a heat press or an iron :) You just need to make sure you are applying a lot of pressure when you are using an iron.
DeleteMonogram, ok. Full name on the outside, a bad idea. https://www.ncjrs.gov/html/ojjdp/psc_english_02/page3.html
ReplyDeleteOh....if I would have had this two weeks ago! We've got several years of school left so I'm so glad to know how to correctly do this. By the way, I understand the safety concerns, however, my daughter is a car rider so her being seen in her personalized backpack and lunchbox is only in school and the short walk from the building to my truck accompanied by a teacher. Thanks again for the tutorial!
ReplyDeleteSigned, melted thermal :)
Oh....if I would have had this two weeks ago! We've got several years of school left so I'm so glad to know how to correctly do this. By the way, I understand the safety concerns, however, my daughter is a car rider so her being seen in her personalized backpack and lunchbox is only in school and the short walk from the building to my truck accompanied by a teacher. Thanks again for the tutorial!
ReplyDeleteSigned, melted thermal :)
I did a lunch box the other day. I had a silicone oven mitt that I such on the inside of the lunch bag to prevent it for sticking and melting. Worked great!
ReplyDeleteHey Melissa! This is great info! I can't wait to try it out on some things I've been hesitant to in the past. Thanks so much!
ReplyDeleteWhat is the neat organizer that you have to the right of your cameo? Whatever it is, I think I need it!
Tammy
Hi Tammy - it is an upcycled spice rack.
DeleteWhen posting the temp. It would be nice to say Farenheight or Celcius. When I bought my second press I didn't realize there was a difference. Nice tutorial.
ReplyDeleteSo in the USA it's Fahrenheit?
DeleteBecause I already found it strange that the t° for this lunch packs would be higher than for a T-shirt! Here (in Belgium) it's Degrees...
Thanks!
I use a Janome presser. This has the same heat designations as a household iron. i.e...cotton, linen,silk,etc. It would be so helpful to know how these relate to actual temperatures.
ReplyDeleteI wish I had seen this BEFORE I melted the plastic lining of a small bag I got at HL that I carry all the stuff I use with my colored pencils like paper stumps, a sharpener etc. (Ever the frugal crafter, I cut the melted lining out and lined the inside with patterned duct tape so as not to waste the fabulous glitter HTV I put on the outside.) Although I have a small heat press, I don't have a pressing pillow but after reading your post, I think I'll check into getting one. TFS!
ReplyDeleteThanks
ReplyDeleteThis is amazing! I just got my heat press and was wondering how to do this safely for the pile of lunch bags I picked up as gifts for the family!
ReplyDelete